PicsArt photo studio has some excellent photo editing tricks and is the world’s leading picture editing app that mainly focuses on providing its services to Android users. With this image editor, you find that many tools let you bring a spark to your images by showing off your creative side. You can use filters, make a collage, click photos from the PicsArt app itself and do so much more when you know all the photo editing tricks in PicsArt.
Here are the 10 of the most useful tips and tricks for you to help become a professional-level editor in PicsArt.
Also Read: 9 Best Smartwatch For Men In India 2022
1. Adding Quotes/Text to your pictures
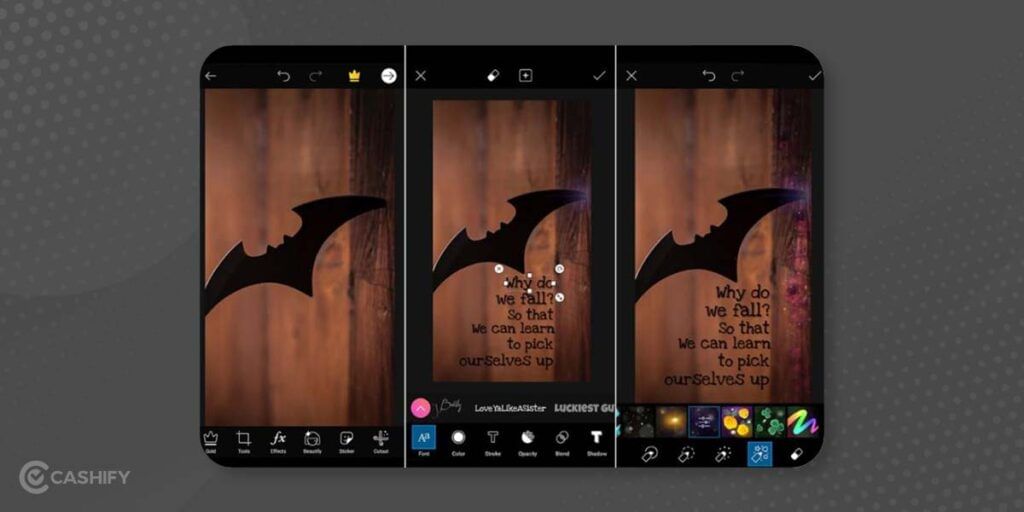
Putting Quotes/Text on an image can make it look presentable and give a subtle feel to the picture. You can choose from various fonts for your pictures to have the suitable Quotes/Text.
With diverse fonts, countless colours are provided, and you can select any colour for your Quotes/Text as it fits the image you are reworking.
Below are the steps on how to add text to a picture:
- On the bottom bar, there are icons; find the Text option.
- Clicking on the Text opens up an empty page.
- Add the needed text and click the Tick logo on the top right of the screen.
- Now, you can pick from various Fonts, Colours, Mixes, and Shades of your volition.
2. Do a diffusion of the images
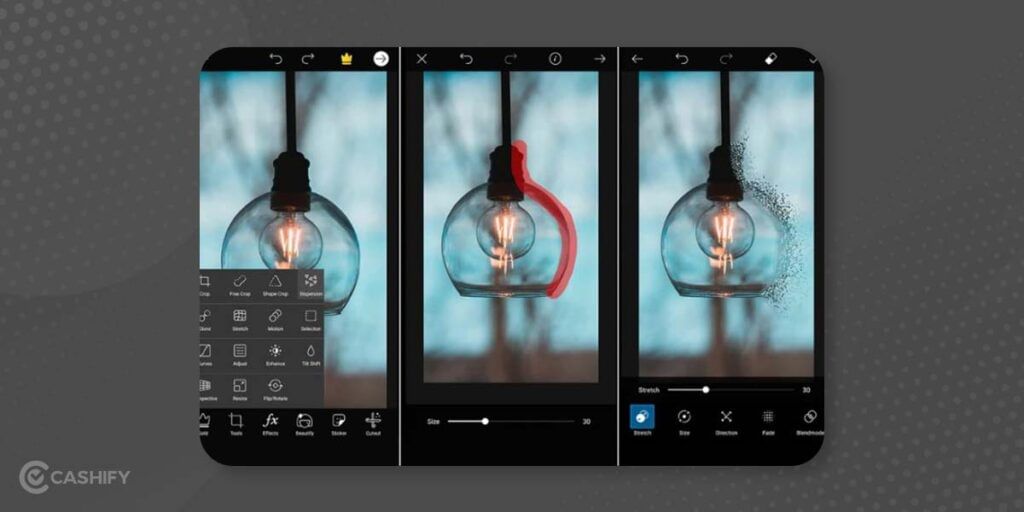
Inside the Tools menu, you will find an option named Dispersion, which you can be put to use to give a diffusion effect to a certain portion of the picture. If used ideally, this effect can genuinely enrich your picture’s ingenuity.
Below are the steps on how to use the Dispersion tool:
- On the bottom bar, there are icons; navigate to the Tools menu.
- Clicking on Tools will show you several choices.
- Choose the option named Dispersion.
- Now you will have to mark the specific part of the image you desire to be shown with a diffused effect.
- You can alter the brush scope from beneath and click the Tick logo on the top right of the screen after you are done editing.
- Now you will find the marked part as diffused, and also, there are multiple choices beneath to revise that part in which you placed the diffusion effect.
3. Recreate with practical image outcomes
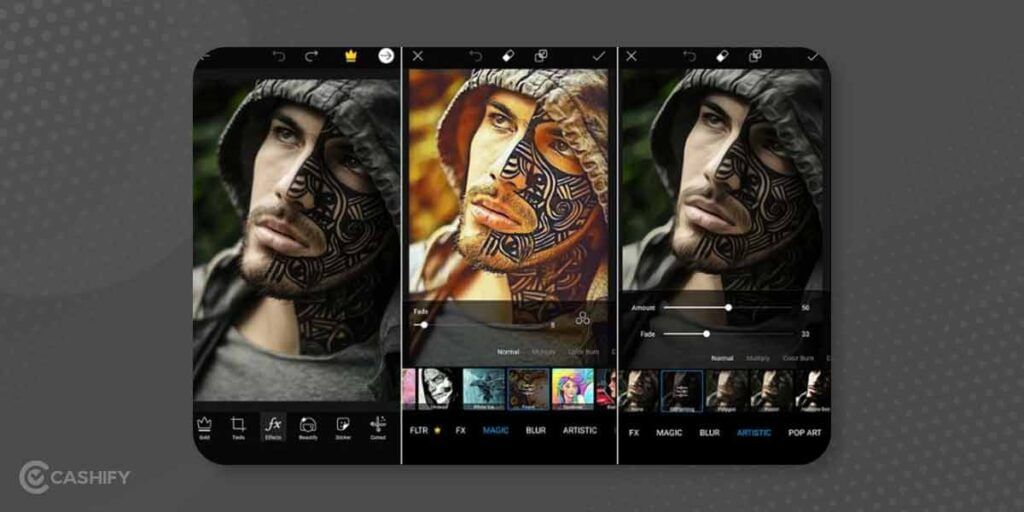
The Effects bar shows up multiple kinds of filters, some truly remarkable. You will find prospects like F.X, ARTISTIC, POP-ART, and much more for you to play around with.
Utilising these effects can create contrast as they deliver an innovative sense to the picture. These options can show up multiple filters inside as well for you to select from for your image enhancement.
Below are the steps on how to add an effect to an image:
- On the bottom bar, there are icons; navigate to the Effects option.
- Choosing the Effects option will show you several choices.
- Pick from a mixture of effects to revise your picture.
- After applying the effect, click on the Tick logo on the top right of the screen after you are done editing.
4. Use stickers
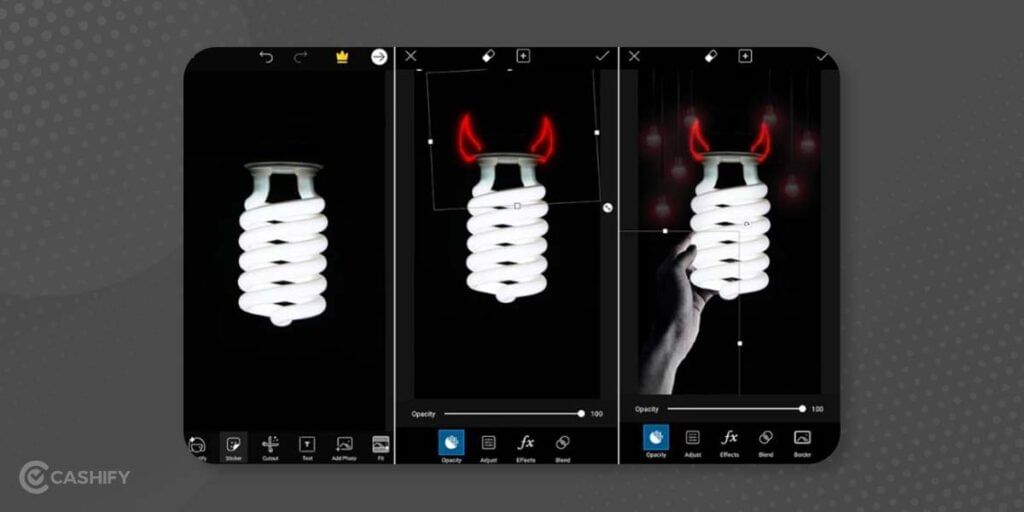
You can add Stickers effects in the picture for more appeal. PicsArt delivers lots of stickers to pick from and lets you make your stickers.
Below are the steps on how to add Stickers to a picture:
- On the bottom bar, there are icons; navigate to the Sticker option.
- Select the Sticker option, and it will show you numerous stickers.
- You can select any stickers you like to insert into the picture.
- Once you are done inserting the sticker, you see a lot of choices like Opacity, Adjust and Effects that you can use for further modification of the image.
- After the final editing with the stickers, click n the Tick logo on the top right of the screen.
5. Modify backdrop
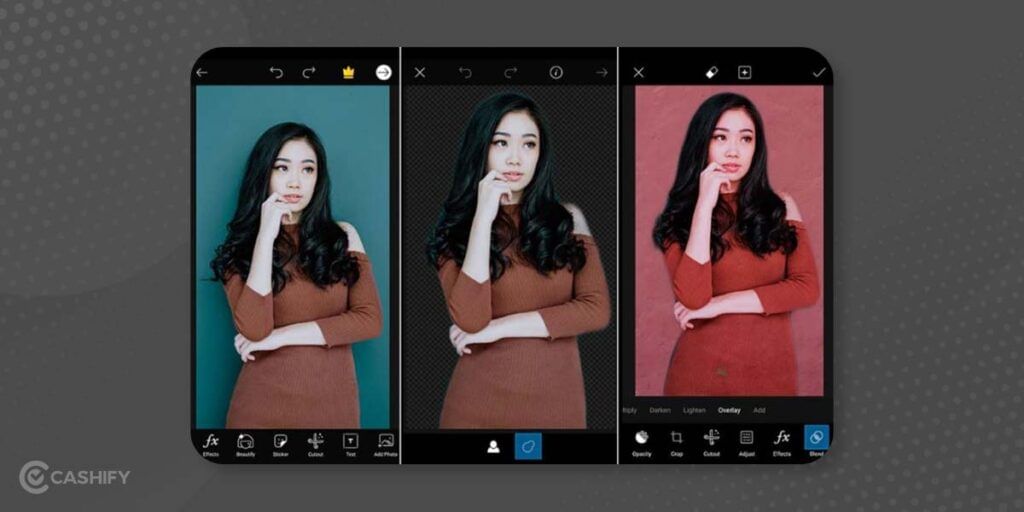
You must have clicked a great picture, but it gets poorer due to a flawed background. But now, you have the option to change the background with the support of the Cutout tool that is in the PicsArt.
The Cutout tool enables you to carve out only your photo from an image and leave the background so that you can use the photo to be placed on a fresh background.
Below are the steps on how to change the Background of an image:
- On the bottom bar, there are icons; navigate to the Cutout option.
- Selecting the Cutout option will show up in 2 choices.
- Select the User-like logo on the left side of the screen so you can carve out the photo.
- You also have the option to rework the cutting with tools like Eraser or Brush.
- After you are done, click on the Tick logo at the top right of the screen.
- Now you need to navigate to the Add Photo option and select the background image you like to use.
- Stretch the photo you inserted from the Add Photo option and test various blending methods as per your need.
Also Read: 6 Best Instant Grocery Delivery Apps In India 2022
6. Alleviate your originality with the help of the Shape Masks
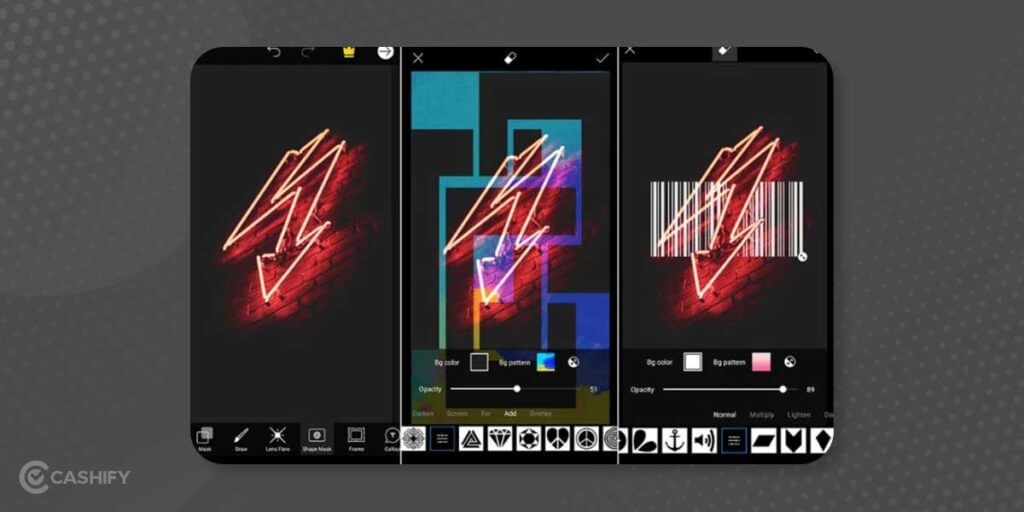
You will find that there are various kinds of forms and figures delivered to choose from to make your images stand out. By choosing the shape that fits your taste, you can alter it as per your image’s proportions.
Below are the steps on how to play around with the Shape masking:
- On the bottom bar, there are icons; navigate to the Shape Mask option.
- Selecting the Shape Mask option will show you various shapes.
- Please choose the preferred shape and resize it consequently.
- You will also find Blend modes you can select like Multiply, Lighten, Dark, and many more to modify your images.
- You will also find the Background Colour and Background Pattern choices.
- With the Eraser tool, you can obliterate any portion of the shape to offer it an innovative sense.
7. Utilise the Blur Effect for the image’s background
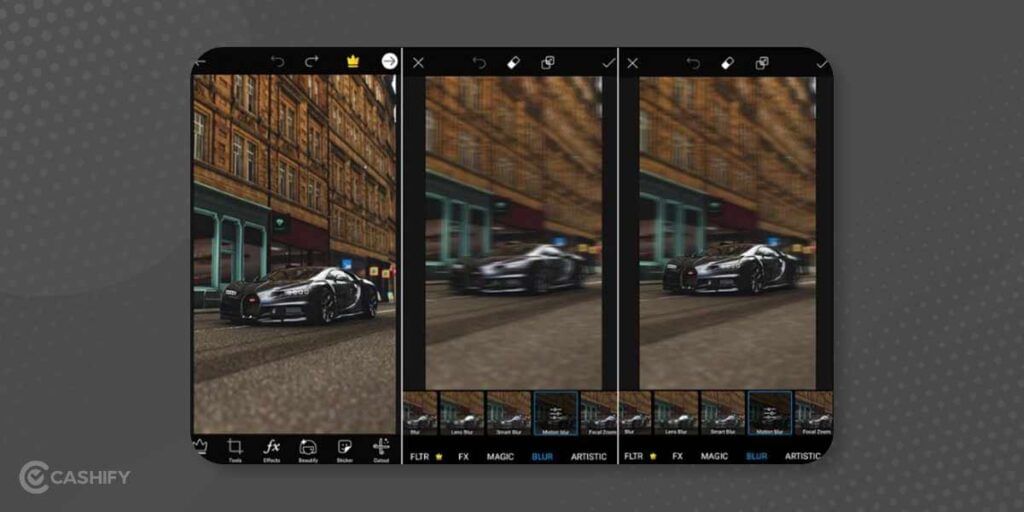
Blur Effect lets you blur out your image’s background to focus on the leading part in the photo and help circumvent the undesirable background.
Below are the steps on how to apply the Blur Effect to your image:
- On the bottom bar, there are icons; navigate to the Effects option.
- In the Effects option, select the Blur option.
- Choose from various Blur choices like Lens Blur, Motion Blur and many more.
- Now you use the blur choice you wish to put into the image, and it will spread the blur effect to the image’s marked area or the whole image if that’s what you chose.
- The Eraser tool can help you erase the effect from the part you want the focus on.
8. Use the Double Exposure
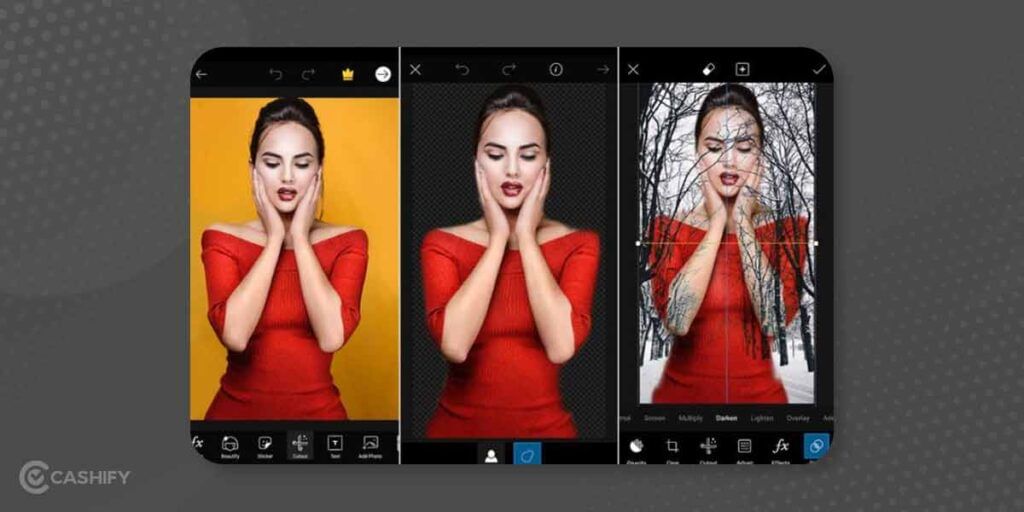
The Double Exposure effect can be fantastic if utilised perfectly and can be one the most useful photo editing tricks in PicsArt. With this effect, you can effortlessly combine two or more additional photos and create an attractive by-product.
To achieve the most satisfactory Double Exposure effect, you should experiment with other blend modes supplied in PicsArt.
Below are the steps on how you can get an excellent Double Exposure impact:
- On the bottom bar, there are icons; navigate to the Cutout option.
- Select the User-like logo on the left side of the screen in order to carve out the image.
- Now navigate to the Add image choice and pick an appropriate photo to combine with the carved-out image.
- Once you add the image, test various blending modes such as Screen, Multiply, Darken, Overlay, etc.
9. Insert White Border to pictures
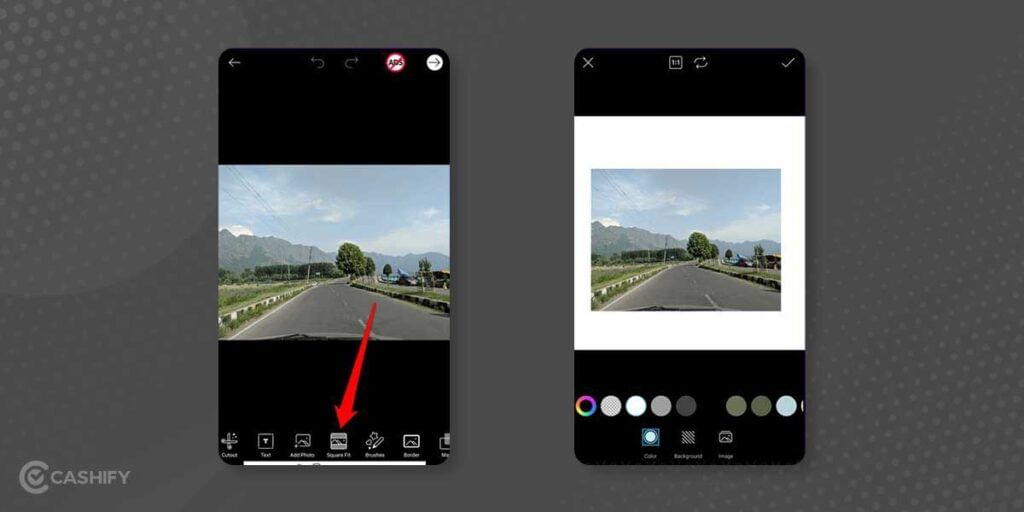
You must have witnessed Instagram profiles that look distinct from the other profiles. Such profiles frankly add a white border to the photos presenting their profile with an uncluttered perspective and this is one of the simplest Photo Editing Tricks in PicsArt.
Below are the steps on how to add White Border to your image:
- On the bottom bar, there are icons; navigate to the Square Fit option.
- After you open the Square Fit option, you can zoom in and zoom out the image to expand or reduce the border.
- After editing, click on the Tick logo on the top right side of the screen and save the image.
10. Add Colourful Borders to the image
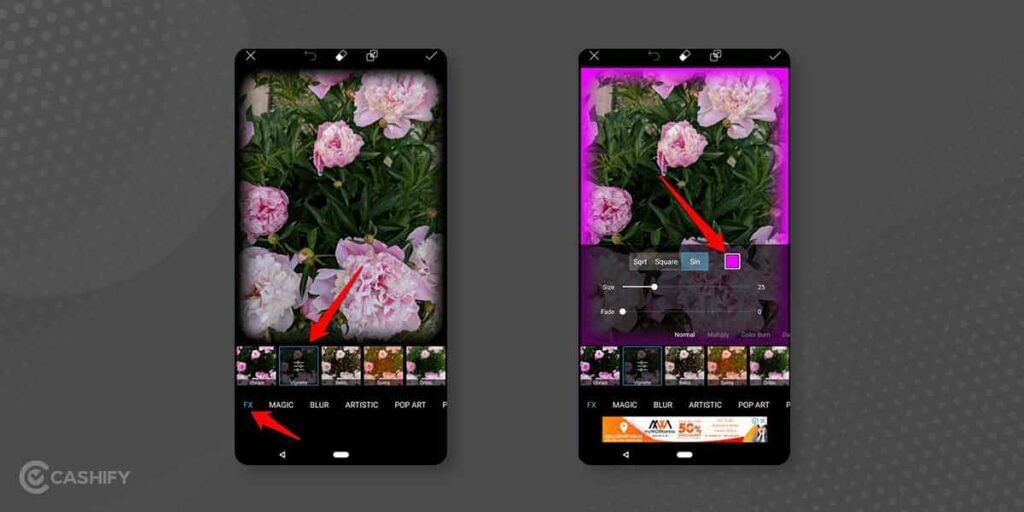
With a bit of experimentation, you can put a pleasant colourful mark on the edge of a picture making one of the easiest Photo Editing Tricks in PicsArt.
- On the bottom bar, there are icons; navigate to the Effects option.
- After you open the Effects option, you will see another option named FX; click on Vignette under FX, then choose the colour from the colour box to colour the image’s border. You can expand or reduce the border size as well.
- After editing, click on the Tick logo on the top right side of the screen and save the image.
Conclusion
PicsArt is a remarkable tool that anyone from amateur level to experienced level can use to rework their shots as this tool does bring dynamism to the images. The best thing about this tool is that anyone can effortlessly handle it, and the tips and tricks that we have expressed are easy to use, but they are some proficient recommendations to assist you in making an instantaneous mark on your ideas and exhibit the zeal of your work via the photos.
Also Read: How Can You Edit TextEdit Files On iPad?
Thinking about wanting a new mobile? Cashify offers the service at your doorstep. Thus, sell your phone online or recycle your phone in Cashify.