Knowing how to screen record on an iPhone allows you to do a lot of stuff with it. For example, you can record your favourite gaming moves and show them to others, upload tutorials of your favourite apps to help a friend, and more!
You can record videos for your YouTube channels with the help of the screen recording feature on your iPhone.
While you are already here, I would assume you are unaware of this feature, and therefore we will walk through two ways to help you make the most out of screen recording. Here’s how!
Also Read: Can You Take Scrolling Screenshot on iPhone? A Complete Guide
Three Ways To Screen Record On iPhone
Screen recording on an iPhone is no rocket science. You just need to get the basics right. Knowing about your iPhone’s default Screen recording feature will make screen recording easy.
1. Enable iPhone’s Screen Recording Feature
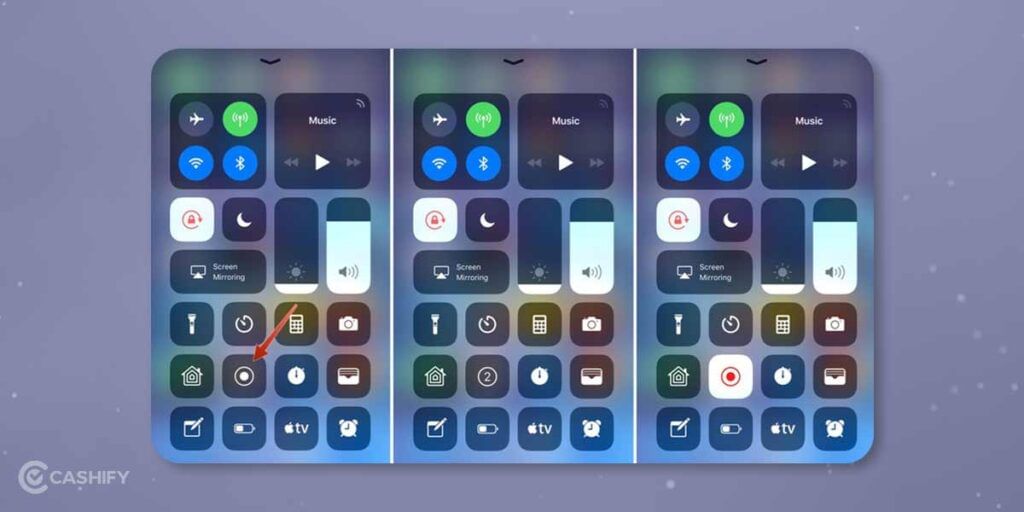
Before you begin recording the screen, you should know how to enable this feature on your iPhone. To do so, you need to check if the screen record button is in the Control Center; if not, you must add it first.
- On the home screen, Open the Control Center.
- Now, find the screen record button in the control centre. It will look like a dot with a circle around it.
- Go to Settings>Control Center>Customize Controls if you can’t find it.
- Scroll down a bit and find the Screen recording option.
- Tap on the “+” symbol that is next to the Screen recording text.
Note that you can remove screen recordings at any time by tapping on the “-” button that appears next to the Screen recording option in the Control centre.
How To Do Screen Recording On An iPhone?
Now that you have added the screen recording option to the Control centre, it’s time to start using it. Here’s how to screen record on iPhone:
- Swipe down or up to open the Control Centre.
- Next, tap the Record button.
- A three-second countdown will start, and the clock in the upper-left corner will appear red.
- Tap on the screen to close the control centre and begin recording both the video and audio.
- If you wish to end the recording, just tap on the red clock and tap on Stop.
Also Read: How To Take A Screenshot On Macbook?
How To Do Screen Recording On iPhone With Audio?
Your iPhone gives you the feature to record yourself too while recording the screen; here’s how to do it:
- Tap and hold the Record button.
- A pop-up screen will appear, there, tap on the microphone icon at the bottom and then tap on Screen recording. You will again see the countdown has begun.
- Now, tap twice on the screen to exit the Control centre.
- So, now the microphone is enabled. It will turn on every time you begin screen recording, but you can turn this feature off anytime you want.
2. How to screen record on iPhone using Mac?
If you have a Mac, here’s some good news: You can screen record on your iPhone with your Mac, too. QuickTime Player for macOS has been a proficient tool for recording screens on iPhones for a long time now.
Also, the recording is done in high quality, which can be useful when creating presentations or guides.
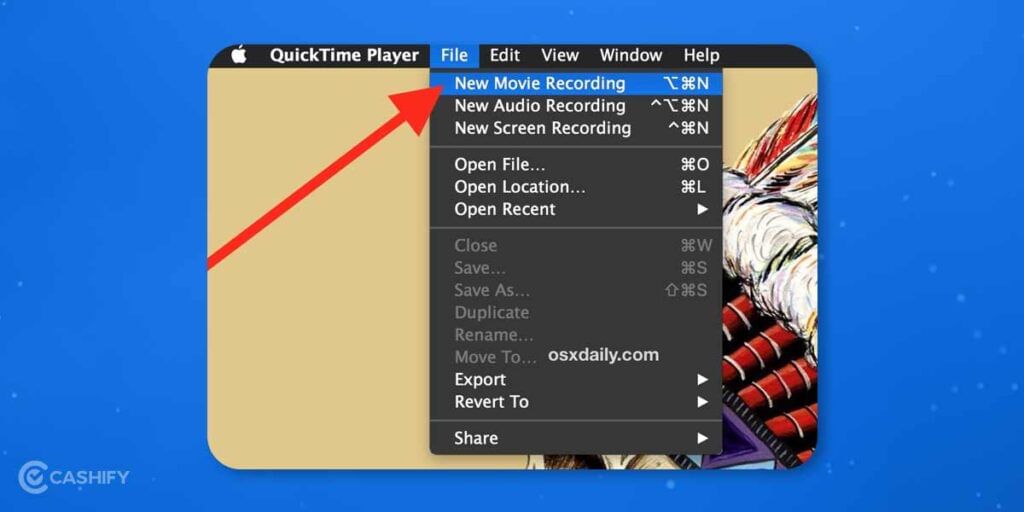
- First of all, connect your iPhone to the Mac and launch QuickTime Player.
- Now, at the top-left corner of the screen, find the File menu and choose New Movie Recording under it.
- A bar with the record button will appear. Click on the downward arrow next to the record button and then choose your iPhone in the Camera menu that appears. You can also enable the built-in microphone and choose the video quality under the same section.
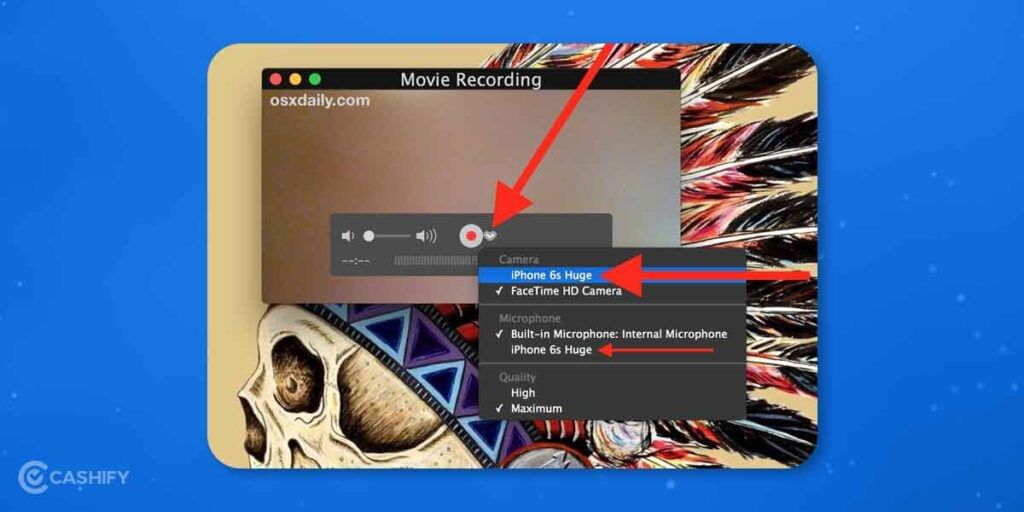
- Your iPhone is now mirrored to the Mac. Tap the record button to start recording the screen. If you want to stop recording, just hit the record button again and save the file in your desired location.
What after recording the screen?
Now that you know how to screen record on an iPhone, you might wonder what’s next. Well, you can edit and share those files easily. iPhone has a lot of editing tools and filter options by default. Make the most out of the screen recording using these tools.
- Open the Photos app and head to the Camera Roll. Select the recorded video.
- Tap on Edit in the top-right corner.
- You will find a visual timeline of the video at the bottom of the screen.
- Adjust the arrow till the time you are satisfied with the length of the video.
- You can also add filters to the video.
- Once done, save the edited video. Tap Done>Save as New Clip.
And that, my friend, is how to do screen recording on an iPhone in the simplest ways. So, go ahead and make the most out of this feature.
3. Using Third-Party Apps
You can record video with audio from the iPhone screen using additional third-party apps for more customisations, which can be downloaded from the App Store. For example, you can use dedicated third-party software, such as Record it!, which makes this process quicker and easier. I’m also using this third-party app.
Additional third-party mobile apps allow you to adjust the quality of iPhone screen recording, select the appropriate format, and upload the footage to Internet resources (YouTube, Instagram, Facebook, among others) at the end of the broadcast.
The screen recording process is common and identical for all iPhone models. On Apple smartphones of up to iPhone 6 models, the “Screen Recording” with the control tool is located at the bottom of the display; newer models are located at the top.
Record it!
Screen Recorder allows you to record tutorials, game guides, video demos and training videos for your favourite games and apps on your iPhone. After recording your screen, you can add video reactions with audio narration to make your recording even better.
Wrapping Up
In the end, I can say that knowing how to screen record on an iPhone is a wonderful feature for showcasing things on your phone. By following these simple steps, you can easily record your screen and use it later. Let me know if you are having trouble with these steps in the comment section below. I would love to hear from you.
Remember to share this article with people who are having trouble doing this and help them.
Also Read: Explained: Why Apple Pay Is Not Available In India?
Looking to upgrade to a better phone? We have a smart solution for you. Buy refurbished mobile phones at almost half price from Cashify. They come backed with a six-month warranty and 15-day replacement policy. Check out refurbished mobile phone sale now!