

Select City
d2c
bb

How To Transfer Files From Mac To PC?

You have decided to make the jump from Mac to PC, and the very first question will pop into your mind – how to transfer files from Mac to PC? Right? Well, do not worry. In this in-depth guide, we have included everything you need to know about switching from Mac to Windows PC. In this guide, we have covered detailed guidance on how to transfer files from Mac to PC as well as setting up your brand-new experience. It is pretty simple than you might think.

One of the significant hurdles you might feel is moving your important files, especially when transferring files from Mac to PC. The reason behind it is simple. On both platforms, you have folders to store music, photos, movies, and documents. However, some files are more difficult to find than others.

Also read: When Will Steam Deck Release In India? All You Need To Know

Once you have moved these files over, Microsoft’s Groove Music app will automatically import your songs. The Photos app will identify all images, and all of your other files will sit where they belong.

Before we deep dive into how to transfer files from Mac to PC, you will need an external hard drive that works perfectly with Macs and PCs. If you do not have such a drive, you need to format the drive. So, it will work on both types of computers.

Let’s learn steps to format a hard drive for both Windows and Mac

How to Format a Hard Drive for Both Windows and Mac?

The major issue you will face when planning to use the external hard drive for Windows and Mac is that these platforms use different filesystems by default. Windows uses NTFS while Mac OS uses HFS. Both are incompatible with each other. However, you can format the drive to work with both Windows and Mac with the help of exFAT filesystems.

Also read: This Exclusive Deal on Apple iPhone Is Too Good To Be True!

Here are the steps.

How to Format an External Drive in Mac OS?

Connect the drive to the Mac.

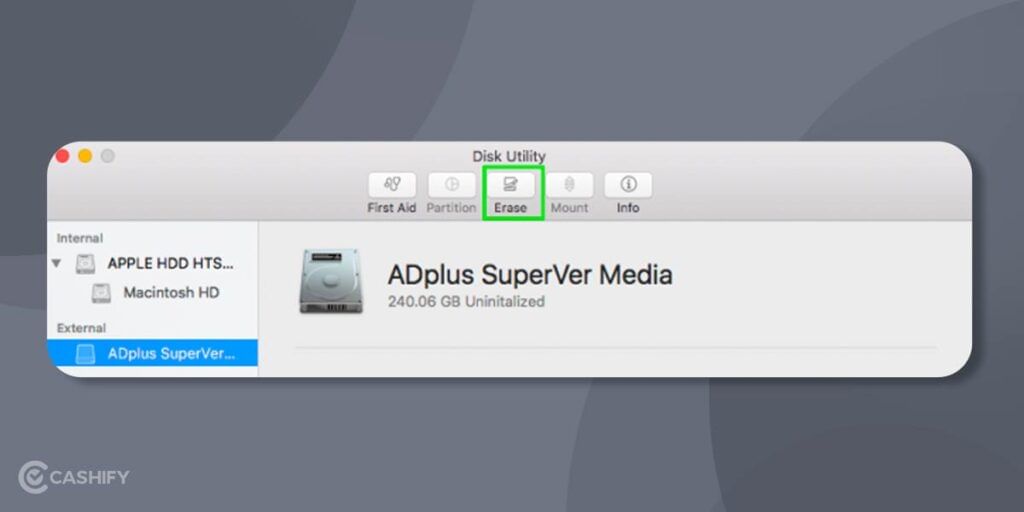
After that, Open the Disk Utility Application.

Select the external drive as the source
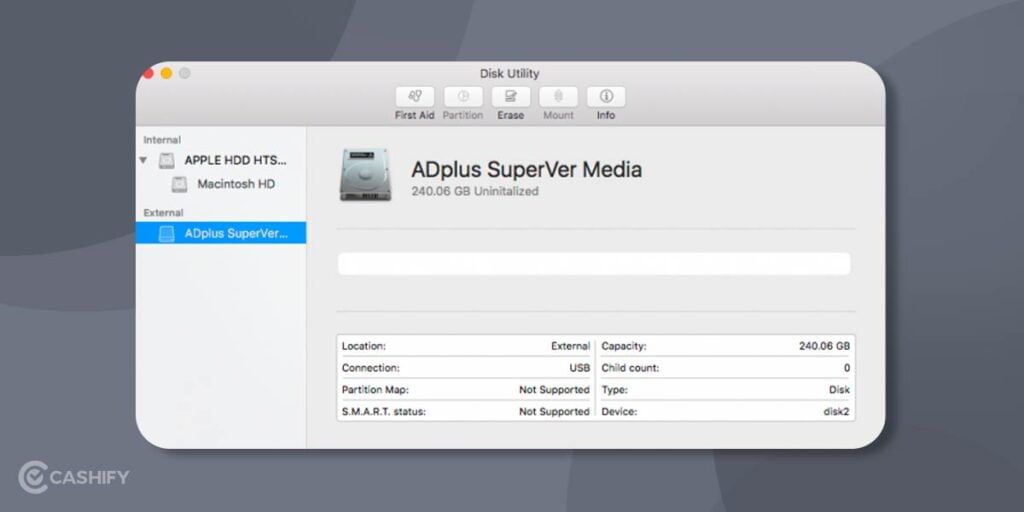
Select the external drive as source

Choose Erase from the icon list near the top of the window. If you are not planning to use the drive for Time Machine, you can skip steps from 5 to 10 and directly go to step 11.

Give the drive a descriptive name, use the Format drop-down menu, and select exFAT. After that, click on Erase.

Click Partition
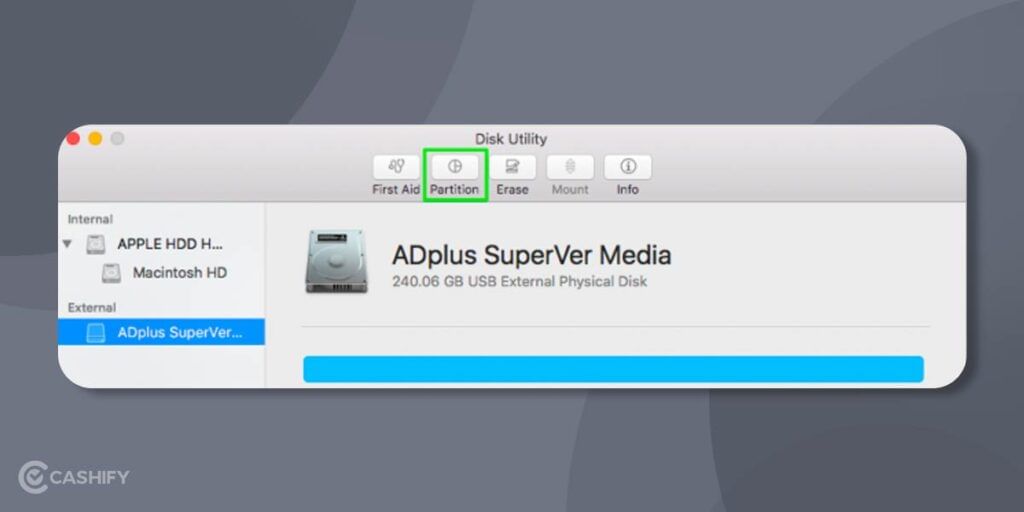
Click partition

Enter the amount of space you want to keep aside for Time Machine.
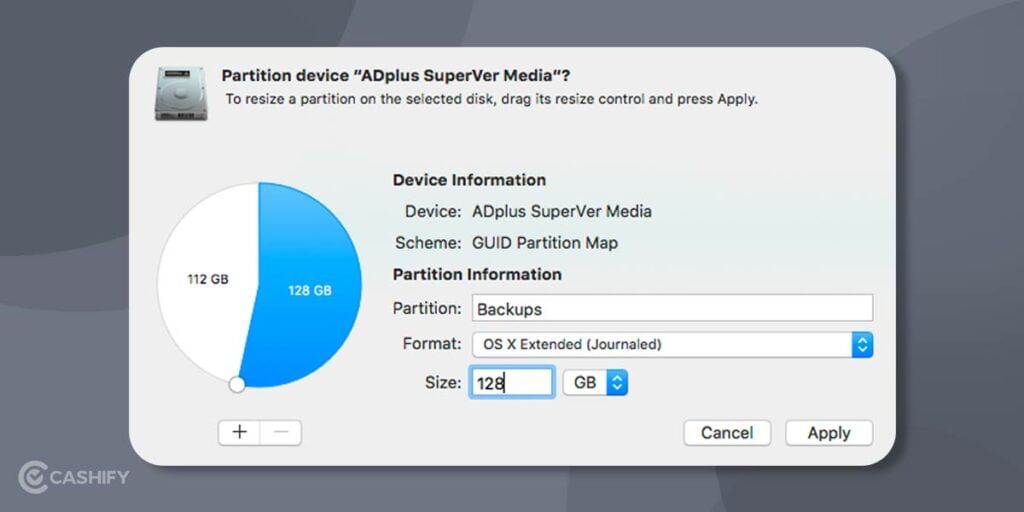
Enter the amount of space you want to keep aside

Click Apply

Choose the new untitled partition to format it with exFAT so we can use it with Mac and Windows.
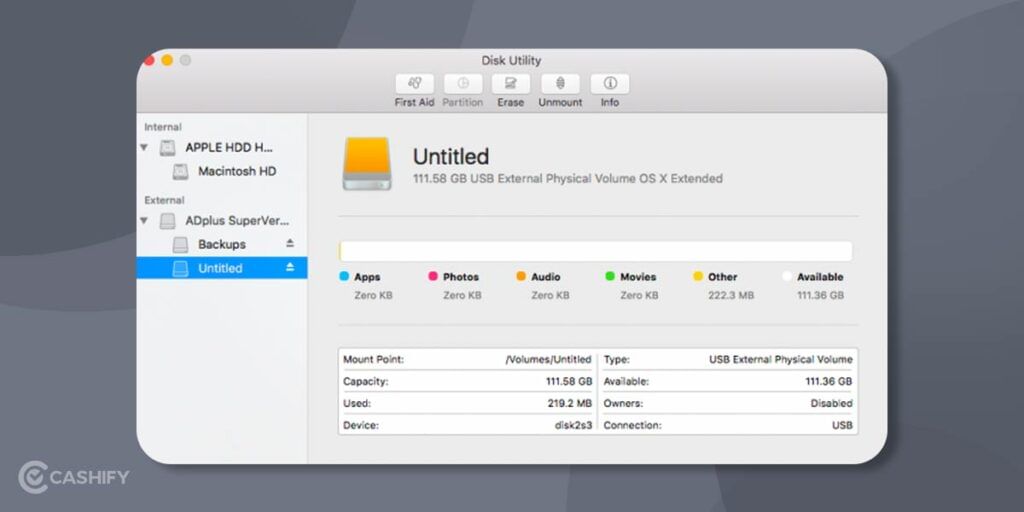
Choose the new untitled partition

Now, click on Erase.

Click on Erase

Give the partition name and select exFAT for the format.
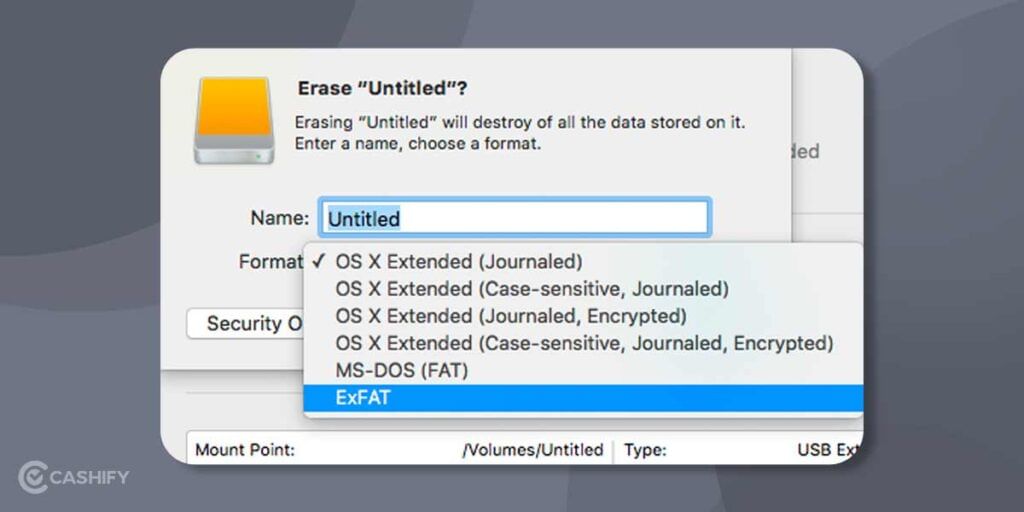
Give the partition name

Click Erase to Finish

Also read: Earphone Buying Guide: Which Features To Consider

How to Format an External Drive in Windows?

Connect the drive to your PC and launch the Start Menu.

Open the Disk Management Tool -> Select Create and format hard disk partitions
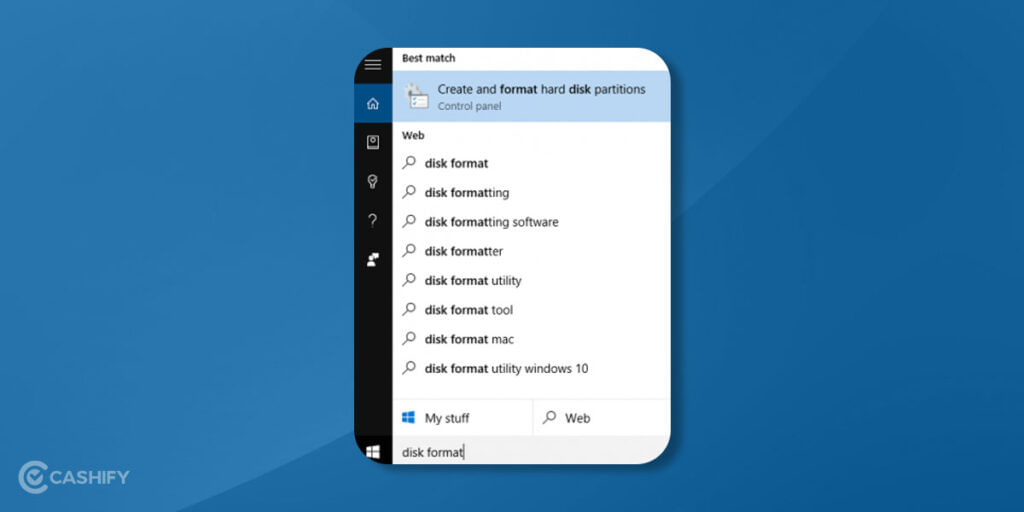
Create & format hard disk partitions

Right-click on the external drive partition -> select New Simple Volume
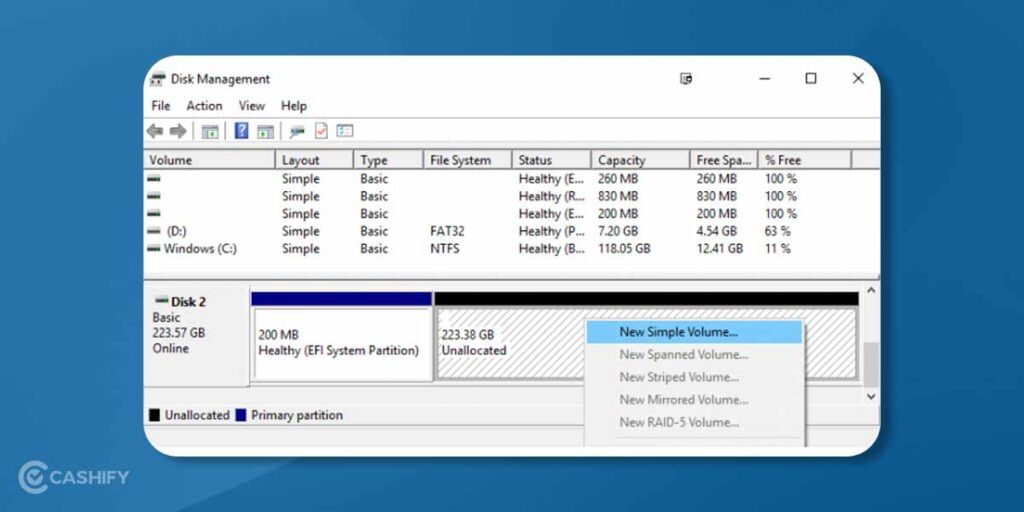
Select new simple volume

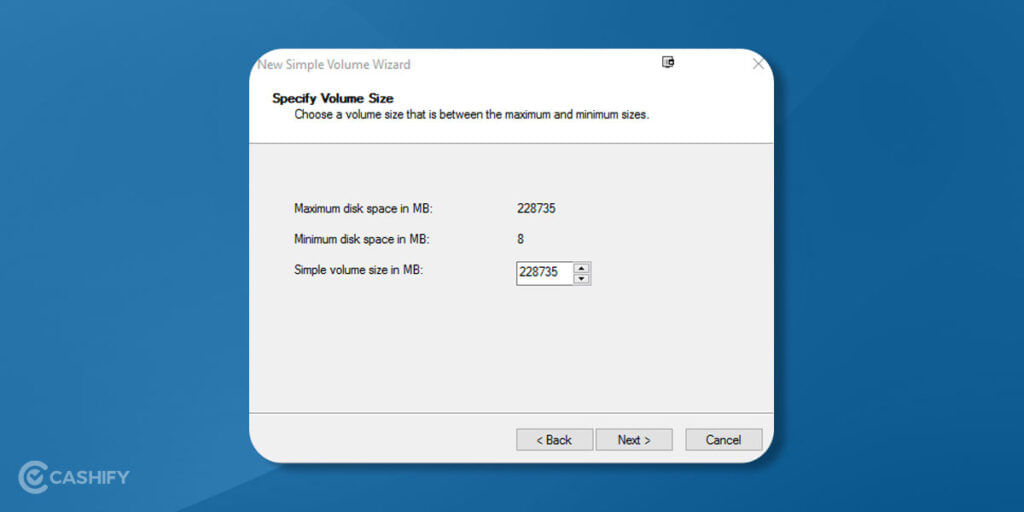
Choose a volume size

Choose a volume size

Assign a drive letter
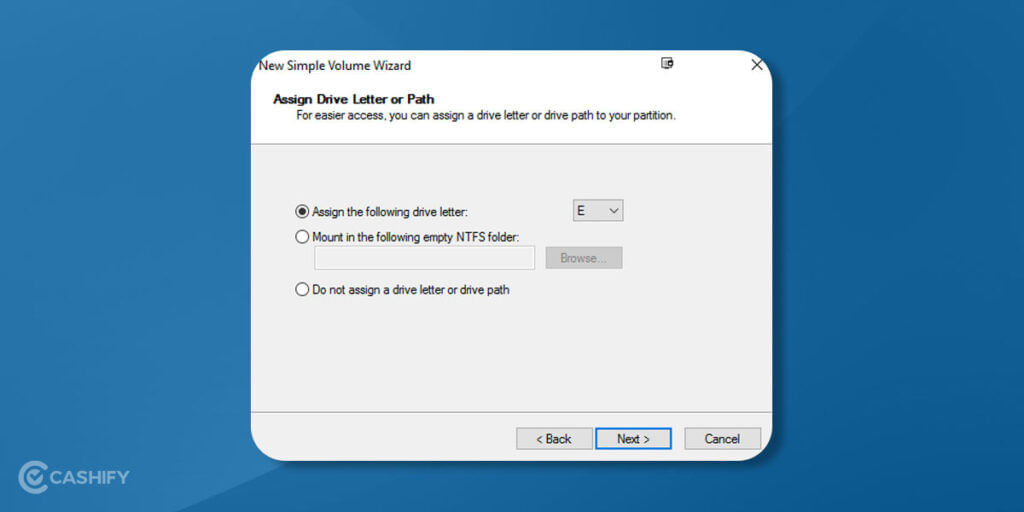
Assign a drive letter

In Format Partition Screen, you need to Choose exFAT as the file system
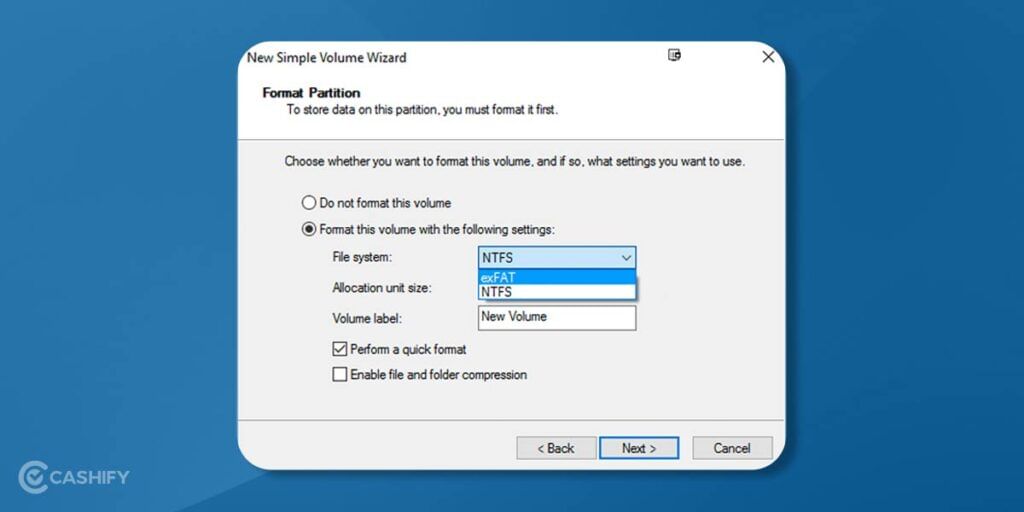
Choose exFAT as the file system

Give a new name to the volume
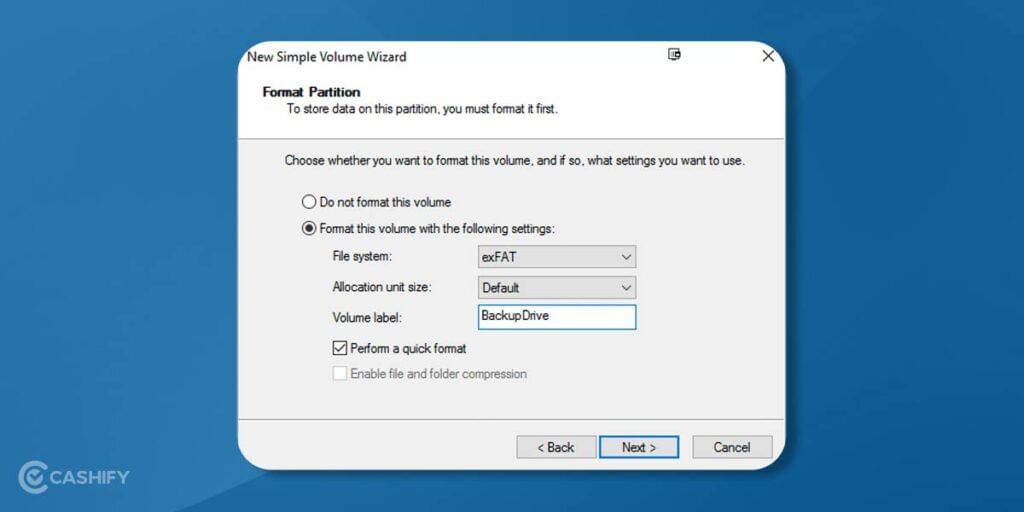
Give new name to the volume

Click Next & then click finish
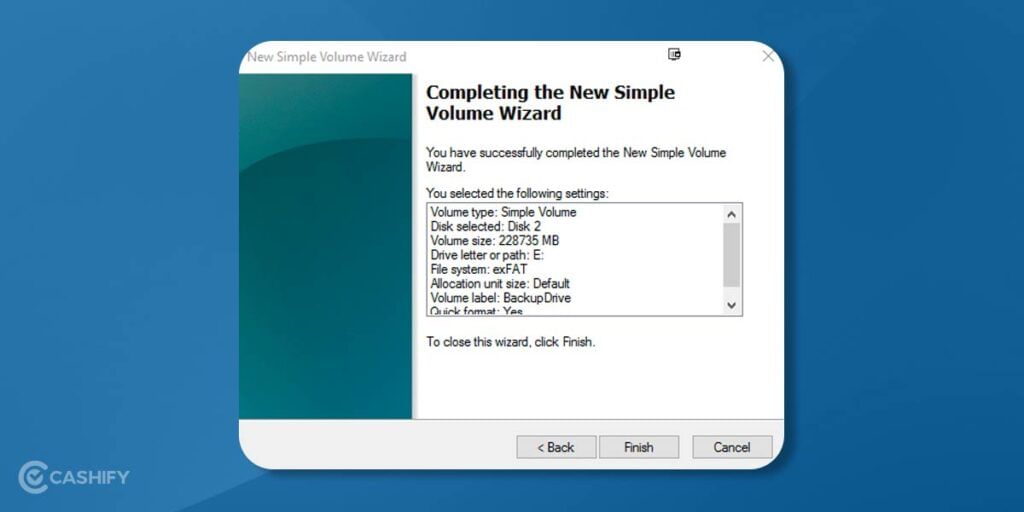
Click on next finish

Now, as you know how to format an external drive in Mac and Windows, let us move to the next section – how to transfer files from Mac to PC.

Also read: Should You Sell OnePlus Nord CE 5G? 3 Upgrade Options

How to Transfer Files from Mac to PC?

You should follow the below steps when you want to transfer files from Mac to PC.

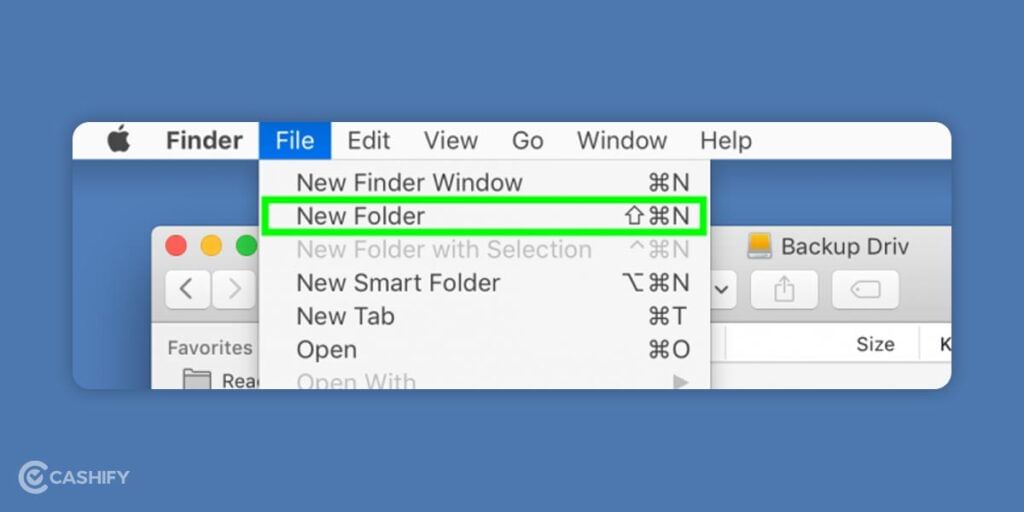
Connect the external drive to your Mac -> open the drive -> select File.
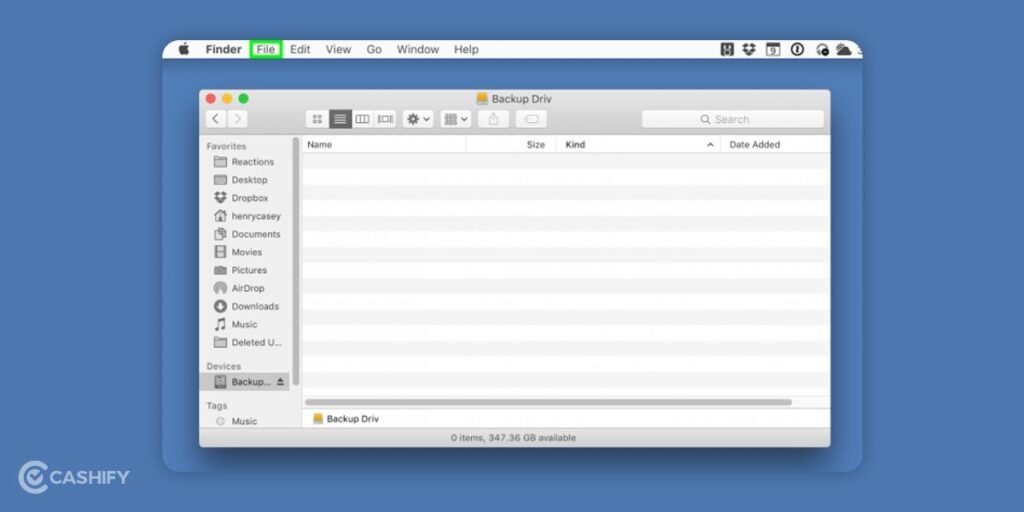
Connect external drive to Mac

Select New Folder

Select New Folder

Now type Exported Files -> hit Return. If you do not use Photos, skip to Step 17.
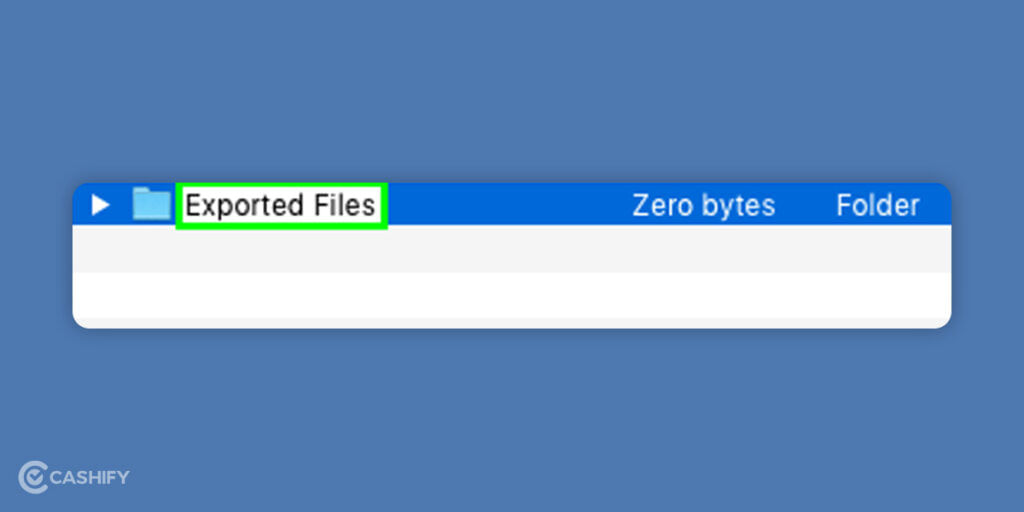
Type exported files

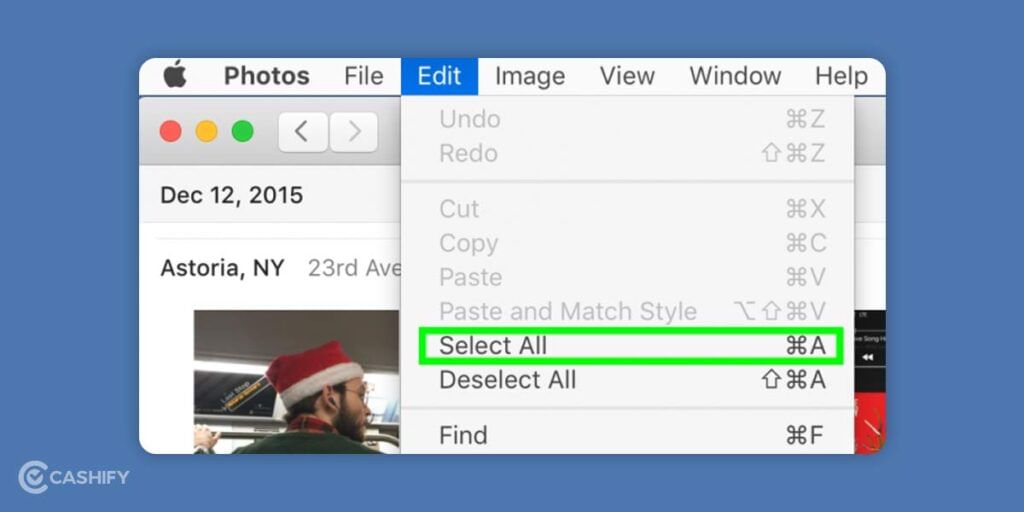
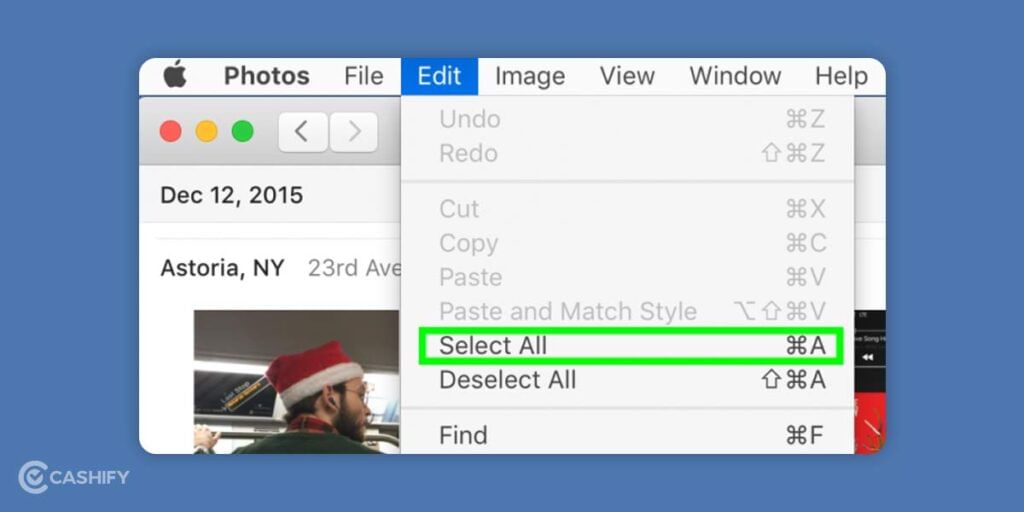
Open the Photos app -> click Edit in the Menu bar.
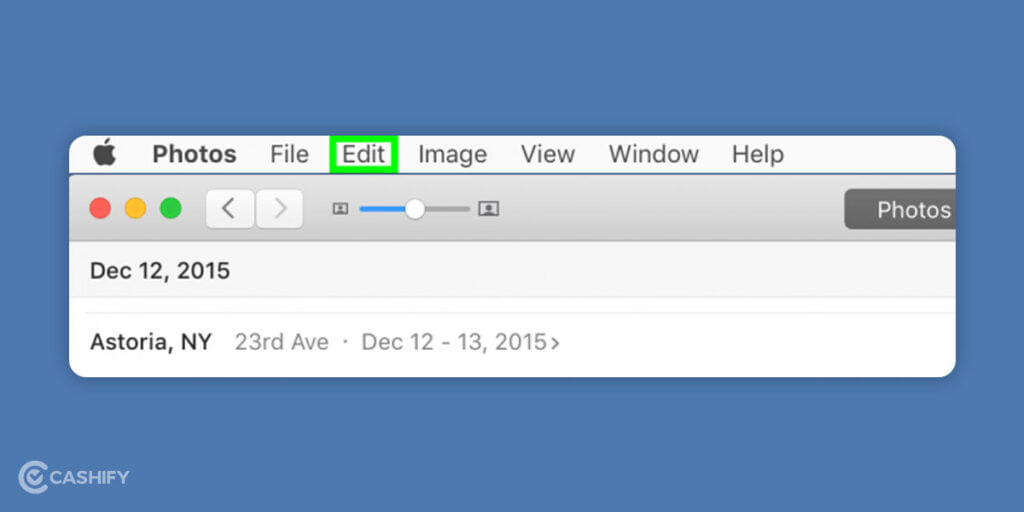
Open the Photos app

Click on Select All

Click Select All

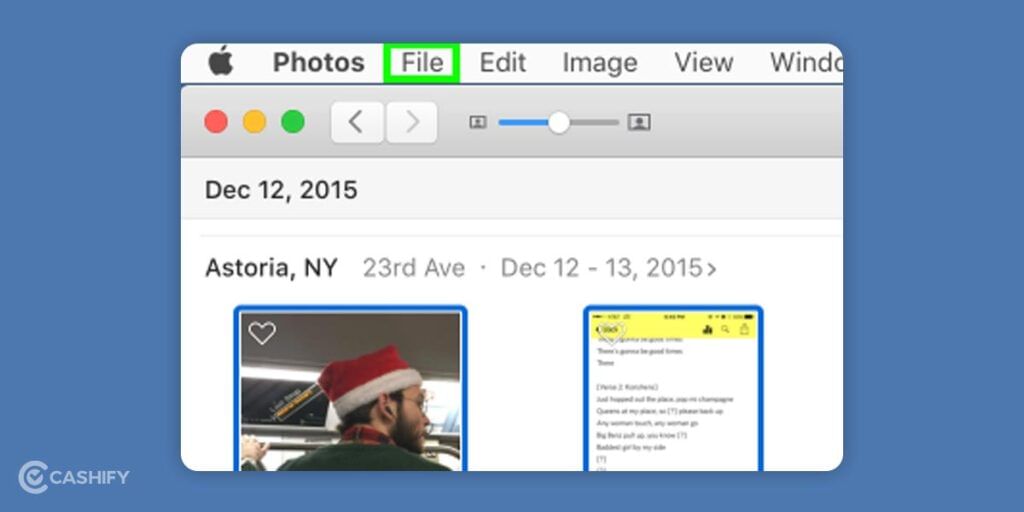
Click File

Click file

Select Export

Select export

After that, select Export Unmodified Original For
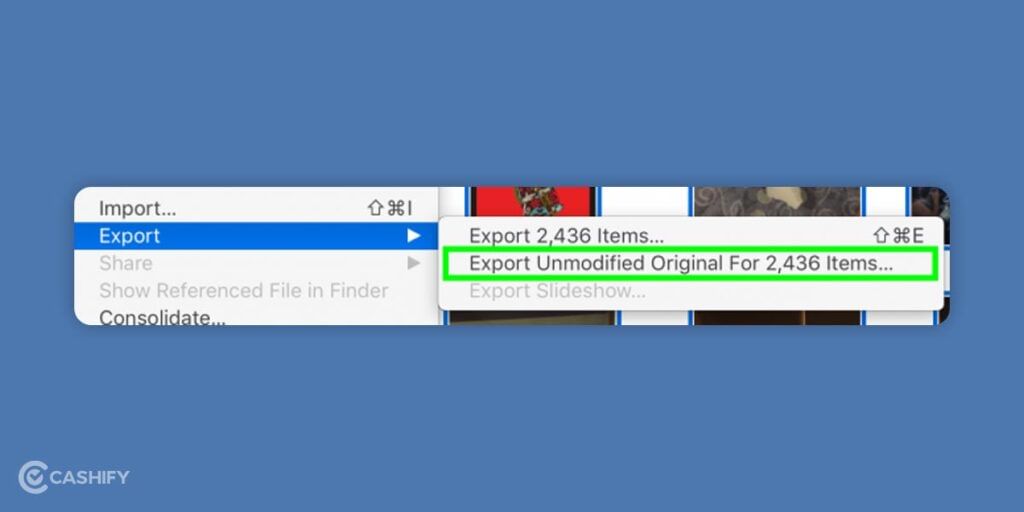
Select Unmodified Original

Then, click on the drop-down menu that is next to Subfolder Format.
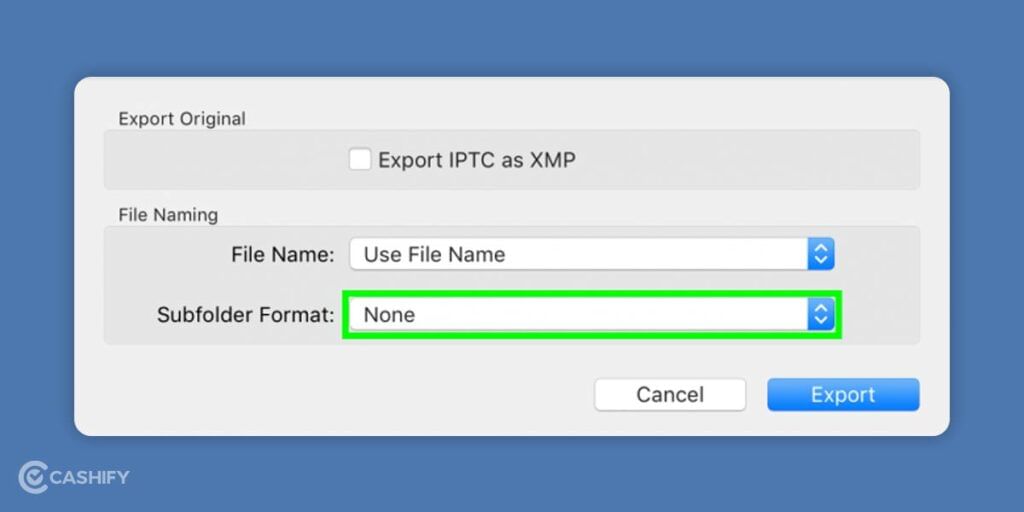
Subfolder format

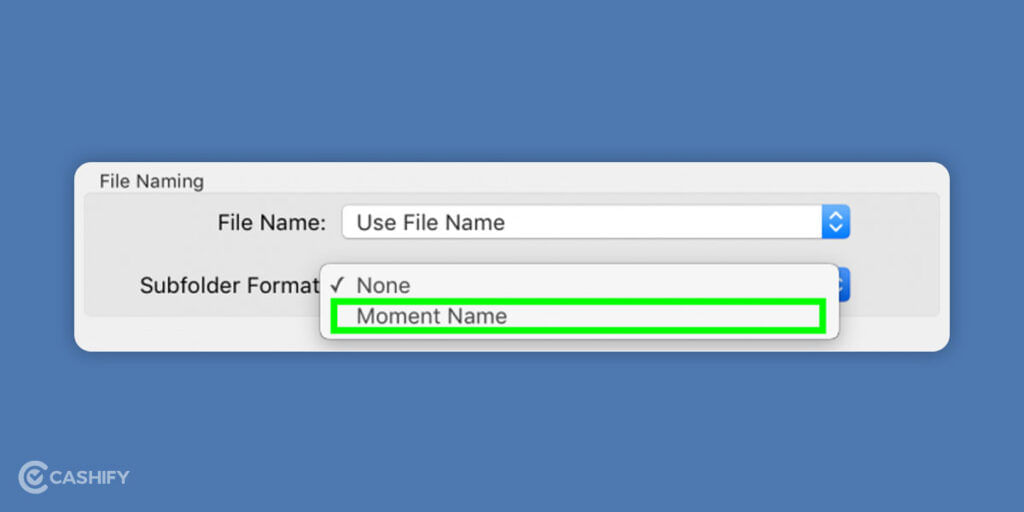
Choose Moment Name

Moment Name

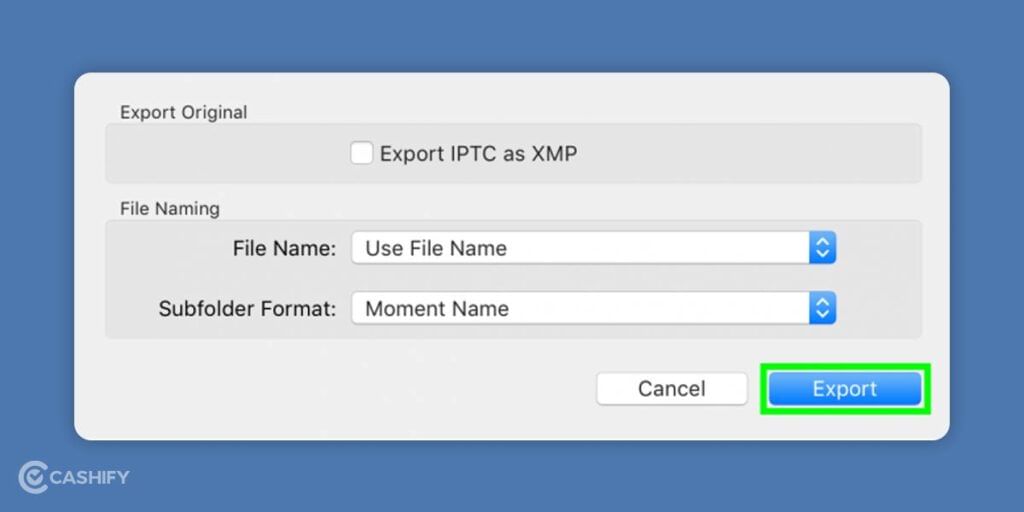
After that, select Export.
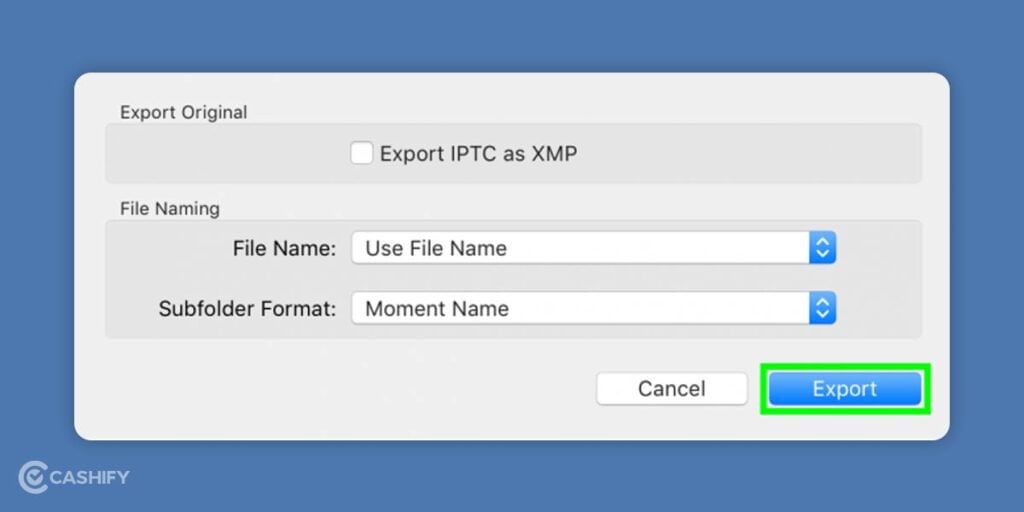
Select export

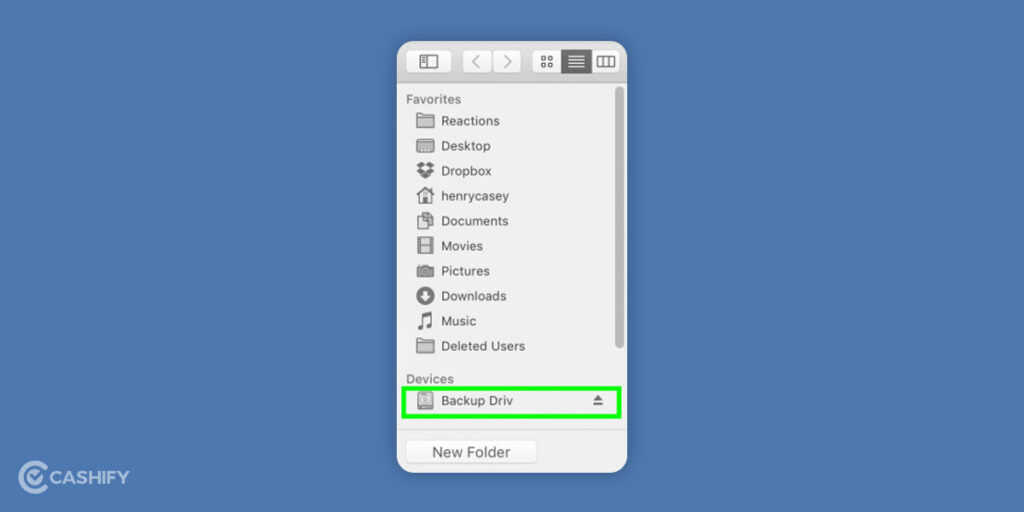
Click on your external hard drive.

Click on external drive

Double click on the Exported Files directory
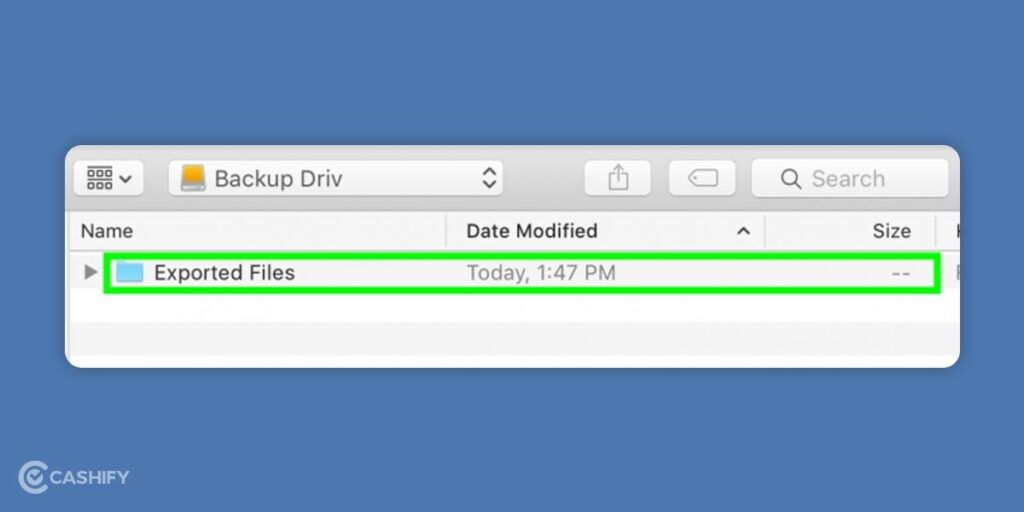
Exported files directory

Now, click on New Folder.
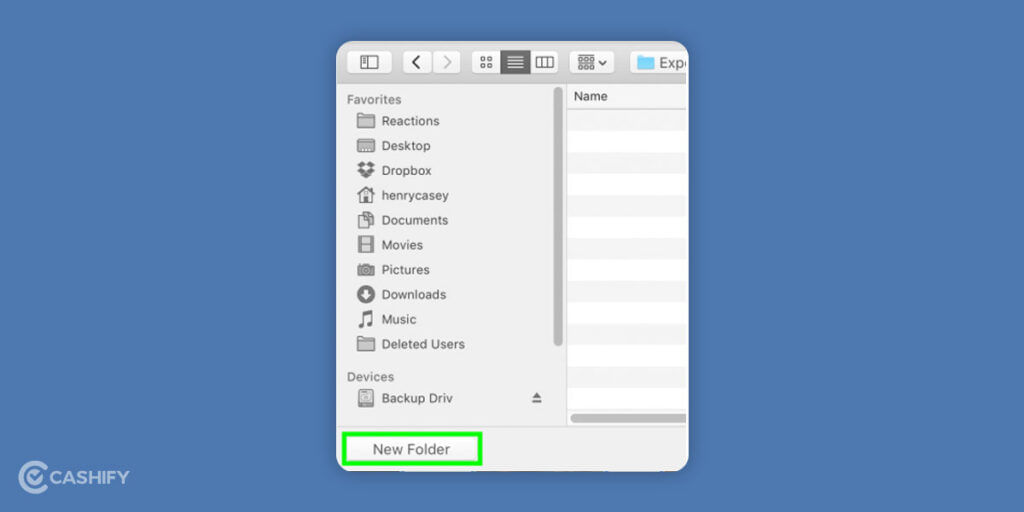
Click new folder

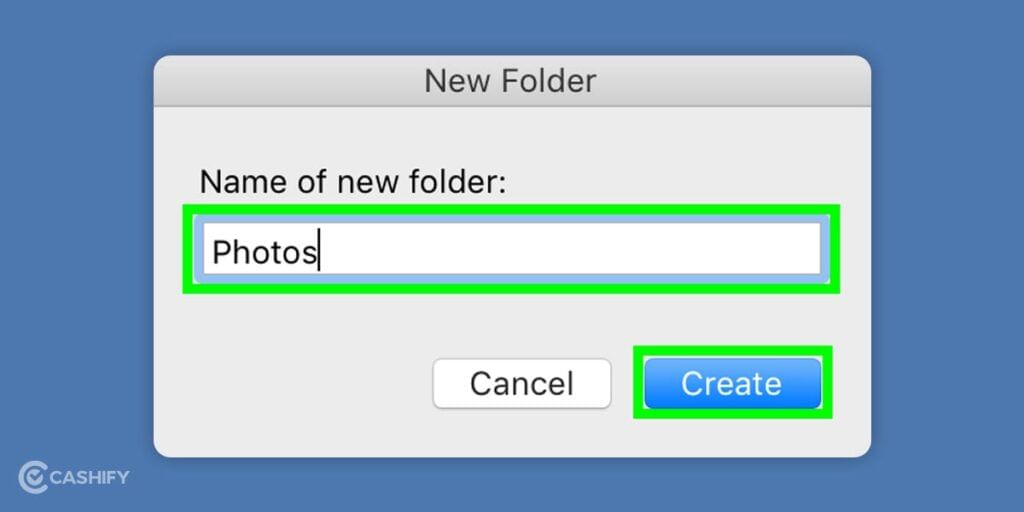
Type photos and click Create

Type photos & click create

Click on Export Originals. This step will take some time, depending on the images you have in total.
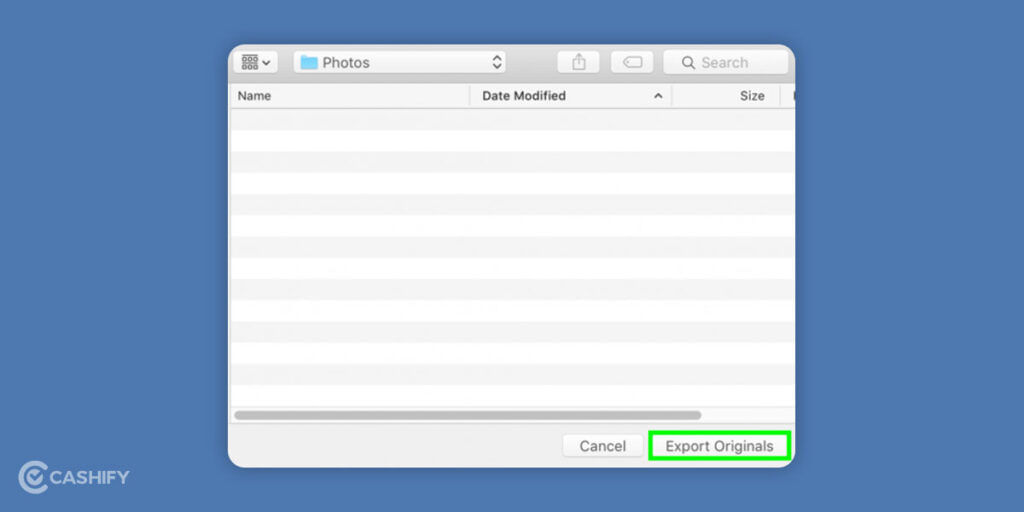
Click on export originals

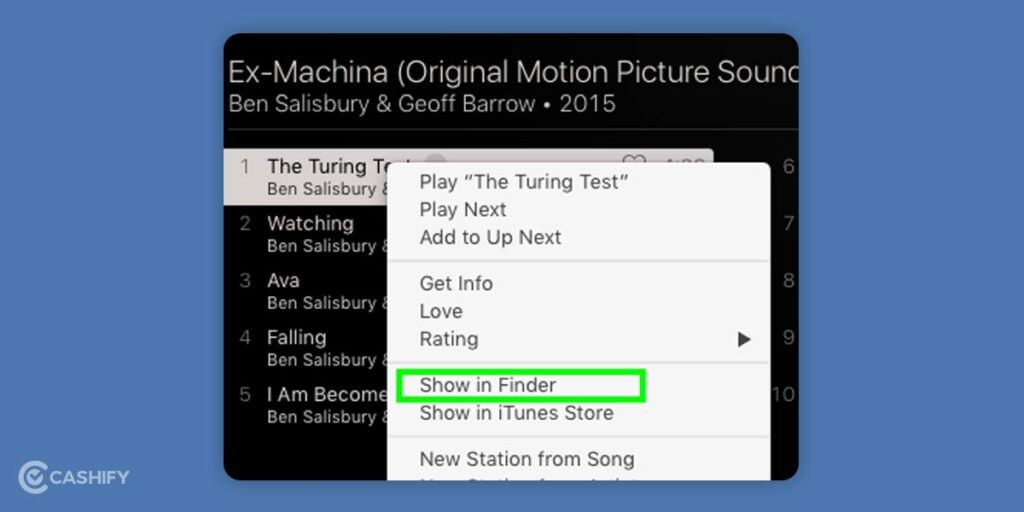
Now, open iTunes and right-click any song. If you do not use iTunes, you can skip to Step 24.
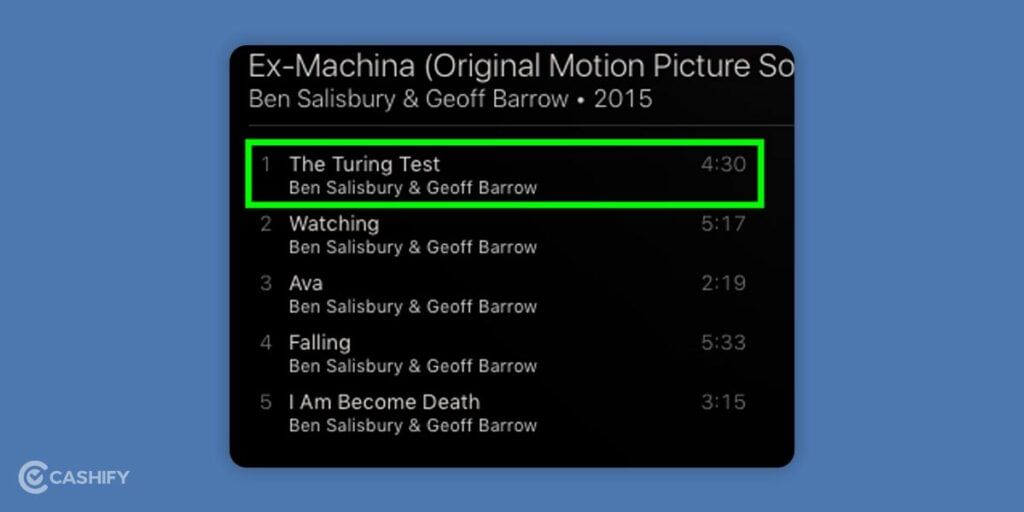
Open iTunes

Select Show in Finder

Select show in Finder

You have to press Command + Up to move up to the Artist directory in this step.
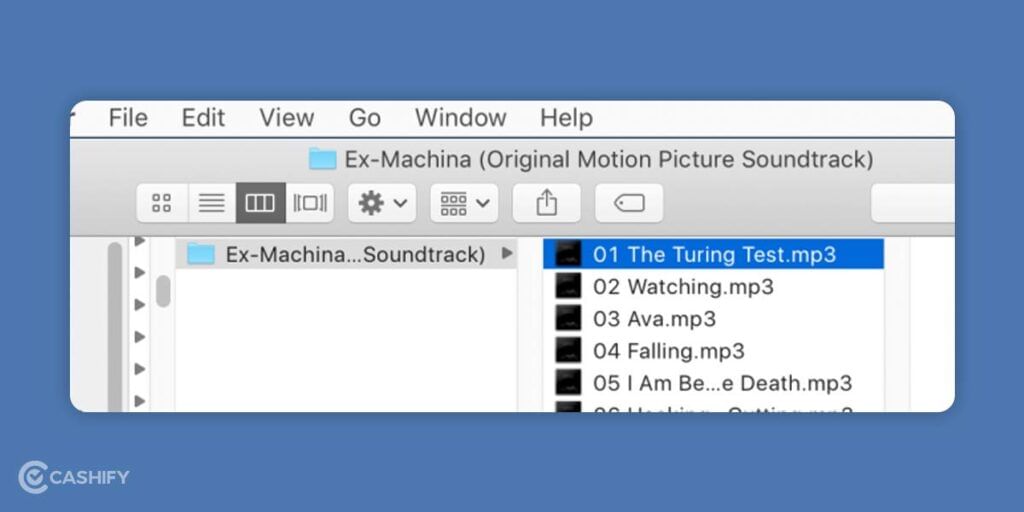
Command + Up to move Artist directory

Then, press Command + Up to move up to the Music directory.
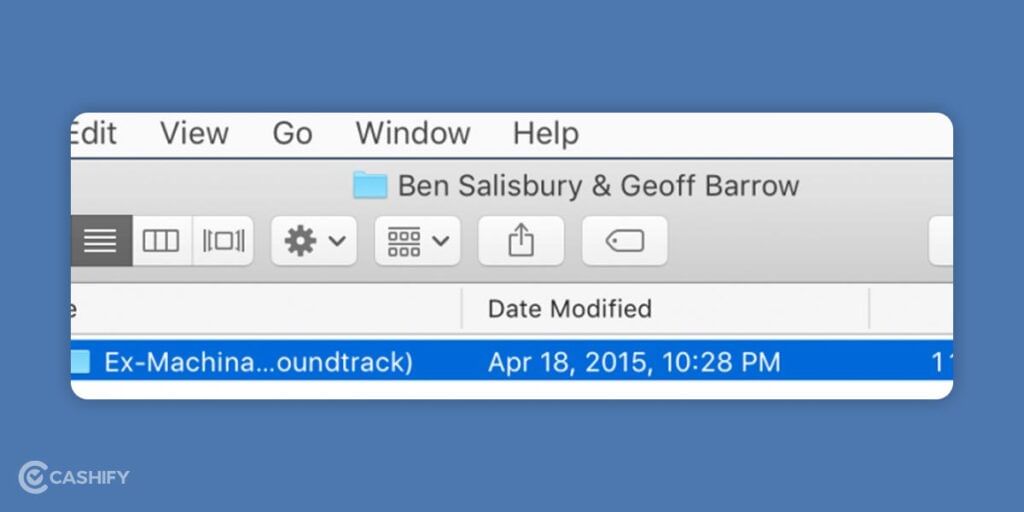
Command + Up to move up to Music directory

Again, press Command + Up to navigate to the iTunes Music directory.
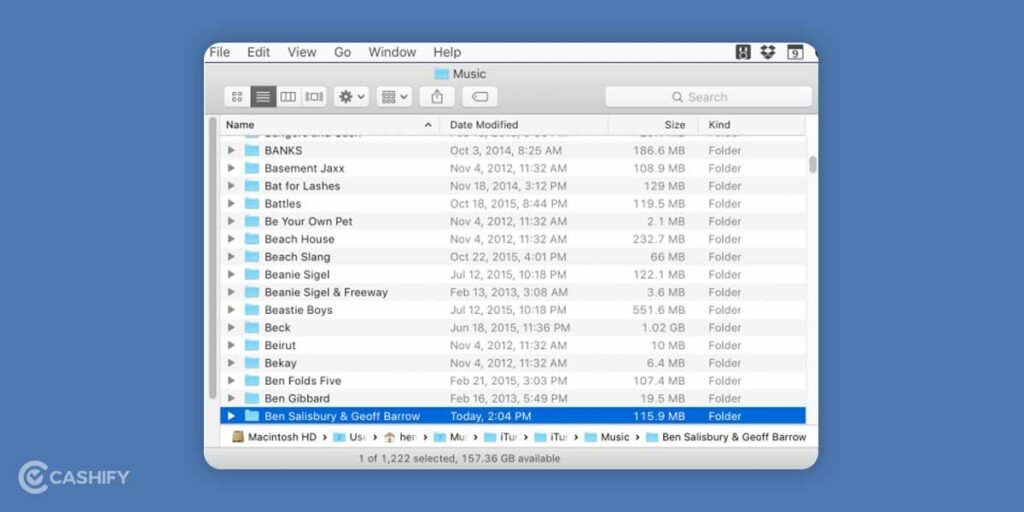
iTunes Music directory

Now, click and drag the Music Folder icon to the external hard drive in the side menu. While doing this, you need to hold the mouse button till Windows shows the external hard drive’s content.
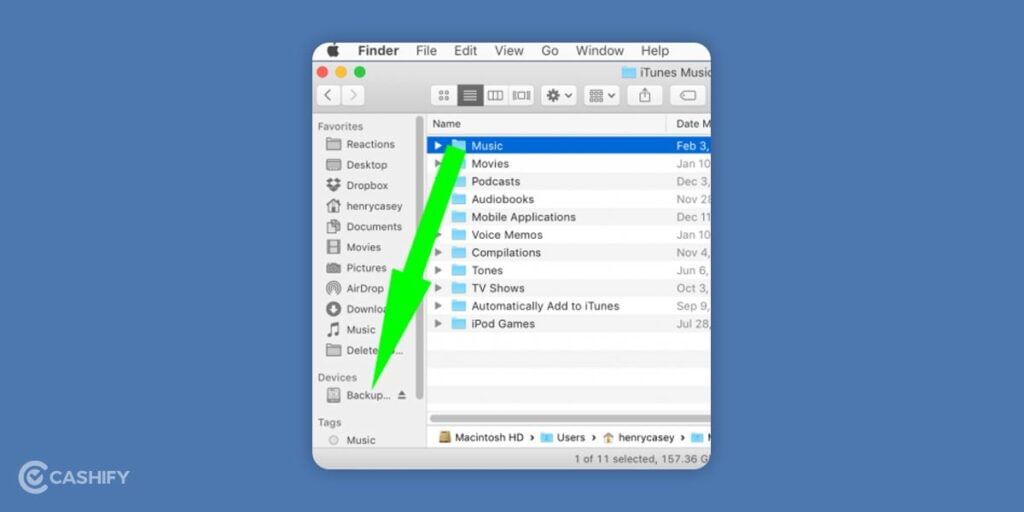
Click and Drag Music Folder

After that, Move from the Music folder to the Exported Files Folder. Release the mouse button, and the files will begin to copy.
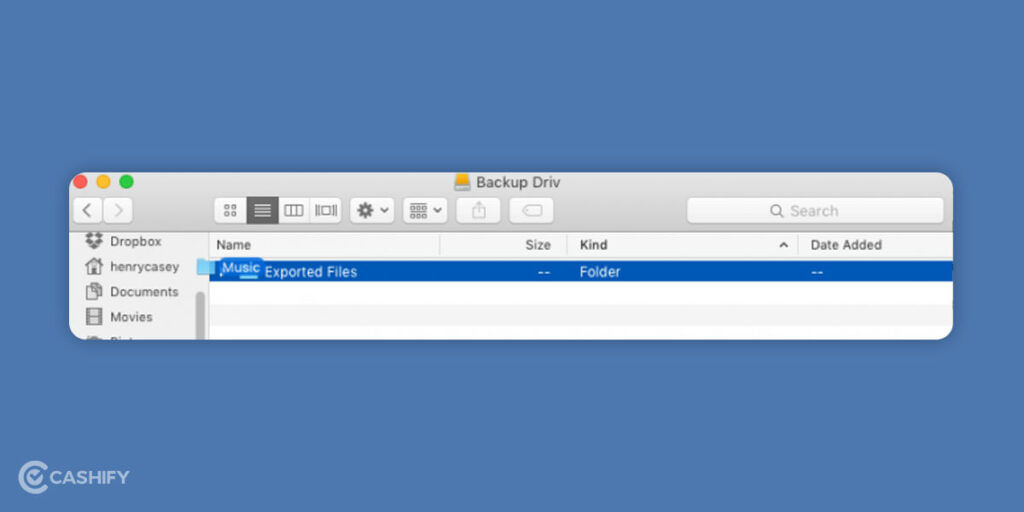
Move the Music folder to exported files folder

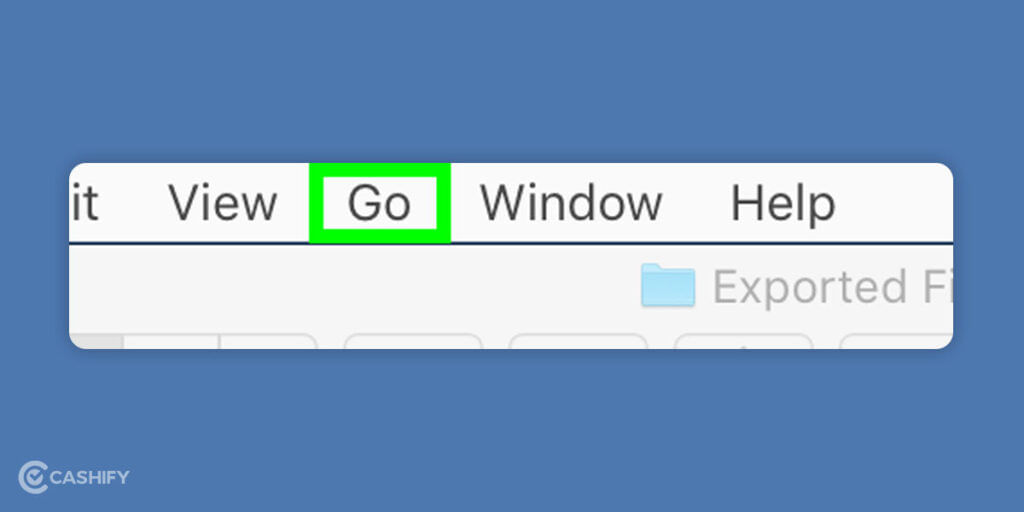
Click on Go in the Menu bar.

Click on Go in the Menubar

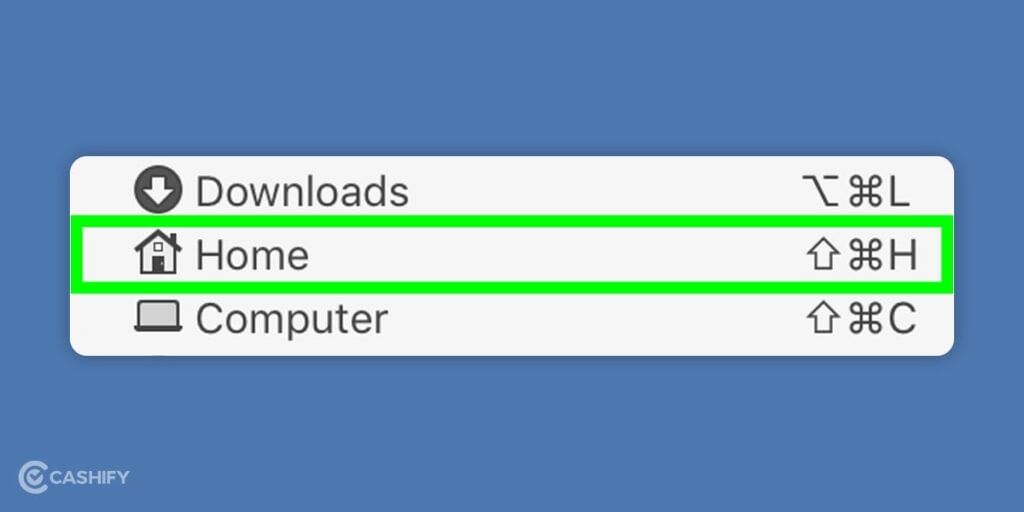
Select Home

Select Home

While holding Command, click on Desktop, Movies, Documents, and Downloads. If you want to bring over additional directories, you can select them, too.
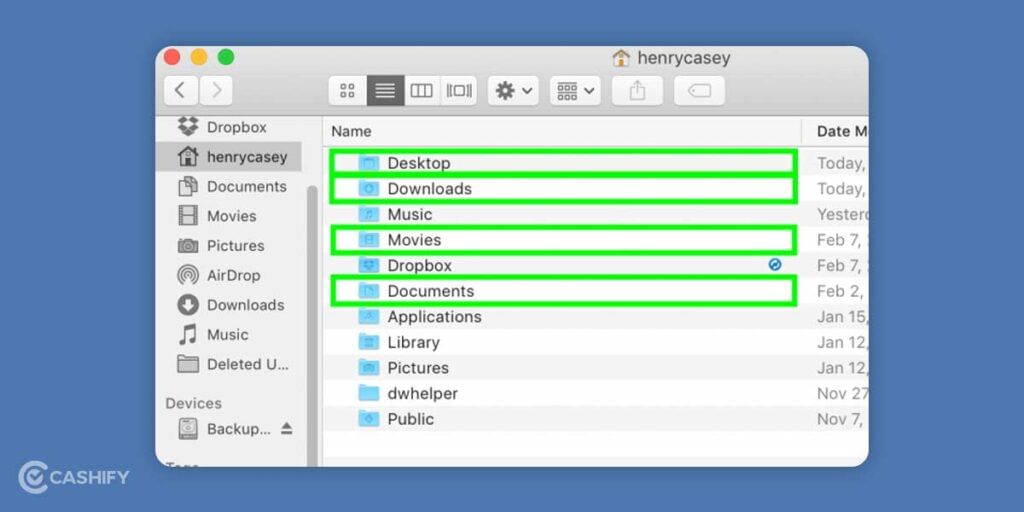
Hold command & click on Desktop, Movies, Documents, Dowloads

Now, drag all these folders to the external hard drive in the side menu.
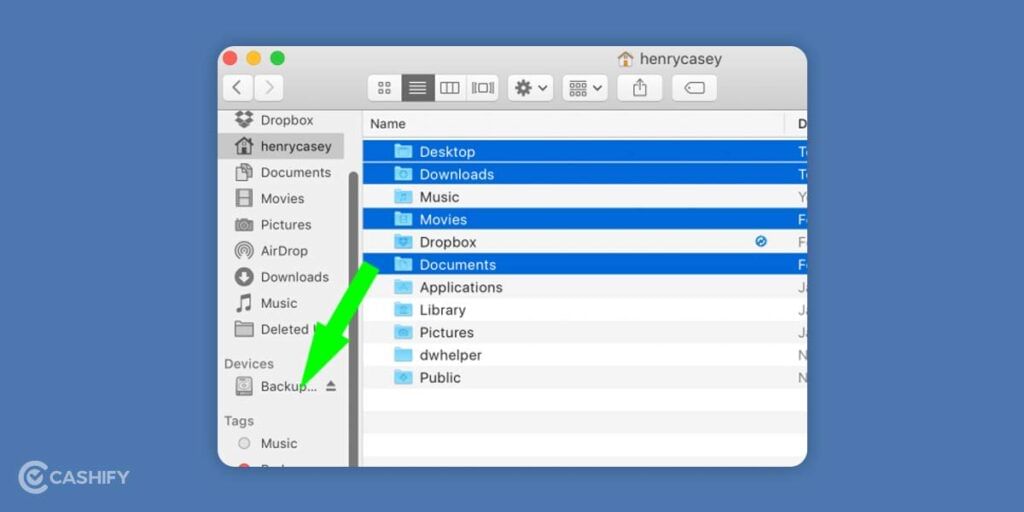
Drag files to external harddrive

Move the folders to the Exported Files folder. Once done, release the mouse button. Once the copying of files is finished, your Exported Files folder should look like this without any progress bars.
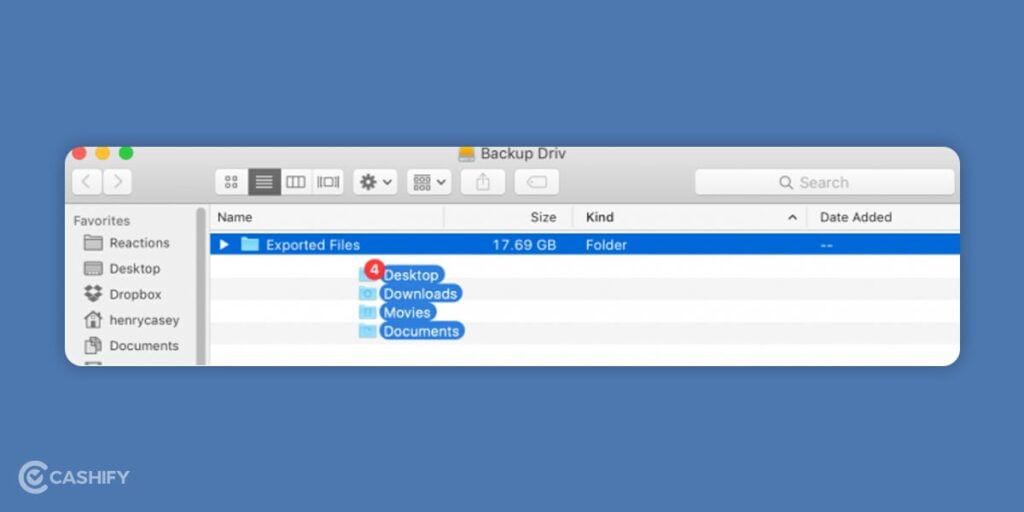
Move the folders to exported files folder

Click the Eject icon that is next to the external drive.
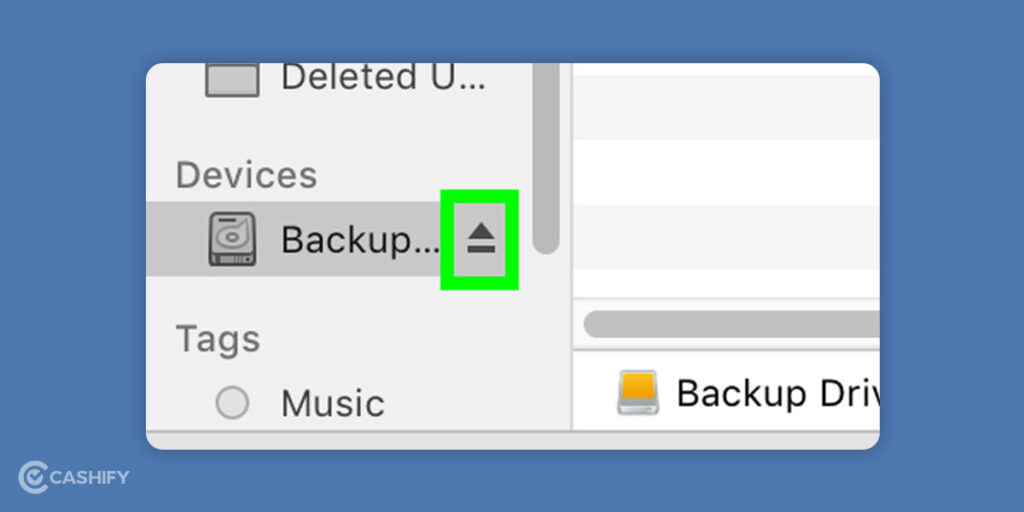
Click on Eject

Now, it is time to connect the external drive to your PC -> Click the File Explorer icon.
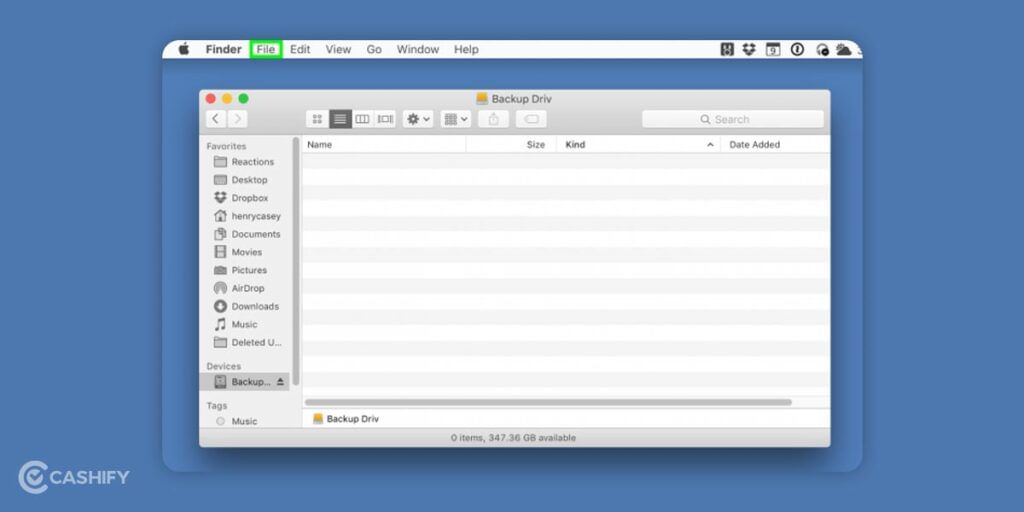
Click File

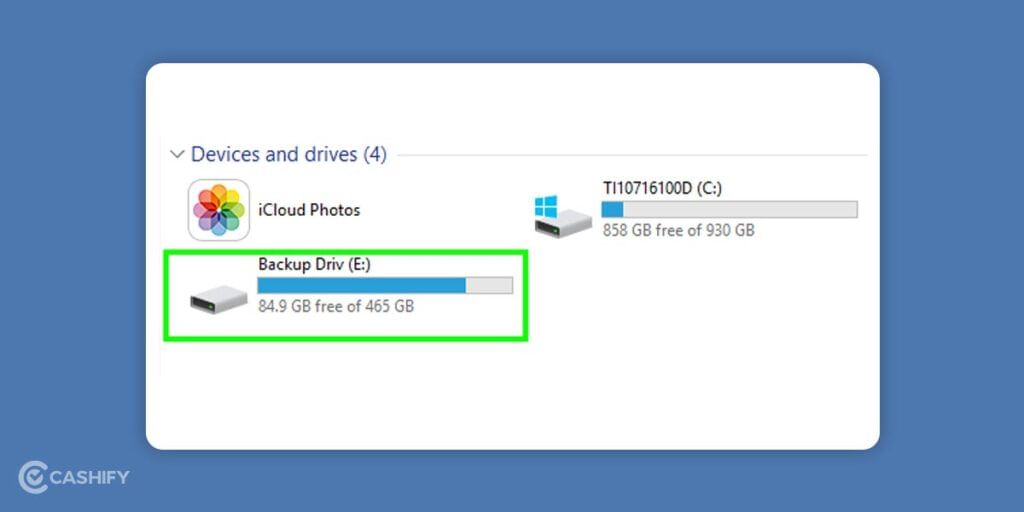
Double click the external drive

Double click external drive

Then Double click the Exported Files folder.
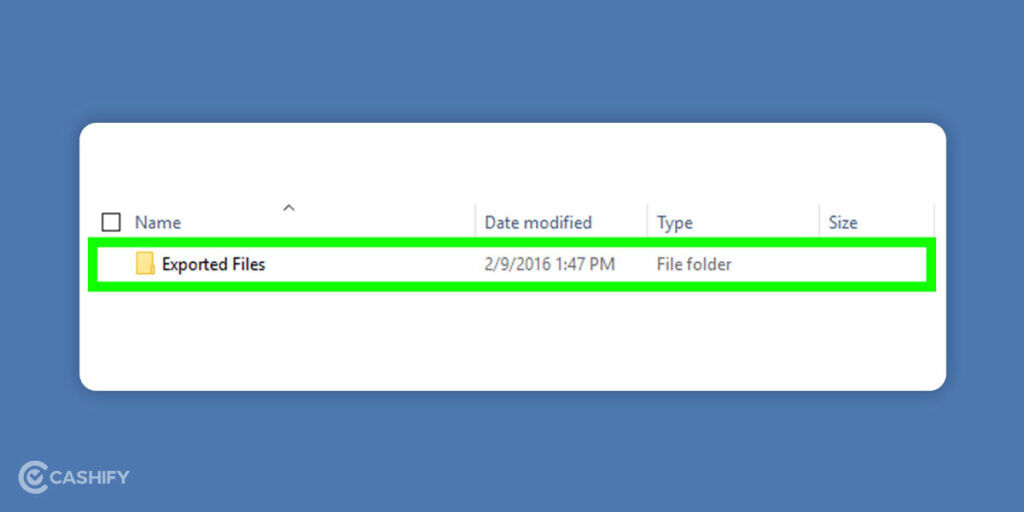
Exported files folder

After that, double-click the Desktop Folder.
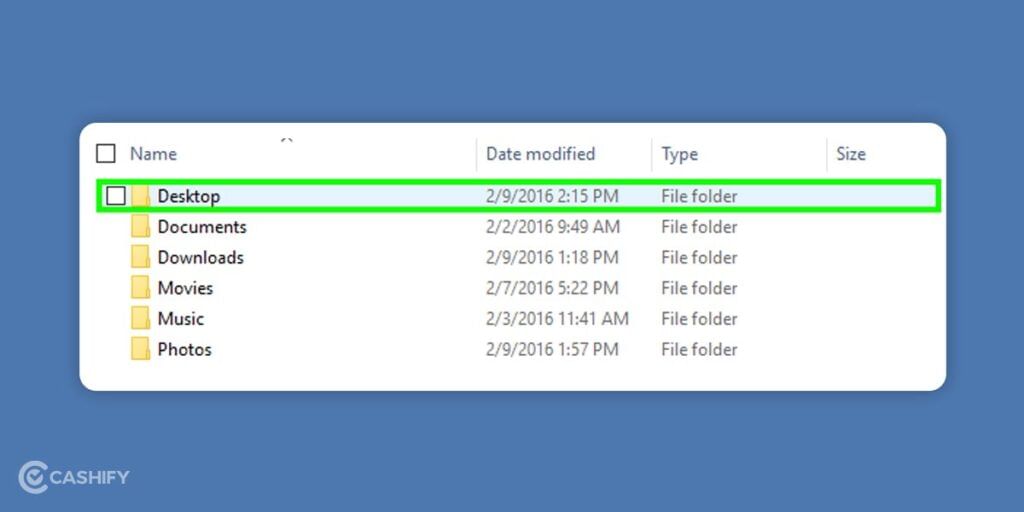
Double click the desktop folder

Click on Select All

Select All

Drag all of the files to Desktop in the sidebar. Repeat steps 33 to 35 as required.
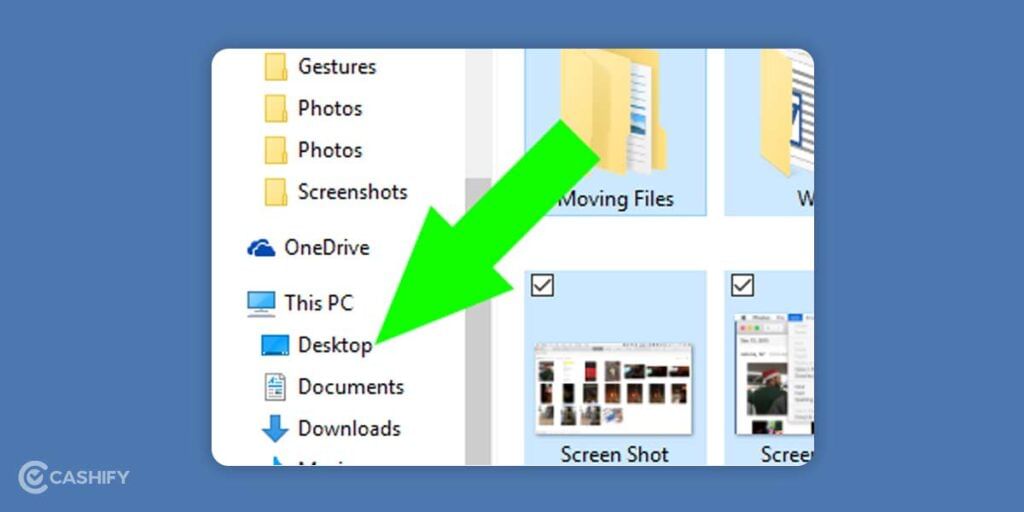
Drag all these Files to desktop icon

Now, your PC has everything all your Mac has.

Also read: MediaTek Dimensity 8100 Beats This Snapdragon Chipset in Geekbench: Details Here

To Wrap Up

In a nutshell, switching from Mac to Windows PC was quite difficult for a few years. However, these days, due to more Microsoft and a third-party app version for a Mac has eased the process. It has reduced the need for converting files. Besides, the cloud and faster data connections have also made it much easier for you to transfer files between systems. Hopefully, this article has cleared all your doubts about how to transfer files from Mac to PC. Still, if you have any doubts, you can share them with us in the comment box below.

Are you planning to sell old mobile phone online or recycle old phone? Cashify is here to help you out with its hassle-free doorstep service.

d2c
Sell old Mobile Phones
  • 1
    How to Format a Hard Drive for Both Windows and Mac?
  • 2
    How to Format an External Drive in Mac OS?
  • 3
    How to Format an External Drive in Windows?
  • 4
    How to Transfer Files from Mac to PC?
  • 5
    To Wrap Up
  • You have decided to make the jump from Mac to PC, and the very first question will pop into your mind – how to transfer files from Mac to PC? Right? Well, do not worry. In this in-depth guide, we have included everything you need to know about switching from Mac to Windows PC. In this guide, we have covered detailed guidance on how to transfer files from Mac to PC as well as setting up your brand-new experience. It is pretty simple than you might think.

    One of the significant hurdles you might feel is moving your important files, especially when transferring files from Mac to PC. The reason behind it is simple. On both platforms, you have folders to store music, photos, movies, and documents. However, some files are more difficult to find than others.

    Also read: When Will Steam Deck Release In India? All You Need To Know

    Once you have moved these files over, Microsoft’s Groove Music app will automatically import your songs. The Photos app will identify all images, and all of your other files will sit where they belong.

    Before we deep dive into how to transfer files from Mac to PC, you will need an external hard drive that works perfectly with Macs and PCs. If you do not have such a drive, you need to format the drive. So, it will work on both types of computers.

    Let’s learn steps to format a hard drive for both Windows and Mac

    How to Format a Hard Drive for Both Windows and Mac?

    The major issue you will face when planning to use the external hard drive for Windows and Mac is that these platforms use different filesystems by default. Windows uses NTFS while Mac OS uses HFS. Both are incompatible with each other. However, you can format the drive to work with both Windows and Mac with the help of exFAT filesystems.

    Also read: This Exclusive Deal on Apple iPhone Is Too Good To Be True!

    Here are the steps.

    How to Format an External Drive in Mac OS?

    Connect the drive to the Mac.

    After that, Open the Disk Utility Application.

    Select the external drive as the source

    Select the external drive as source

    Choose Erase from the icon list near the top of the window. If you are not planning to use the drive for Time Machine, you can skip steps from 5 to 10 and directly go to step 11.

    Give the drive a descriptive name, use the Format drop-down menu, and select exFAT. After that, click on Erase.

    Click Partition

    Click partition

    Enter the amount of space you want to keep aside for Time Machine.

    Enter the amount of space you want to keep aside

    Click Apply

    Choose the new untitled partition to format it with exFAT so we can use it with Mac and Windows.

    Choose the new untitled partition

    Now, click on Erase.

    Click on Erase

    Give the partition name and select exFAT for the format.

    Give the partition name

    Click Erase to Finish

    Also read: Earphone Buying Guide: Which Features To Consider

    How to Format an External Drive in Windows?

    Connect the drive to your PC and launch the Start Menu.

    Open the Disk Management Tool -> Select Create and format hard disk partitions

    Create & format hard disk partitions

    Right-click on the external drive partition -> select New Simple Volume

    Select new simple volume

    Choose a volume size

    Choose a volume size

    Assign a drive letter

    Assign a drive letter

    In Format Partition Screen, you need to Choose exFAT as the file system

    Choose exFAT as the file system

    Give a new name to the volume

    Give new name to the volume

    Click Next & then click finish

    Click on next finish

    Now, as you know how to format an external drive in Mac and Windows, let us move to the next section – how to transfer files from Mac to PC.

    Also read: Should You Sell OnePlus Nord CE 5G? 3 Upgrade Options

    How to Transfer Files from Mac to PC?

    You should follow the below steps when you want to transfer files from Mac to PC.

    Connect the external drive to your Mac -> open the drive -> select File.

    Connect external drive to Mac

    Select New Folder

    Select New Folder

    Now type Exported Files -> hit Return. If you do not use Photos, skip to Step 17.

    Type exported files

    Open the Photos app -> click Edit in the Menu bar.

    Open the Photos app

    Click on Select All

    Click Select All

    Click File

    Click file

    Select Export

    Select export

    After that, select Export Unmodified Original For

    Select Unmodified Original

    Then, click on the drop-down menu that is next to Subfolder Format.

    Subfolder format

    Choose Moment Name

    Moment Name

    After that, select Export.

    Select export

    Click on your external hard drive.

    Click on external drive

    Double click on the Exported Files directory

    Exported files directory

    Now, click on New Folder.

    Click new folder

    Type photos and click Create

    Type photos & click create

    Click on Export Originals. This step will take some time, depending on the images you have in total.

    Click on export originals

    Now, open iTunes and right-click any song. If you do not use iTunes, you can skip to Step 24.

    Open iTunes

    Select Show in Finder

    Select show in Finder

    You have to press Command + Up to move up to the Artist directory in this step.

    Command + Up to move Artist directory

    Then, press Command + Up to move up to the Music directory.

    Command + Up to move up to Music directory

    Again, press Command + Up to navigate to the iTunes Music directory.

    iTunes Music directory

    Now, click and drag the Music Folder icon to the external hard drive in the side menu. While doing this, you need to hold the mouse button till Windows shows the external hard drive’s content.

    Click and Drag Music Folder

    After that, Move from the Music folder to the Exported Files Folder. Release the mouse button, and the files will begin to copy.

    Move the Music folder to exported files folder

    Click on Go in the Menu bar.

    Click on Go in the Menubar

    Select Home

    Select Home

    While holding Command, click on Desktop, Movies, Documents, and Downloads. If you want to bring over additional directories, you can select them, too.

    Hold command & click on Desktop, Movies, Documents, Dowloads

    Now, drag all these folders to the external hard drive in the side menu.

    Drag files to external harddrive

    Move the folders to the Exported Files folder. Once done, release the mouse button. Once the copying of files is finished, your Exported Files folder should look like this without any progress bars.

    Move the folders to exported files folder

    Click the Eject icon that is next to the external drive.

    Click on Eject

    Now, it is time to connect the external drive to your PC -> Click the File Explorer icon.

    Click File

    Double click the external drive

    Double click external drive

    Then Double click the Exported Files folder.

    Exported files folder

    After that, double-click the Desktop Folder.

    Double click the desktop folder

    Click on Select All

    Select All

    Drag all of the files to Desktop in the sidebar. Repeat steps 33 to 35 as required.

    Drag all these Files to desktop icon

    Now, your PC has everything all your Mac has.

    Also read: MediaTek Dimensity 8100 Beats This Snapdragon Chipset in Geekbench: Details Here

    To Wrap Up

    In a nutshell, switching from Mac to Windows PC was quite difficult for a few years. However, these days, due to more Microsoft and a third-party app version for a Mac has eased the process. It has reduced the need for converting files. Besides, the cloud and faster data connections have also made it much easier for you to transfer files between systems. Hopefully, this article has cleared all your doubts about how to transfer files from Mac to PC. Still, if you have any doubts, you can share them with us in the comment box below.

    Are you planning to sell old mobile phone online or recycle old phone? Cashify is here to help you out with its hassle-free doorstep service.

    Previous
    Next

    Comments

    Recent Articles

    Apple Watch Ultra 4 vs Samsung Galaxy Watch 9: What's The Better Choice?
    11th Sep 2026
    5 Best Reasons To Buy The iPhone 18 Pro Max: Is It Really Worth Your Investment?
    10th Sep 2026
    OPPO Find X10 Series Launch Date, Expected Price, And Specs In India
    10th Sep 2026
    OriginOS 7 Beta: How To Download Guide And Eligible Devices
    10th Sep 2026
    Xiaomi 18 Fold vs Samsung Galaxy Z Fold 8: Which Is The Better Foldable Choice
    9th Sep 2026

    Featured Videos

    iPhone 15 Wonderlust Launch Event: What To Expect And How To Watch?
    11th Sep 2023
    Apple Watch Series 9: Here Is All That Happened In The Wonderlust Event
    10th Aug 2023
    Samsung Games Portal: Everything You Need to Know
    12th Jul 2023
    Here’s The Best Way To Buy Refurbished Samsung Galaxy Note 20 Now!
    11th Jul 2023
    Apple MacBook Air 15 Inch: An Expensive Yet Unbeatable Laptop Choice In 2026
    10th Jul 2023

    You May Also Read

    New Launches

    Apple iPhone 18 Pro Max

    Apple iPhone 18 Pro Max

    Starting from:
    ₹1,79,900
    Apple iPhone 18 Pro

    Apple iPhone 18 Pro

    Starting from:
    ₹1,64,900