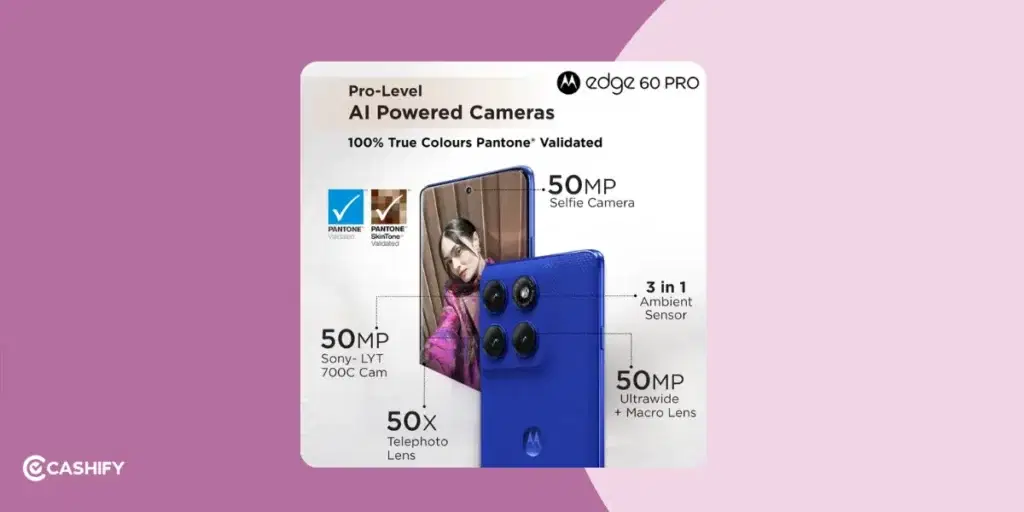
You are already way ahead in the photography game, having the Motorola Edge 60 Pro. It comes with a powerful camera system. The best camera settings for the Motorola Edge 60 Pro will give you the pro-level edge. With its advanced AI features and versatile modes, you can capture stunning photos in various scenarios. So, with this post, let me take you through some of the best settings that are simple yet using them correctly can change everything!
Let’s quickly know the basic configuration: It features a 50-megapixel main camera, a 50-megapixel ultrawide lens. There’s a 10-megapixel telephoto lens as well. In front, a 50-megapixel selfie camera. Now that we know that, let’s hop into the settings that will enhance your clicks.
Also read: Unlock Stunning Shots! Best Vivo V50 Camera Settings Revealed!
1. Use Auto Mode with AI Enhancements For Any Shot!
When photo editing apps become overwhelming, you have to open the Motorola Edge 60 Pro’s Auto mode. It is perfect for quick, high-quality photos without much tweaking. The advanced Moto AI enables Photo Enhancement Engine. It optimises exposure, contrast, saturation, and colour for vibrant, balanced images. Here’s how to set it up:
- Open the Camera app and stay in Photo mode (default).
- Tap the Settings icon (gear) in the viewfinder.
- Go to AI SETTINGS and ensure Auto Enhance is turned on. This uses RAW image data for better quality, especially in tricky lighting.
- If you prefer natural colours, switch to Natural mode to reduce AI processing for a more realistic look.
Try this: When the camera detects a specific scene (e.g., Food or Landscape), a bar with the scene name appears. Keep it on for automatic enhancements to the scene, or tap to turn it off for more control.
Also read: Master The OnePlus 13 Camera: 5 Pro Tips for Stunning Photos!
2. Use HDR for Bright and Shadowy Scenes
High Dynamic Range (HDR) mode is great for capturing scenes with both bright and dark areas, like a sunset or a shaded park. The Motorola Edge 60 Pro automatically switches to HDR when it detects high-contrast scenes. If you want, you can adjust it manually:
- In the Camera app, tap the HDR icon in the viewfinder.
- Choose Auto HDR for the camera to decide when to use it, or set it to On for consistent HDR use.
- Avoid HDR in low-contrast scenes (e.g., indoors with even lighting) to prevent unnatural colour boosts.
Try this: For outdoor shots with heavy shadows, combine HDR with Smart Composition (found in Settings > AI SETTINGS). This applies the rule of thirds to offset your subject, creating a balanced and professional-looking photo.
Also Read: 5 Phones That Deliver DSLR-Like Photography!
3. Use Portrait Mode for Stunning Solo People Shots!
Fortunately, you have the Moto Edge 60 Pro, which excels at portraits. Add the Dynamic Bokeh feature to it. It creates a natural background blur that blends well to highlight the person in front. Here’s how to get the best results:
- Switch to Portrait mode in the Camera app.
- Choose from focal lengths: 24mm (Wide), 35mm (Standard), or 50mm (Close). The 35mm and 50mm options are great for single subjects, while the 24mm works for group shots.
- Adjust the blur level by dragging the slider in the viewfinder to control background softness.
- Ensure good lighting, as the telephoto lens (used for 50mm shots) performs best in bright conditions.

Try this: For creative portraits, try the 85mm focal length in Portrait mode. It uses digital zoom on the telephoto lens. You get a tighter crop with a dreamy blur. You can avoid it in low light to prevent softness.
Also, adjust the blur slider for a natural background bokeh effect, and let AI smooth out imperfections while keeping your look authentic.
Also read: Change These Camera Settings On Your iPhone 16 Pro Today!
4. Close Ups with Auto-Macro
Close-up photos now get the definition they deserve without any manual intervention. The Auto-Macro mode is best when you want to take a quick shot of an insect over a flower or fabric details, and so on. To use this:
- In Settings > PHOTOS, turn on Auto-Macro.
- When you move close (about 2.5cm) to a subject like a flower or insect, Moto AI switches to the 50-megapixel ultrawide lens. This adds sharp details.
- The camera automatically detects the close distance and activates macro mode, so you don’t need to switch manually.
5. Use AI in Night Vision for Low-Light Shots
Not many phones in the market can capture great low-light or night photos, even though they offer it. The Moto Edge 60 Pro is different as it leverages the Moto AI for Night Vision mode. It is able to capture bright, detailed photos in low light.
- Switch to Night Vision in the Camera app, or let the camera activate it automatically (a moon icon appears in Photo mode).
- AI combines multiple exposures to reduce noise and enhance clarity, ideal for night skies or dimly lit rooms.
Hold the phone steady for a few seconds during capture, or use a tripod for sharper results.
Also read: Realme GT 7 Vs Moto Razr 60: Which One Should You Buy?
5. Experiment with Pro Mode
Okay, if the above settings are as easy as drinking water to you, you may proceed to this one. The Pro mode is for advanced users. It lets you manually adjust settings like shutter speed, ISO, and white balance. Controlling them becomes an important aspect during situations like night photography or motion shots. Here’s how you can start using this advanced feature:
- Switch to Pro mode in the Camera app.
- Adjust the shutter speed according to the scene you want to click:
- Use a fast shutter (e.g., 1/6000s) to freeze motion, like a running pet.
- Use a slow shutter (e.g., 1/4s) for motion blur, like flowing water.
- Setthe ISO to a low setting (100-200) for bright scenes to reduce noise, or a higher setting (800+) for low-light conditions.
- Adjust white balance for accurate colours under artificial lights (e.g., warm for incandescent bulbs).
- Save photos as RAW (DNG) for more editing flexibility in apps like Adobe Lightroom. You will see a RAW badge on the photo thumbnail.
Try this: In Pro mode, enable the Leveler (Settings > CAPTURE SETTINGS) to display a horizon guide. Tilt your phone until the white lines turn blue for perfectly straight shots, especially for landscapes or architecture.
Also read: 5 Mobile Phones With The Same Camera As iPhone 15!
Best Camera Settings For Motorola Edge 60 Pro: Recommendations!
This is your holy grail to achieving stunning shots without much brain-draining. Try these out:
| Setting | Recommendation / Details |
|---|---|
| Photo Resolution | Set to High for better quality. |
| Auto Macro | Enable for automatic switching when close to subjects. |
| Watermark | Usually best kept OFF. |
| AI Audio (Video) | ON for internal mic clarity. OFF for external mic use. |
| Efficient Videos | OFF (H.264) if editing; ON (H.265) to save space. |
| Selfie Mirror | Use to correct flipped selfies (text). |
| Gesture Selfie | Enable for hands-free shots with a palm gesture. |
| Tap Anywhere to Capture | Turn ON for faster photo snapping. |
| Shutter Sound | Turn OFF for quieter operation. |
| Grid & Level | Turn both ON to help with alignment and composition. |
| Quick Capture | Enable “twist wrist twice” gesture to launch camera instantly. |
| Keep Last Mode | Enable geotagging for organising photos. |
| Save Location | Enable the “twist wrist twice” gesture to launch the camera instantly. |
| Flash | Options: Auto, On, Off. No “Always On.” |
| Filters | Available, but not strength-adjustable. |
| Colour Styles | Choose between Natural (default) and Signature (boosted saturation). |
| Aspect Ratio | 4:3 recommended for most use. Others: 1:1, 9:16, Full. |
| HDR (Video) | Supports HDR10+. Turn OFF for smaller files and easier editing. |
| Mic Mute/Unmute (Video) | Option available while recording. |
Also read: Is Your Motorola Edge 40 Neo Not Turning On? Revive It In Minutes!
Best Camera Settings For Motorola Edge 60 Pro: In A Glance!
Although I have explained everything above, I would like you to have a checklist you can glance at quickly while you are about to be in action:
| Mode/Setting | Available On | Details |
|---|---|---|
| Photo (Auto) | Rear (1x, 0.5x, 3x), Front | Standard photo capture with AI assistance. |
| Portrait Mode | Front & Rear | Rear: 24mm, 35mm, 50mm, 85mm options; Front: supports wide-angle. Adjustable blur (1–6). Recommended: 3. |
| Macro Mode | Rear (Ultrawide lens) | Auto-switch or manual; great for close-up shots. |
| Pro Mode | Rear (1x, 0.5x, 3x) | Full manual control (Focus, ISO, WB, Shutter Speed, Exp. Compensation). Supports RAW, JPEG, RAW + JPEG. No 2x digital zoom. |
| Ultra Resolution | Rear (1x, 0.5x) | Captures full 50-megapixel resolution photos. |
| Night Vision | Rear & Front | Enhances low-light photos. |
| Tilt-Shift | Rear (1x, 0.5x, 3x) | Miniature effect with selective blur. |
| Long Exposure | Rear | Traffic Trails, Water & Clouds. Adjustable durations or infinity. |
| Group Shot | Rear | Captures multiple faces clearly. |
| Video (Standard) | Rear (1x, 0.5x, 3x), Front | 4K @ 30fps supported on all lenses. 1080p @ 60fps also available. |
| Slow Motion | Rear (1x only) | 1080p @ 120fps and HD options. Not available on ultrawide or 3x. |
| Macro Video | Rear (Ultrawide) | Stabilises the horizon in video. Limits to 1080p @ 30fps. |
| Time-Lapse | Rear | 4K supported; speed ranges from 4x to 32x. |
| Dual Capture Video | Front + Rear (any lens) | Simultaneous recording with layout options (split view, picture-in-picture). |
| Horizon Lock | Rear | Stabilises horizon in video. Limits to 1080p @ 30fps. |
| Beauty Mode | Front | Adjustable settings for face shape, smoothing, and more. |
In The End
Now that you are acquainted with the best camera settings for Motorola Edge 60 Pro, it is time to get the results. The Motorola Edge 60 Pro camera, due to its versatility, has made photography so easy in different setups and conditions. Showcase your photography style to friends by smartly using the camera features.
What do you think about these best settings for the Motorola Edge 60 Pro? Would you like to add any more settings? If yes, there in the comments section.
If you’ve just bought a new phone and don’t know what to do with your old phone, then here’s your answer. Sell old mobile to Cashify and get the best price for it. If you are planning to buy a new phone, check out Cashify’s refurbished mobile phones. You can get your favourite phone at almost half price with six-month warranty, 15 days refund and free delivery.