Are you also planning to buy the latest and most iconic flagship release from Motorola in 2026, the Motorola Signature? Well, then, this blog is for you. If the camera of this phone is your topmost priority, then you need to check out the best camera settings for Motorola Signature inside this article. Bet it video recording, portrait mode, or other AI-based modes, we guide you through all of them. So, without further ado, let us begin.
Also Read: Best Camera Settings For Motorola Edge 60 Pro!
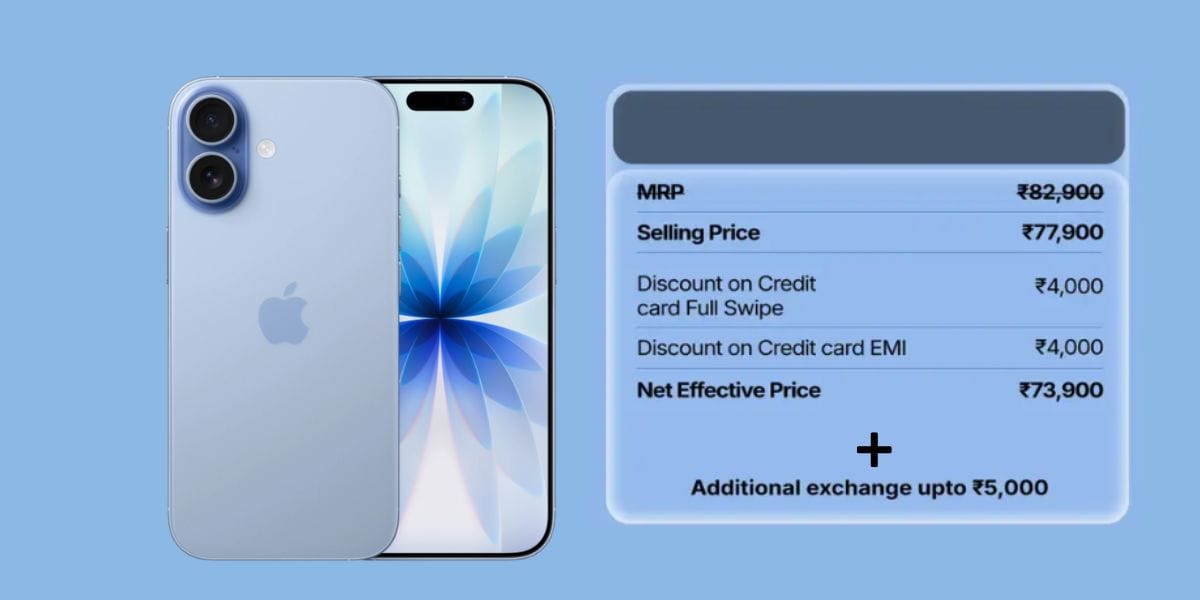
Motorola Signature Brings Top-Notch Camera Excellence
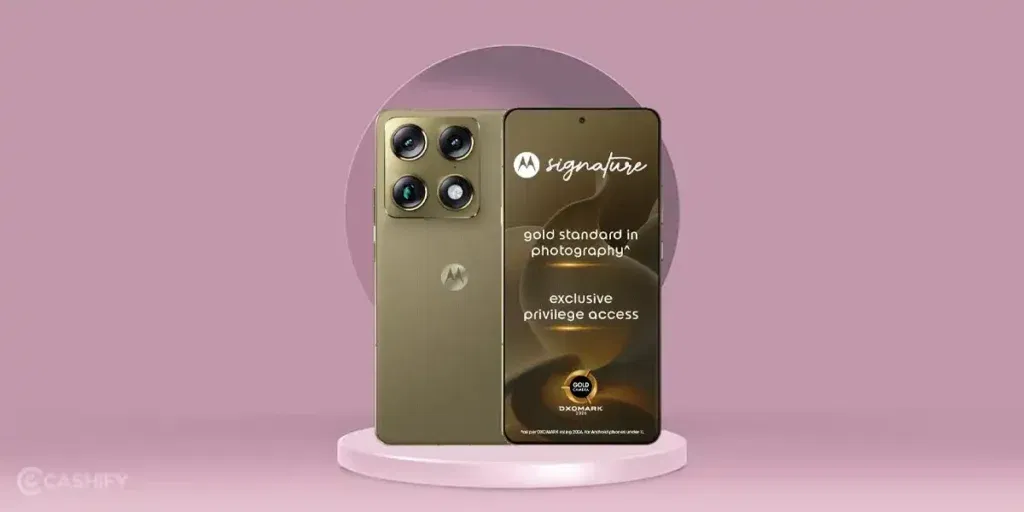
The Motorola Signature was launched in January 2026. The phone’s ultimate USP stands out in its camera. The phone has established itself as a tough competitor to other supreme camera-centric flagships like the Vivo X300 Pro, OPPO Find X9, iPhone 17, etc.
Quad Camera Setup And DXO Set The Right Tone
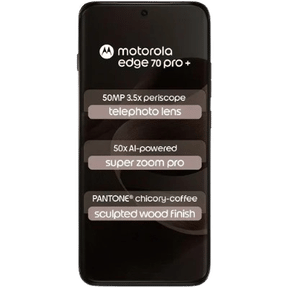
Moto Signature features a quad 50MP setup (including a large Sony LYTIA 828 main sensor with OIS, 50MP ultrawide, 50MP 3x periscope telephoto, and 50MP selfie camera), earning DXOMARK Gold Label for imaging excellence. So if you use the best camera settings for Motorola Signature, you are bound to get excellent street photography shots. The main sensor delivers stunning detail, cinematic Dolby Vision 8K video, lifelike colors, and versatile perspectives with strong zoom and low-light performance.
All Camera Modes And Details Of Motorola Signature

| Camera Modes | Details |
| Portrait Mode | 50 MP main or telephoto |
| Ultrawide Mode | 50 MP ultrawide (122° FoV) |
| Landscape Group Shots | 50 MP main |
| Night Vision Mode | 50 MP primary |
| Pro Mode | All rear cameras (50 MP each) |
| Zoom (Telephoto) | 50 MP periscope telephoto (3× opt., up to 100× digital) |
| Selfie Mode | 50 MP front |
Also Read: iPhone 17 Pro camera settings
Now, let us move to the use cases of this phone’s camera.
Use Cases Of Motorola Signature’s Camera: What Can Be The Benefits
Here are some of the useful purposes for which Motorola Signature can be the best choice:
- For street photography.
- For low-light vision photos.
- To click iconic portrait shots.
- To click ultrawide outer shots in daylight.
- For object photography.
Here Are The Best Camera Settings For Motorola Signature
So, here are the best camera settings for the Motorola Signature That Will Help You Get The Best Clicks:
Use Portrait Mode For Best Clicks
If you are clicking pictures of your friends or your close people, then switch to portrait mode. The portrait mode of this phone captures the best skin tones, blurs all the extra noise, and gives you the best clicks.
a picture clicked by Motorola Signature camera [as uploaded officially by Motorola]
Moreover, the portrait mode in the 3x settings can also be used for clicking close shots of stationery objects, pets, and other objects.
Use Ultrawide Mode Only for Street Photography
If you’re a street photographer, then the Moto Signature has a very nice ultrawide lens to support your street clicks. Use it, set the ISO right, and you will get excellent shots.
For Groupfies, Use Landscape Instead Of Ultrawide
Many of us make this mistake, but I warn you beforehand. Never use ultrawide mode for clicking people. It doesn’t put the right size, minimises people’s body outline, and if someone zooms up your picture, the real picture would be very ugly.
So, instead of ultrawide, if you are clicking wide angles with lots of people in the frame, then switch to landscape mode.
Also Read: Moto G77 Camera Specs, Battery, and Performance: See All Details Here
Best Camera Settings For Night Mode In Motorola Signature
If you’re out there enjoying your nightlife and find a good vision to click, then use the night mode of your camera. Just go to modes, click on Night Vision.
Secondly, if the setting is not that dim, you can also use Pro mode, as it sharpens your photos, adds some megapixels, so that light shadows would be cut off, and you can click a good photo.
Use Accurate ISOs

Before clicking any picture, setting your ISO is important. Make sure you set it to a middle range, as it brings out the best camera settings for Motorola Signature.
Zoom Mode For Wildlife Or Skyline Shots
If you’re in front of a building, want a good skyscraper click, or some good jungle-safari shots, then the periscope telephoto lens of the Motoorla Signature is for you.
Use Apps And Tools For Best Results
To achieve the best results, you should always try using some editing tools. It is not to undermine your photography skills, but to just add a touch-up and make things appear better for your social media profiles.
So, time to give you some of the best tools and apps that can be a great aid to the best camera settings for Motorola Signature.
Also Read: realme p4 power vs realme 16 pro
Add-Ons To Improve The Best Camera Settings Of Motorola Signature
Now, it’s time for some add-ons. Some of the apps and APK sites, which are safe and easy-to-use, can be very crucial to enhance your Motorola phone’s camera. So, to get the best out of your phone’s camera, here are some of the useful apps and editing tools that you can use:
Best Camera Upgrades Or Alternatives
- Google Camera (GCam) Port.
- Open Camera.
- ProCam X or Lite.
- Footej Camera.
Best Editing Tools
- Snapseed: Free, powerful tools (selective edits, healing).
- Adobe Lightroom Mobile: Helps in Pro colour/RAW editing with presets.
- Remini: For AI unblur/denoise/enhance.
- PhotoDirector: For AI object removal, quality boosts.
- YouCam Enhance: Useful in quick AI upscale/denoise.
Also Read: Gemini AI Adds Labs Tool And Makes Chats Portable: See All The New Experiments
End Note: Maximise Your Photography With The Best Camera Settings For Motorola Signature
That’s it from our end in this guide to the best camera settings for the Motorola Signature. The Motorola Signature proves that great photography is a mix of powerful hardware and smart usage. With its DXOMARK-rated quad-camera system, the phone is built to excel across portraits, low-light scenes, street shots, and zoom photography. By using the right camera modes, accurate ISO levels, and helpful editing tools, you can unlock its true potential. So go out there, take your shots, and use this blog as your ultimate guide for the best clicks! And keep coming for more such information and guides.
If you’ve just bought a new phone and don’t know what to do with your old phone, then here’s your answer. Sell old mobile to Cashify and get the best price for it. If you are planning to buy a new phone, check out Cashify’s refurbished mobile phones. You can get your favourite phone at almost half price with six-month warranty, 15 days refund and free delivery.