Do you know that your Android mobile phone has a lot of secrets that can enhance your Android experience? That’s right; we are talking about the developer settings on Android that will help you unlock a lot of optimisations and customisations on your mobile phone.
This article is not just a simple explanation of how to enable developer options on your phone. We are also going to explain what each setting means and how you can make the best use of these settings.
Also Read: How To Block SIM Card On Jio / Airtel / Vi And More!
Enabling Developer Settings On Android Mobile Phone
Let’s look at the simple steps on enabling these settings step-by-step:
Step 1: Access Settings
Open the Settings app on your Android mobile phone. You can find it by swiping down from the top of your screen and tapping on the gear-shaped icon to go to the settings menu.
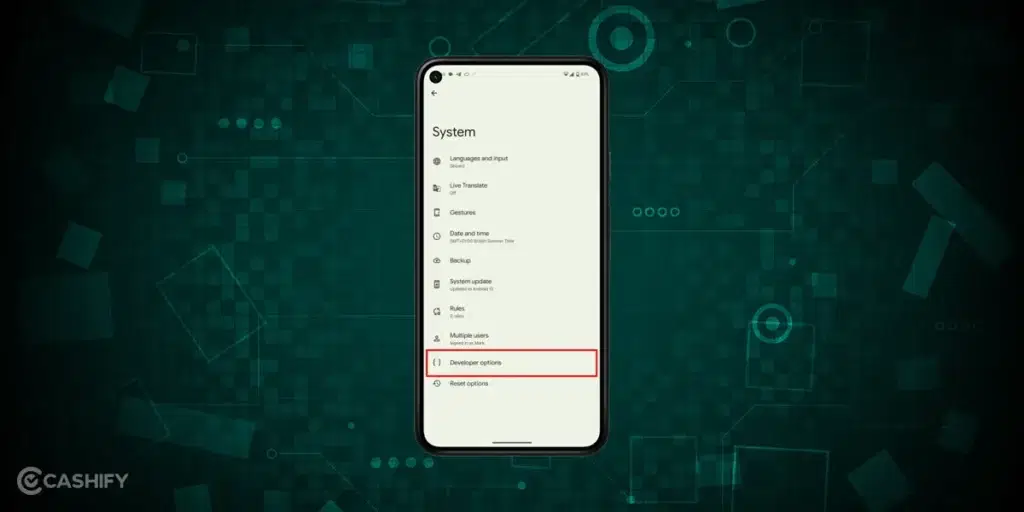
Step 2: Navigate to About Phone
Scroll down the Settings menu until you find the “About Phone” or “About Device” option, and tap on it.
Step 3: Find the Build Number
Look for the “Build Number” entry within the “About Phone” section. It’s usually located towards the bottom of the list.
Step 4: Tap Build Number
Tap on the “Build Number” entry repeatedly. You may need to tap it around seven times in quick succession.
Step 5: Enter Your PIN or Password
If prompted, enter your device’s PIN or password to confirm your action. This step ensures that only authorized users can access Developer Options.
Step 6: Enable Developer Options
After tapping the Build Number several times, you’ll see a message indicating that you are now a developer. This means Your Android mobile phone has been enabled with Developer Options.
Step 7: Access Developer Options
Return to the main Settings menu. You’ll now find a new option called “Developer Options” or “Developer Settings” listed above or below the “About Phone” section.
Step 8: Customize Your Settings
Tap on “Developer Options” to access a range of advanced settings and customisation options. From here, you can change various aspects of your device’s performance and behaviour to suit your needs better.
Also Read: How To Know How Old Is My Phone?
What Developer Settings On Android Mobile Phone Means?
Now it’s time to unlock the fun and tons of customisation options. When you enable developer options, you will see that there are tons of options. As a beginner, it can be a bit complex to understand what they all mean and how to use them to your advantage.
But nevertheless, consider this article as your guide to developer options on your Android mobile phones. Let’s look at these settings one by one and see what they mean:
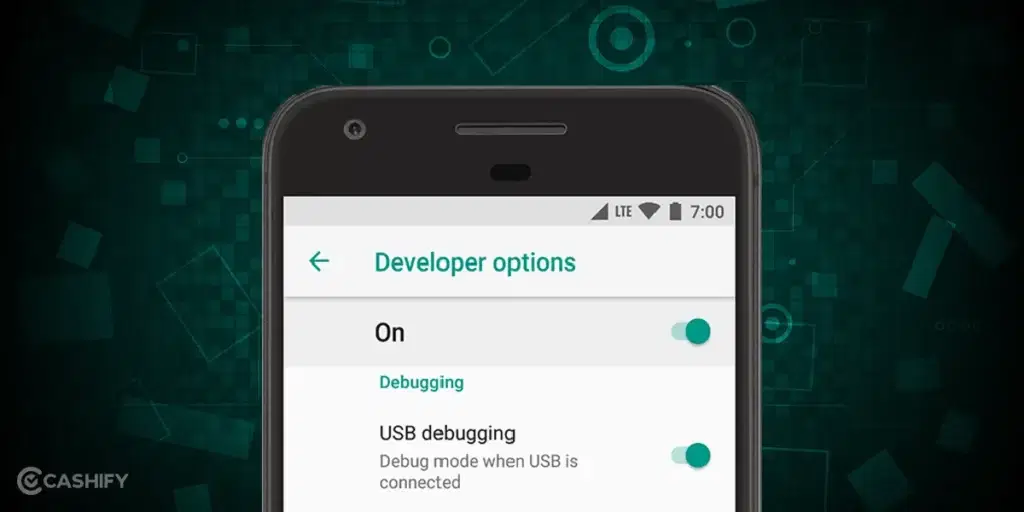
USB Debugging Option
Now this is an interesting option in the developer settings menu. With USB debugging, you can make your computer communicate with your phone via this option. This option serves a variety of purposes.
Here’s a simple table to help you understand the uses of USB Debugging options on develop settings menu:
| Purpose | Description |
|---|---|
| App Development | Testing and debugging Android applications directly on devices from a computer. |
| Software Debugging | Diagnosing and troubleshooting software issues by analyzing logs and system processes. |
| System Modifications | Making system-level modifications such as rooting, installing custom ROMs, and tweaking settings. |
| Data Recovery and Transfer | Accessing and recovering data from an Android device’s internal storage using specialized tools or software. |
| Screen Mirroring and Remote Control | Displaying the device’s screen on a computer monitor or remotely controlling the device for demonstrations or support. |
| Performance Optimization | Analyzing system resource usage and fine-tuning settings to optimize device performance and battery life. |
Also Read: What Is Google Arcade Swags? Know Prices, Earn Points, And More!
Selecting USB Configuration
This setting allows you to choose what you want to do with your phone when you connect it to your computer. You can choose options like charging only, PTP, MTP, charging connected devices, using devices such as MIDI, and much more!
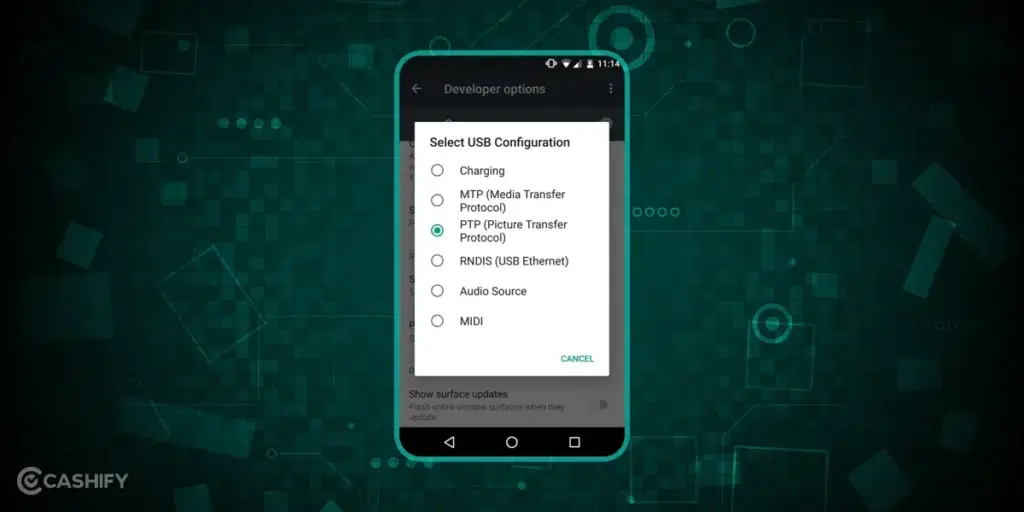
Don’t worry if these options seem a bit complex. Let me help you in breaking down these options for a clear understanding. Here’s a simple table to help you understand:
| USB Configuration | Use |
|---|---|
| Charging Only | Charge your device without data transfer |
| Transfer Files (MTP) | Transfer various types of files between device and computer |
| Transfer Photos (PTP) | Specifically transfer photos between device and computer |
| Use device as MIDI | Control device for controlling MIDI-compatible software/hardware |
| Charge connected device | Use your device to charge another device via USB |
| Use USB for file transfer | Convenient shortcut for selecting file transfer mode |
Also Read: Top Amazon Echo Pop Features We Bet You Did Not Know About!
OEM Unlocking
Now, this setting can be complex to people who have no idea about bootloaders and custom firmware in the developer settings on Android. When a mobile phone is produced, the manufacturer puts a special lock so that only things that the manufacturer approves can be loaded into the device.
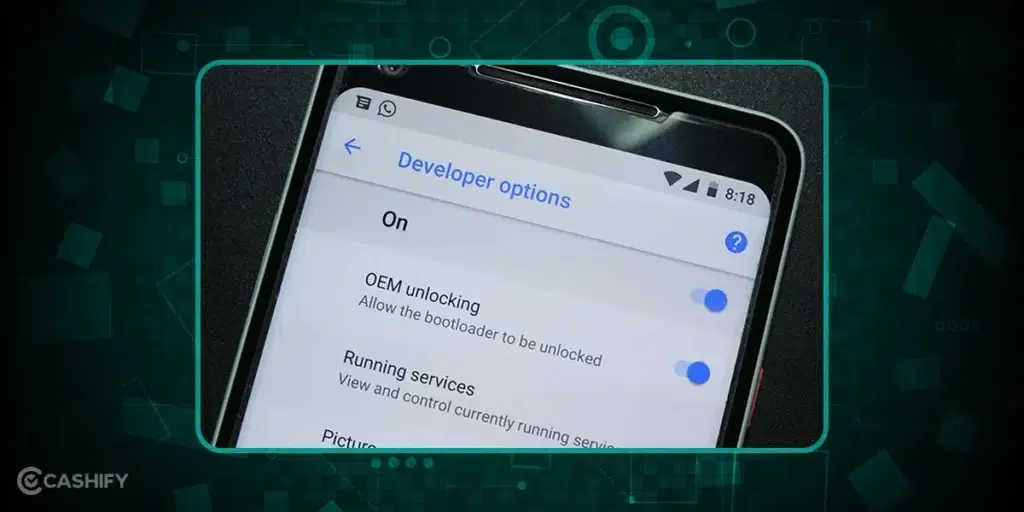
Now when you unlock the OEM setting, you can change the basic settings of your phone and even install different software. Here’s a simple table to understand what OEM Unlocking can do to your mobile phone:
| Use of OEM Unlocking | Description |
|---|---|
| Custom ROMs | Install modified versions of Android or different operating systems for new features and customization options. |
| Rooting | Gain access to deep parts of your phone’s software, allowing you to remove bloatware, customize settings, and run apps with special permissions. |
| Custom Recoveries | Install custom recoveries like TWRP or ClockworkMod for creating backups, installing custom ROMs and mods, and recovering your phone from issues. |
| Developer Tools | Access a toolbox of developer options and debugging tools for testing apps, tweaking settings, and developing software. |
| Unlocking Bootloader | Unlock the bootloader to install custom software, modify system files, and customize your device. |
While OEM unlocking opens up exciting possibilities for customising and enhancing your device, it also carries risks. Modifying your phone’s software can void warranties, cause instability, and even brick your device if not done correctly.
Also Read: What Is Vintage iPhone? Here’s Everything To Know!
Logger Buffer Sizes
Logger Buffer is like a log of your device keeping track of what its doing and any errors that might happen. When we talk about the Logger Buffer Size in the developer settings on Android options, we are talking about all the things your mobile phone can remember at any time.
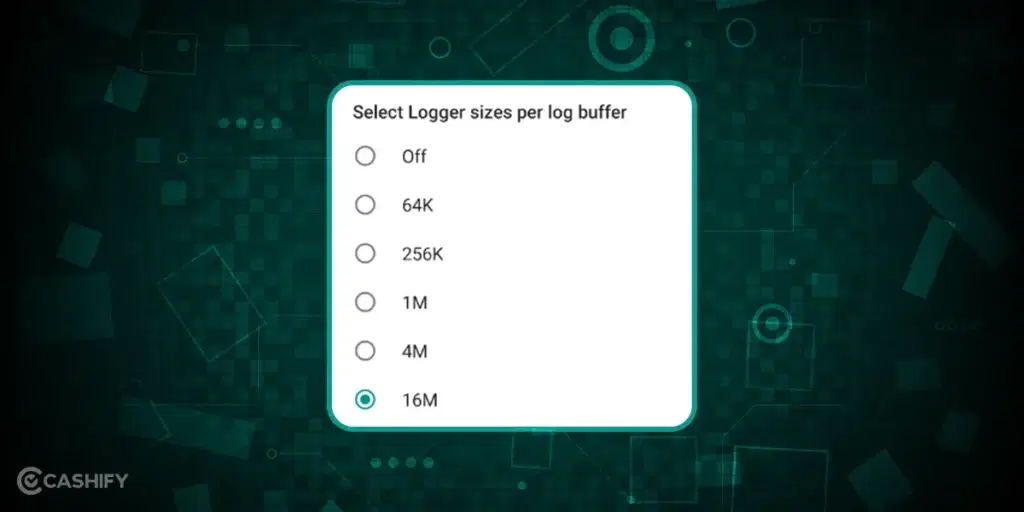
Logger buffer sizes play a crucial role in monitoring, troubleshooting, and optimizing the performance of your device. By adjusting the buffer size, you can tailor the logging behavior to meet your specific requirements, whether it’s diagnosing issues, monitoring performance, or conserving system resources.
| Use of Logger Buffer Sizes | Description |
|---|---|
| Troubleshooting | Helps find and fix problems by storing detailed info about errors and system events. |
| Performance Monitoring | Keeps track of how well your device is running by watching how it uses its resources. |
| Resource Optimisation | Balances how much memory is used for logging – more memory for detailed logs, less for faster performance. |
| Customisation | Lets you pick how much info you want to keep, matching your needs – detailed or just the basics. |
If the Logger Buffer Size is 256 K Per Log Buffer, then it simply means that your mobile phone can store 256 KB of data per Log Buffer. Even though this size can hold considerable amount of data, it’s not unlimited.
Also Read: What Is Grok: The New AI Chatbot By Elon Musk
Wi-Fi Scan Throttling
This is one of the most useful setting in the developer settings on Android mobile phone. With the help of this setting, you can tell your mobile phone to take breaks in between searching continuously for Wi-Fi signals without stopping.
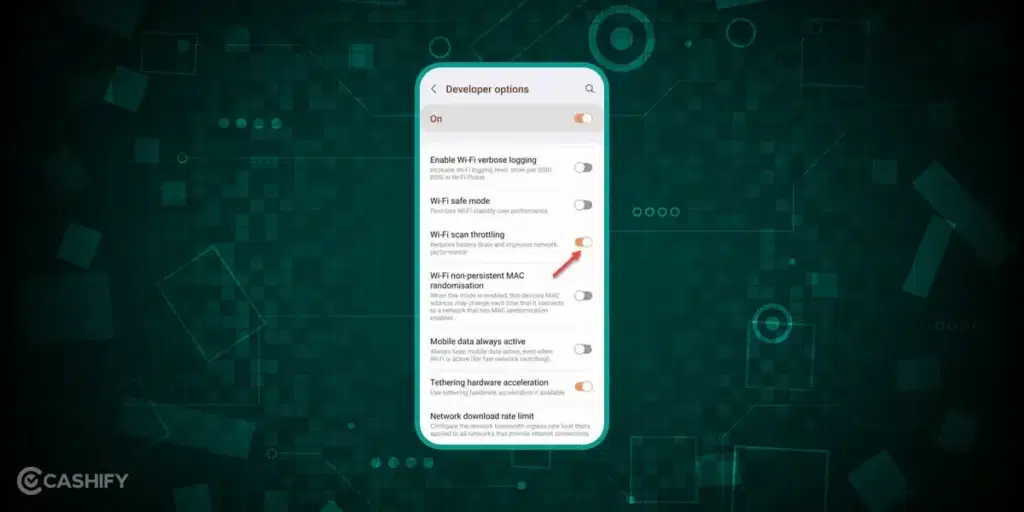
Your device will still look for Wi-Fi networks nearby, but instead of doing it non-stop, it will do it in an organised and efficient manner. Let’s understand the benefits of Wi-Fi Scan Throttling:
| Wi-Fi Scan Throttling | Description |
|---|---|
| Battery Conservation | Limits how often your device searches for Wi-Fi networks, helping to save battery power and prolonging battery life. |
| Reduced Network Congestion | Prevents network congestion and interference by spacing out Wi-Fi scans, leading to smoother network performance. |
| Optimised Performance | Ensures that other tasks are not overwhelmed by constant scanning activities. |
Also Read: Best Watch Faces For Smartwatch That Will Make It Look Cool And Chic!
Media Transcoding Settings
Media Transcoding in the developer settings on Android is like a magic wand that can help you convert and transcode media files from one format to another. This is useful because different apps need different media formats, and this setting will help you easily manage your media files.
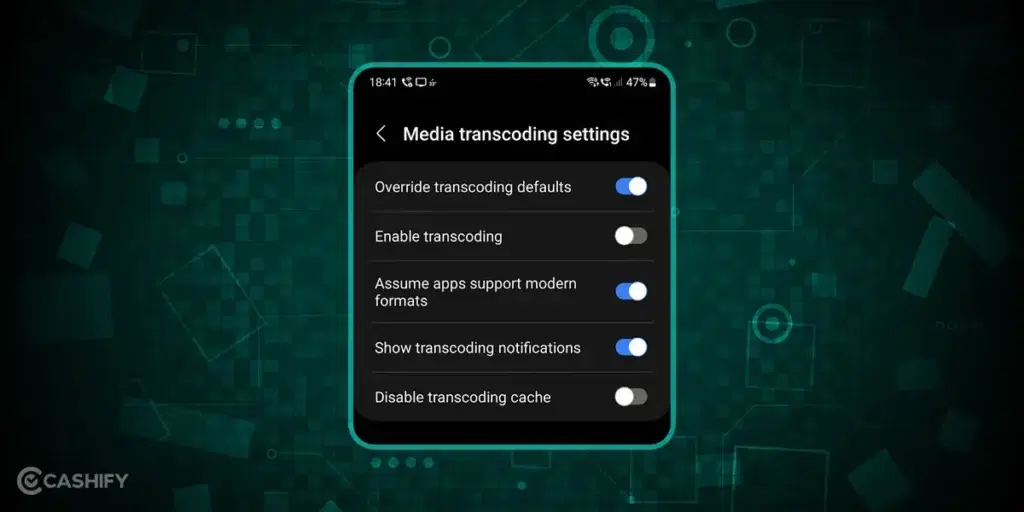
You can also do quality adjustments like changing the size of the file, making it small or big. You can adjust things like bitrate, resolution, and compression to adjust things according to your needs and wants. This way, you can also stream videos or audios smoothly without buffering. Let’s understand these settings in detail with the help of this table:
| Transcoding Settings | Description |
|---|---|
| Override Transcoding Defaults | Lets you manually choose how media files are changed, instead of letting the device decide automatically. |
| Enable Transcoding | Allows your device or app to change media file formats when needed. Without it, no format changes can happen. |
| Assume Apps Support Modern Formats | Tells your device or app to think other apps can handle new formats without changing them. |
| Show Transcoding Notifications | Shows messages when the device is changing media file formats. |
| Disable Transcoding Cache | Stops the device or app from remembering format changes. |
Also Read: How To Take Pictures Of The Moon With Your Smartphone?
System Tracing
System tracing settings in developer settings on Android will allow you to gather detailed information about your device’s performance and the behaviour of your operating system. With this, you can see everything that’s happening with your device to get a deep understanding of how your device works. You can use it to gather information about your CPU usage, memory allocation, app activity, and more.
With the help of this, you can identify issues and bottlenecks that might be slowing down your Android mobile phone. You can also see which apps consume the most battery power. Let’s understand System Tracing Settings with the help of this table:
| System Tracing Settings | Description |
|---|---|
| Record Trace | Think of this like turning on a special recorder to track everything happening inside your device. It helps you understand how apps are running and find any issues. |
| Record CPU Profile | This setting focuses on tracking how busy your device’s brain (the CPU) is. It helps pinpoint which apps are using the most processing power, which can affect performance. |
| Collect Winscope Traces | Winscope traces are like notes that provide insights into how your device is performing. Enabling this setting gathers these notes, which are valuable for developers to debug and improve their apps. |
| Trace Debuggable Applications | Enabling this setting helps developers focus on specific apps while tracing, making it easier to analyze their behaviour for debugging purposes. It’s like putting a spotlight on certain suspects in an investigation. |
| Per-CPU Buffer Size | Adjusting this controls how much space each part of your device has to record information during tracing. It ensures enough data is captured for analysis without overloading the device’s resources. |
| Long Traces | This extends the duration of tracing, allowing for more comprehensive data collection over time. It’s helpful for diagnosing issues that may occur intermittently or over a longer period. |
Wrapping Up: Developer Settings On Android
In the end, I can say that developer settings on Android play a crucial role in unlocking the hidden powers of your Android mobile phone. Knowing what they mean can help you in making the best use of these settings. This will also help you in enhancing your overall mobile phone experience. You can unlock customisations that are not usually possible on any Android device.
If you know someone who is curious about his or her android mobile phone, don’t forget to share this article with them so that they can make the best use of it. Don’t forget to leave your valuable comments and ask your doubts in the comment section below, I would to hear it from you!
If you’ve just bought a new phone and don’t know what to do with your old phone, then here’s your answer. Sell old mobile to Cashify and get the best price for it. If you are planning to buy a new phone, check out Cashify’s refurbished mobile phones. You can get your favourite phone at almost half price with 6-month warranty, 15 days refund and free delivery.