Knowing how to take a screenshot on Windows 10 is not only necessary but also simple. It’s an effortless talent to learn, and we’re here to help you perfect it, whether you want to share something significant or hilarious with the people you care about or whether you need to take screenshots frequently for work.
Even today, after the world sees a greater familiarity with Android and iOS, the simplicity of Windows as an operating system cannot be negated. If we go by the exact numbers projected by Microsoft, there are around 1.4 billion active devices running on Windows 10 and 11 alone.
In this article, we will talk about how to take screenshot on Windows 10. We’ll go over a few different methods for taking screenshots of the entire screen or just a portion of it, depending on your needs.
Also read: Incognito Mode: Are You Really Away From Those Prying Eyes?
Different Methods Of Taking Screenshot On Windows 10
Let us discuss some of the ways in which you can take screenshot on your Windows 10 device. For your clarity, we will deal with performing the same activity on Windows 10 mobile phones in a separate header.
Also Read: 5 Best Online Shopping Apps For A Wholesome Experience
1. Using Print Screen Key (PrtScr)

The PrtScr key is the most basic and first method of taking a screenshot. One of the best things about this key is that it is available directly for access on the keyboard and hence makes the work of taking screenshot on Windows 10 easier.
Here’s how you can work using the steps mentioned.
- Print Screen or PrtScr takes the screenshot of the screen that is currently open. Generally, this key is located in the top right corner of the keyboard.
- For taking the screenshot all you need to do is open the screen you need to capture.
- The next step is to go to your MS Doc/ MS Docx/ MS Word file and press Ctrl+V to paste this screenshot.
- You can use these programs to edit your screenshot, add text over it, and more.
Also Read: Get 1000+ Free Followers On Instagram In 5 Minutes! Here’s how
Other Keys + PrtScr
There are multiple other keys that can be used along with PrtScr:
- Alt + PrtScr: When the Alt key (placed on the bottom left, adjacent to the Windows key) is used together with PrtScr, the user can copy the window currently open on the screen. The difference here is that you don’t get a view of the taskbar in the screenshot that you got while you simply using Alt+PrtScr.
- Windows+ PrtScr: Pressing these keys together captures the entire screen and saves it as an image in the Pictures> Screenshots folder. Under the Pictures library, we can find the Screenshots folder.
PS: This is especially helpful when you want to add these screenshots directly to a guideline or document which needs more referencing using the image guide.
Also Read: 5 Best Wireless Phone Chargers: Get Rid Of Those Cable Tangles!
2. Using Snipping Tools
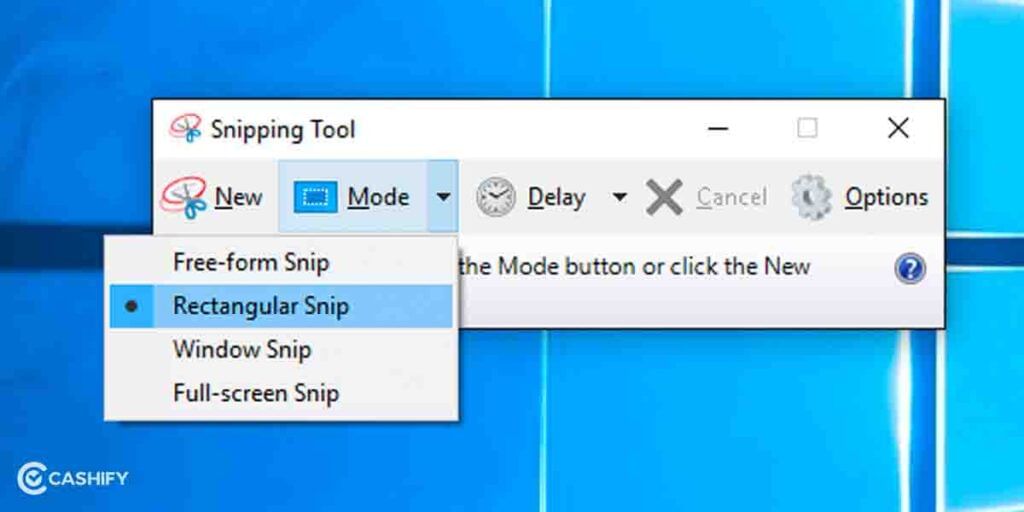
One of the best ways to take a screenshot on Windows 10 is to use the snipping tool. This is probably one easy way to perform the task. However, there are not many functions that you can use with a snipping tool.
- Press the Windows key on the keyboard or click on the Windows icon present generally on the leftmost area of the taskbar.
- Type ‘Snipping Tool’ here. An application pops up. Click on it.
- Once it’s up and running, use the Mode option to select the structure of your screenshot. It gives you the option to have a Free form snip, Rectangular snip, and Window snip.
Also Read: 8 Easy Steps To Get Free Instagram Followers Organically!
- Let’s discuss these snips in some detail.
| Kind of Snip | Function |
| Free-form snip | Using this you can draw a rough outline around an object or area of interest that you want to screenshot. |
| Rectangular snip | This can be used to get a rectangular-shaped screenshot by sliding your mouse around the object or region you want to capture |
| Window Snip | Capture standalone windows such as a conversation box, browser, video player, or music player |
- Once you are aware of these functions and set your preference, open the screen that you want to capture. Now open the snipping tool and click on New.
- Press Ctrl+S to save this screenshot on your device. Else, you can also use them in real-time.
Fun Method: Let’s say you want to share these screenshots over WhatsApp that you have opened on the web. All you need to do here is to press Ctrl+C on the snipping screen and open the contact with whom you want to share it all and directly press Ctrl+V over Whatsapp. Boom! There it is. You are ready to share it right away.
Also read: 5 Best Action Cameras: Capture The Thrill Of Adventure!
3. Using the Game Bar
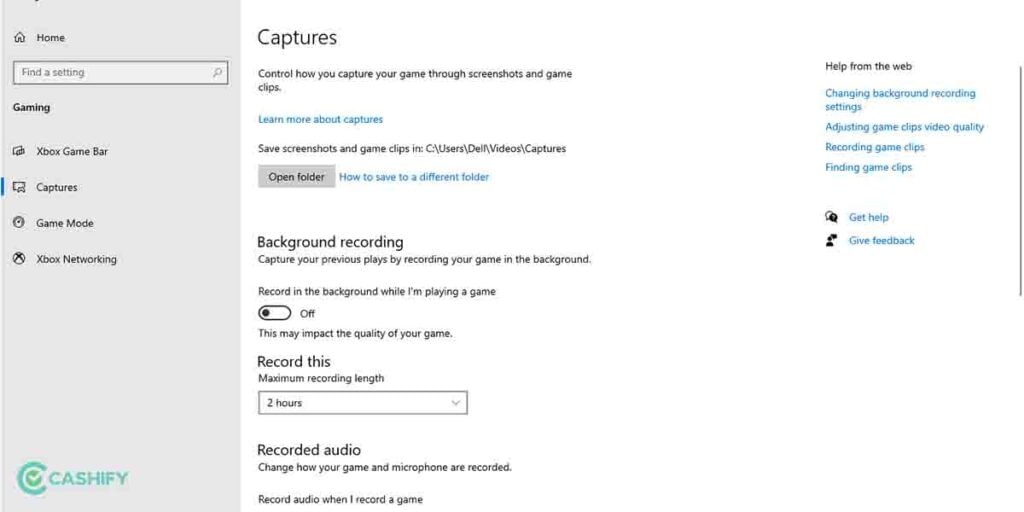
Imagine capturing the screenshot on Windows 10 OS while playing the games on your PC and laptop. Yes, the Game Bar helps you get right to it.
The Game Bar is a screenshot and video recording overlay that you may use in most Windows games. Here’s how to put it to use:
- Open the Xbox Console Companion software or start a game from the Start menu.
- Press Windows + G while playing the game. The Game Bar overlay should now be visible.
- To take a screenshot, click the camera icon or use the keyboard shortcut Windows key + Alt + PrtScn.
The snapshot will be stored in a subfolder called Captures in the Videos folder.
You may also capture a screenshot on Windows 10 while playing a game on Steam by pressing F11. It will be saved to your Steam screenshots folder.
Also read: Best WhatsApp Chrome Extensions and Apps
4. Using third-party applications
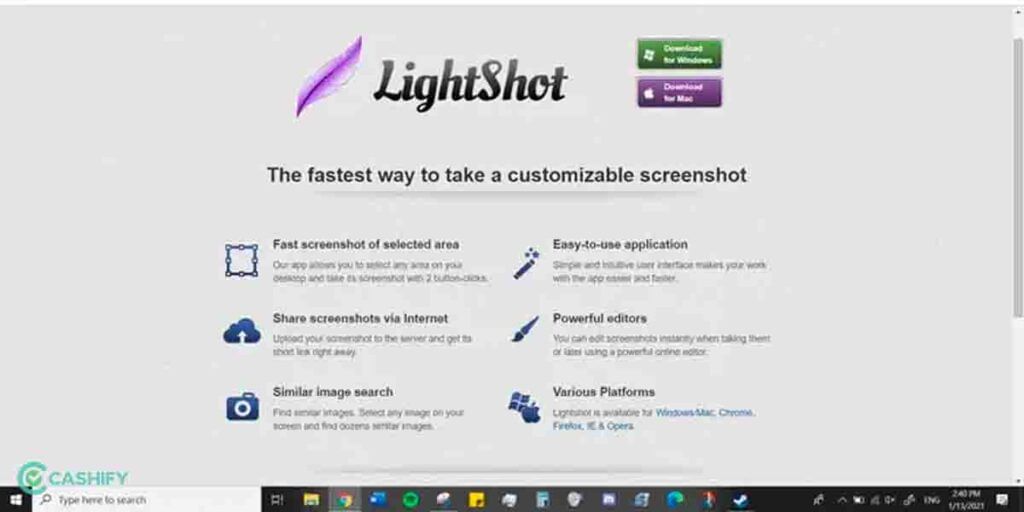
There are multiple third-party programmes that are available for use when you want to take screenshot on Windows 10. Some can be downloaded as software on your PC while others can be used online too.
- Lightshot can be used for Windows as well as Mac. You can directly share the captured screenshot over the internet.
- Screenshot Captor can be used for screenshots and accentuating the feature of the image using different filters as well.
- SnapDraw is another example of a third-party app that lets you get your screenshot ready by the use of filters, texts, images, etc.
- Some online sites exist that lets you take screenshot directly without downloading them. For this, you can try Screenshot Guru, Snipboard, and Pikwy among multiple other.
However, because there are so many options, it’s worth experimenting with a few to determine what works best for you.
Also read: Explained: What Is GIF? All That You Need To Know
5. Screenshot On Windows 10 Mobile Phone
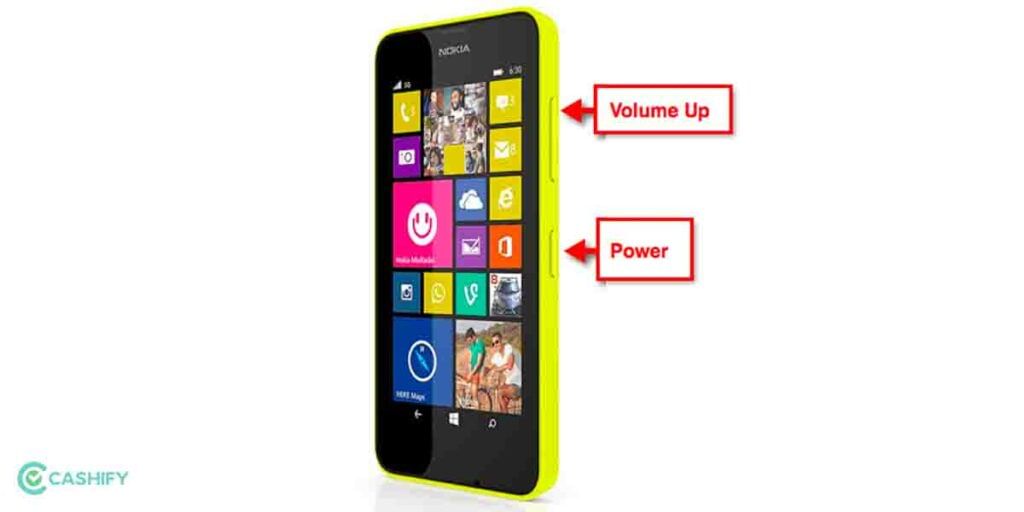
Lastly, one of the most demanded understanding is about how to take screenshot on a mobile phone having Windows 10. Let’s discuss some of the steps involved in it.
- Open the screen for which you want to capture the screenshot.
- Press the Volume down and Power buttons together. Both of them should be held together rather than going for it one after the other.
- The image is then stored in your Gallery. You can edit and share it from the picture gallery directly.
Also Read: 5 Best Instagram Reels Editing Apps That You Cannot Miss
Final Words: How To Take Screenshot Windows 10
Taking screenshot on Windows 10 is pretty simple and not at all complex. Through the simple use of the steps mentioned above, you can complete the task in a go. Our detailed article will help you understand the steps and refer to the method you prefer opting for.
Also Read: 6 Best Logitech Wireless Mouse That You Can Buy In India
Cashify lets you sell old mobile phone and sell old laptop. If you are looking forward to getting the best deal for your product, then Cashify is the right place for you.