Using an antivirus is surely an amazing way to make sure that your Windows PC is safe. However, if you can enable Secure Boot on Windows 11, nothing is better than that. The good thing is that Windows 11 PCs have this feature automatically turned on. In fact, if you are running on Windows 10 and want to upgrade to Windows 11, you can’t do so if your Secure Boot is disabled. Don’t worry, we have got your back and will take you through how you can enable this super important feature on Windows 11. Let’s hop right in!
Also read: 5 Tips On How To Level Up Fast In Apex Legends Mobile
Why Enable Secure Boot On Windows 11?
Before getting into how to enable Secure Boot on Windows 11, let us first understand why it is needed in the first place. The simple, one-word answer would be – security. Yes, Secure Boot actually protects your device against malicious malware attacks. But, how? It basically offers this additional layer of security as a Windows startup application. This prevents malware from taking over your PC when you start it.
That may make you wonder how Windows protected you against such malicious attacks before Secure Boot. The answer is that it did not. That is the only reason why bootloaders could load any operating system previously. Now, Windows 11 does not even allow Linux to be loaded into it.
This is an excellent feature to prevent the operating system from getting corrupted in any way. Besides, keeping malware applications at bay is always a good idea.
Also read: How To Upgrade To Windows 11 For Free!
When you enable Secure Boot on your Windows 11 or Windows 10 PC, it basically creates this trusted link between the UEFI (Unified Extensible Firmware Interface) and the operating system. For those wondering, UEFI is that low-level element that silently works towards booting your PC successfully.
How To Enable Secure Boot On Windows 11?
The process may seem very tedious to those who are not familiar with the BIOS setup. However, if you are familiar with it, it is a piece of cake. Either way, we have broken down the guide into mini subparts to help you easily enable Secure Boot on Windows 11. Without any further ado, let’s get started with it!
Phase 1: How to enter BIOS on Windows 11?
Step 1: Firstly, head into the Settings panel by using the Windows + I shortcut.
Step 2: Then, select Recovery from the options.
Step 3: After that, spot and click on the Restart now button beside the Advanced startup option.
Also read: How To Check If Your PC Or Laptop Can Run Windows 11?
Step 4: You will be redirected to a blue page that asks you to Choose an option. From the list, click on Troubleshoot.
Step 5: Now, select Advanced options.
Step 6: Click on UEFI Firmware Settings.
Voila! With that, the BIOS page or UEFI Settings page for your Windows 11 PC will show up.
Phase 2: How to enable Secure Boot?
Step 1: Once you are on the BIOS page, look for an option called Security. It can also be listed as Boot or System Configuration.
Step 2: You will see the Secure Boot option here. Press Enter.
Step 3: If the option is still greyed out, head over to Security and set up the administrator or supervisor password.
Also read: New Windows Media Player For Windows 11: A Complete Guide
Step 4: Now, enter your new password and confirm your new password to be done with it.
Step 5: Head back into the Boot > Secure Boot option to enable it. It will be enabled successfully this time.
Step 6: Press F10 and then, the Enter Key to save your settings and exit from BIOS.
Phase 3: How to check if Secure Boot is enabled?
Step 1: First and foremost, you have to restart your PC to properly enable Secure Boot on Windows 11.
Step 2: Next, press the Windows key once.
Step 3: In the search panel, type System.
Step 4: The System Information option will pop up. Click on this.
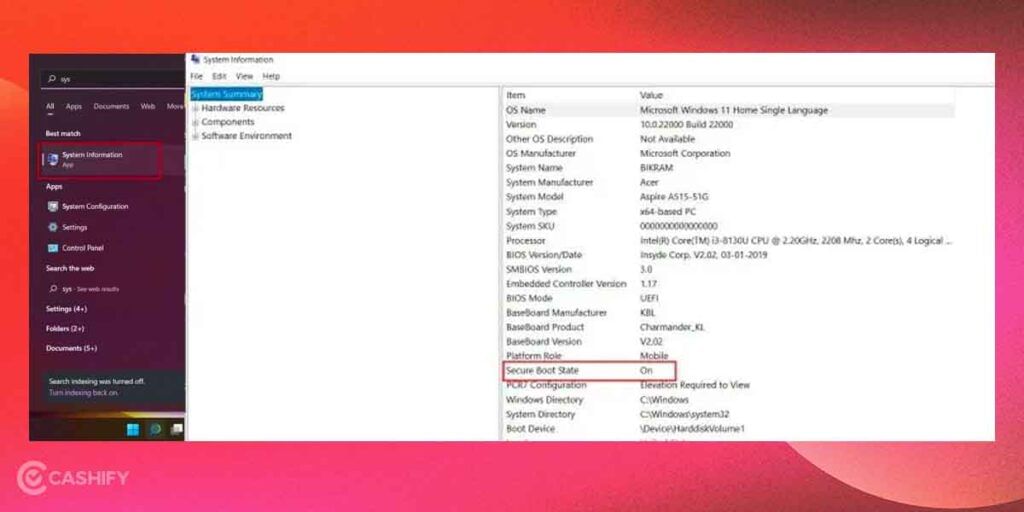
Step 5: In the System Summary section here, look for Secure Boot State. Right beside it you can see whether it is enabled or disabled.
Also read: How To Use Android Apps On Windows 11: Step-By-Step Guide
Now that you know how to enable secure boot on Windows 11, you will have an additional layer of much-needed security. This is indeed the best way of keeping malware attacks at bay and enhancing the overall security of your PC.
Looking to sell your old phone or recycle your old phone? Try Cashify for the best deals and get rewarded instantly!