TWRP recovery is one of the finest custom recovery tools available for several Android devices. In the scope of ease of usage and level of flexibility, TWRP recovery excels. Back in time, installing custom recovery had different methods a few of which would be easy, and others complicated. Apart from the usual connecting your smartphone to the PC method, you can also install TWRP Recovery without a PC. But there’s a catch, you will need another Android device that was rooted with Magisk.
Earlier, Google got rid of Android’s native ability to send Fastboot and ADB commands from one to another. This particular mod developed by osm0sis and Surge1223, contributors at XDA, makes installing TWRP Recovery without a PC possible again.
What you’ll be needing are two Android devices out of which, one phone is already rooted with Magisk while having USB OTG support and a USB data cable with an OTG adapter to connect both the devices. Here, the already rooted device acts as a PC.
Also read: How to recover deleted photos from iPhone
How to Install TWRP Recovery without a PC
- Install ADB and Fastboot for Android
This step is to be done on the host Android device that already has root access via Magisk. Open up the Magisk Manager > menu on the left > go to “Downloads”. Now, tap on the search icon and type “adb” to find the ADB & Fastboot for Android NDK Module.
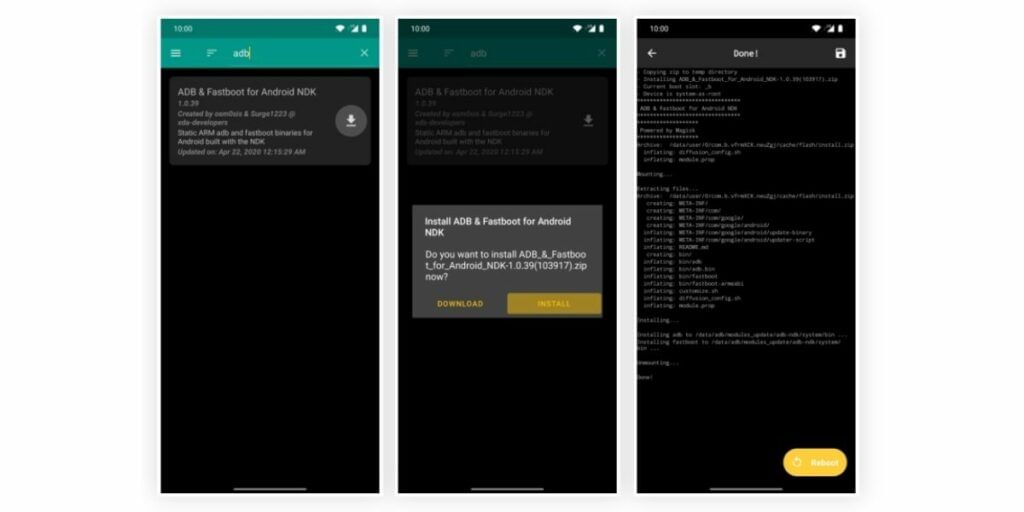
After finding the module, download the module and install it. And, later reboot the device to activate the module.
- Download TWRP Recovery for your device
Now, head over to the TWRP project website and find the TWRP image file for the device you want to install and store the downloaded file in the Download folder on both devices. Rename the img file to something you know to make things easier in the later section of the guide.
Download TWRP image file from here
- Install Termux app on the host device
This step is to be done on the host device. The Magisk module you installed in the first step is only useful if you have a terminal app. Install the Termux app on your already-rooted device.
Download Termux app from the Play Store
- Enable USB Debugging
This step is to be done on the target phone. On the phone that you want to install TWRP Recovery in, go to Settings > About Phone > and tap on the “Build number” seven-time to enable Developer Options. Now, go to the Developer Options and enable USB Debugging.
Also read: How to recovery deleted photos from WhatsApp
- Connect both the devices via the USB Cable and OTG adapter
- Allow USB Debugging permission
Once the devices are successfully connected to each other, the target device will show a prompt asking for permission to allow USB debugging. Now, tap on the “Always allow from this computer” and click on Allow.
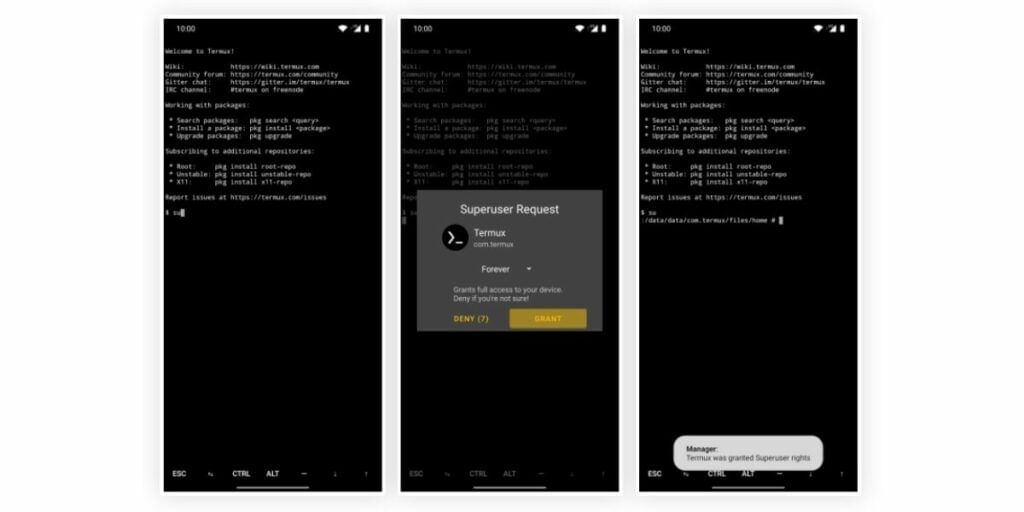
- Grant Root Access
On the already-rooted device, open the Termux app, enter the following command and press Enter.
su
What this command does is that it sets off a request to Grant permission. Now, when the prompt shows up, click on “Grant” and you can move ahead with the guide seamlessly. However, you will need to run the su command to send any ADB or Fastboot commands each time.
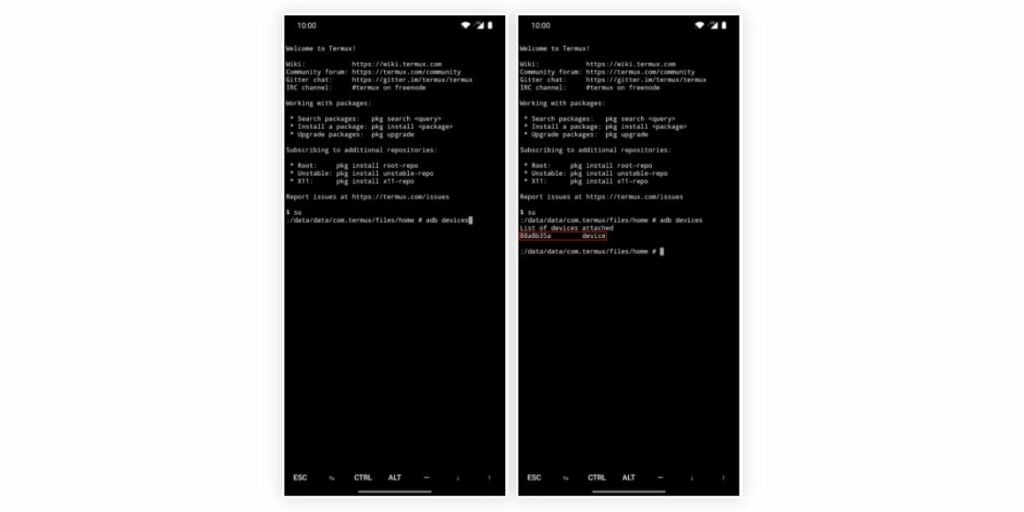
- Verify the device connection by entering the following command.
adb devices
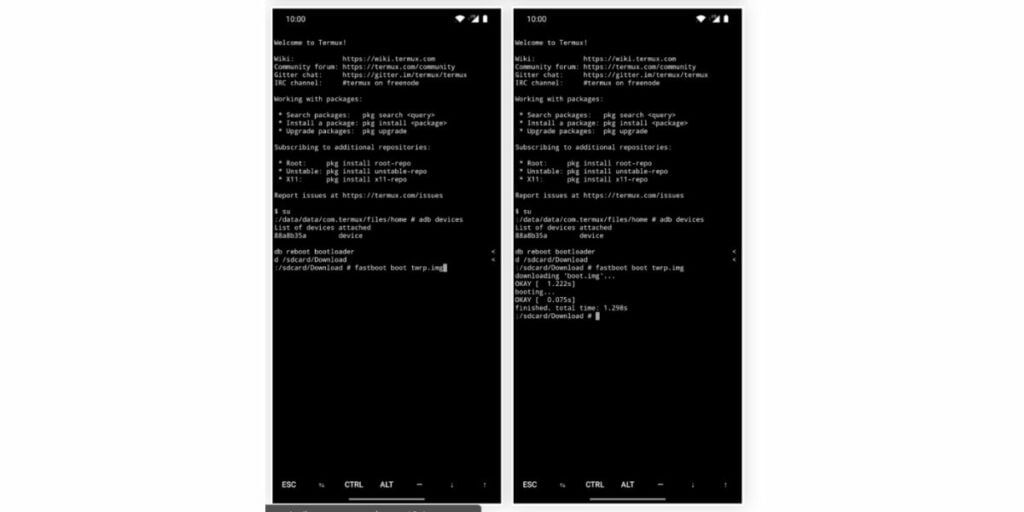
- Boot the target device into Fastboot Mode by entering the following command in the Termux app.
adb reboot bootloader
- Locate the TWRP image file by entering the following command in the Termux app.
cd /sdcard/Download
This command will direct the terminal window to the “Download” folder where the downloaded TWRP image file is stored in your device’s storage.
- Check Partition Layout
While the next step is to send the twrp.img file to the target device so as to install the TWRP recovery, the procedure is different depending on whether your phone supports Android 7.0 A/B partition layout. To check if your phone supports A/B partition or not, install the Treble Check app from the Google Play Store and check if it supports A/B partitioning in the “Seamless System Updates” section.
Now, follow either of the below steps depending on whether your phone supports A/B partitioning or not.
Also read: How to see deleted WhatsApp messages on Android
- Install TWRP Recovery if A/B partition is supported
If A/B partition is supported by the target device, open the Termux app on the host device and type the following command and tap Enter.
fastboot boot twrp.img
Running the above command will temporarily boot up TWRP recovery in the target device. However, if you do not install the permanent file from here, the TWRP recovery mode will not show up the next time you boot into recovery mode.
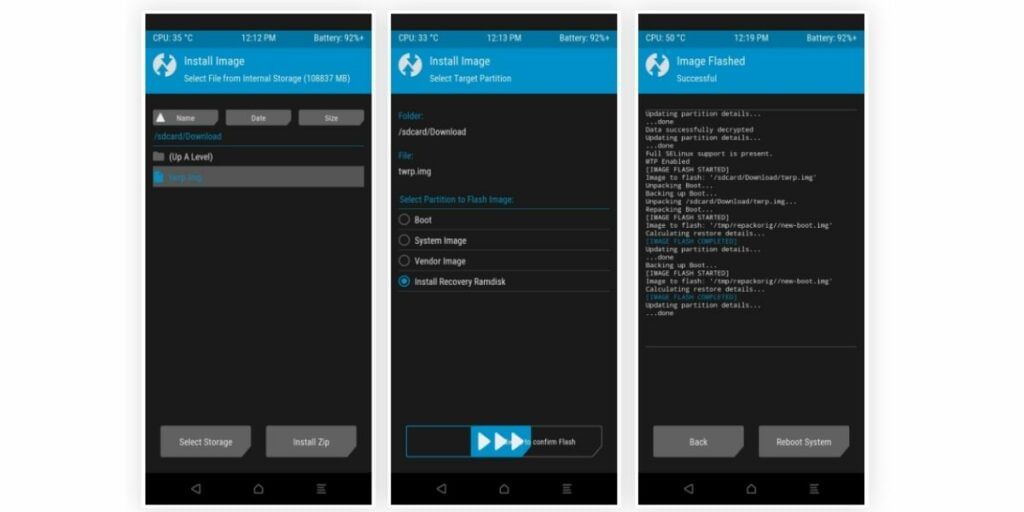
So, in the temporary TWRP recovery that opened in the target device, click on Install, browse to the Download folder and click on the Install image button. Now, select the twrp.img file and select Install Recovery Ramdisk. Then swipe on the slider to begin the installation process.
Once the installation is done, go to the home button and click on Reboot followed by Recovery which will take you to the permanent TWRP Recovery mode.
- Install TWRP Recovery if A/B partition is not supported
If the target device does not support A/B partition system, you can simply open the Termux app that you have installed earlier on the host device and type the following command and press Enter.
fastboot flash recovery twrp.img
This command will directly install the TWRP Recovery onto your device because that is how devices with A-only Partitions work. Now, all you have to do is enter the following command for the target device to enter into the installed TWRP Recovery mode.
fastboot reboot recovery
After the whole process is finished, you can safely disconnect your devices that are interconnected. Now, with the new TWRP custom recovery, you have the access to do a lot in the customization section.
While playing around with the phone’s software can be fun and rewarding, the installation process may also brick devices which can result in loss of data. So, make sure to take a proper backup of your device and understand your phone’s warranty policies regarding bootloader unlocked status.
Also read: How to install GCam mod in any Android device
For the latest smartphone news, stay tuned to Cashify. We also allow you to compare mobile phones so you can find out the better phone before buying.