Buying a new phone is thrilling, right? But what about setting up your Android device as soon as you turn it on? Well, the “OK Google, Set Up My Device” command will ease out this process. This command will provide guidance to you on what is required to get started. OK Google, Set Up My Device command will explain everything to you, including data transfer, app installation, and feature setup. In this article, we will discuss step-by-step instructions that are required to get your phone ready quickly. Through this guide, you will not feel lost during the “OK Google, Set Up My Device” process. Without further ado, let’s get started.
Also Read: Apple Watch Series 10: Price, Features, And Other Details
Using OK Google Set Up My Device: A Precap Of All Procedures
Before we dive in any further into this guide, here’s a quick precap of all the procedures for you to know how to setup my device using OK Google:
| Steps | Action |
| Step 1 | Turn on your phone> Welcome screen (language/vision settings) |
| Step 2 | Insert SIM / eSIM or Skip |
| Step 3 | Connect Wi-Fi (or Set Up Offline) |
| Step 4 | Wait for preparation |
| Step 5 | Copy apps & data |
| Step 6 | Sign in to your Google account > Go to restore backup |
| Step 7 | Go to Google Services> click Accept |
| Step 8 | Set PIN/fingerprint |
| Step 9 | Later: Finish setup, update apps/system, transfer remaining data |
Now, let us move on to the complete guide on how to use OK Google to set up your device, and guide you through each step with full details and security.
Things To Do Before You Setup Your Android Device!

Here are the prerequisites to set up my device. These steps are essential to make the setup process as smooth as saying ok Google set my device:
Before You Start
To ensure a smooth setup, prepare the following:
- Old Device: Have your old phone ready and charged.
- SIM Card and Wi-Fi: Insert your SIM card and ensure an active internet connection.
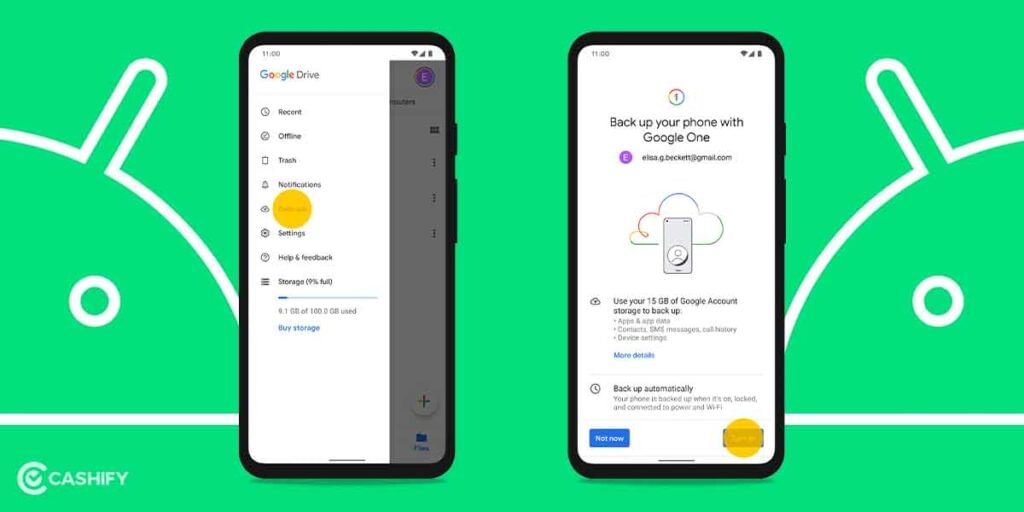
- Backup Data: On your old phone, go to Settings > System > Backup to back up contacts, messages, and apps to your Google account. Back up WhatsApp to Google Drive (check for sufficient storage, 15 GB free limit).
Other data, such as contacts, messages, call history, app list, and settings, are covered by Android’s built-in backup tool.
Ok Google Set Up My Device: How To Get Started?
One good thing is that Android 15 users enjoy faster data transfers with the updated Quick Share feature and an Express Setup option that reduces setup time.
| Step | What to Do |
|---|---|
| 1. Turn On Your Phone | Press the power button to turn on your phone. You’ll see a Welcome screen. You can change the language or make the screen easier to see if needed. |
| 2. Insert SIM Card | Put in your SIM card. If you’re using eSIM, tap on “Download a SIM instead?” You can also skip this step and do it later. |
| 3. Connect to Wi-Fi | Pick a Wi-Fi network and connect to the internet. If there’s no Wi-Fi, choose “Set Up Offline.” |
| 4. Wait for Preparation | Your phone will take a few minutes to get ready for setup. Just wait for it to finish. |
Now, let us give you the guide straight away and start the OK Googe setup my device procedure for you right here.
Seamless Setup Process For Phones
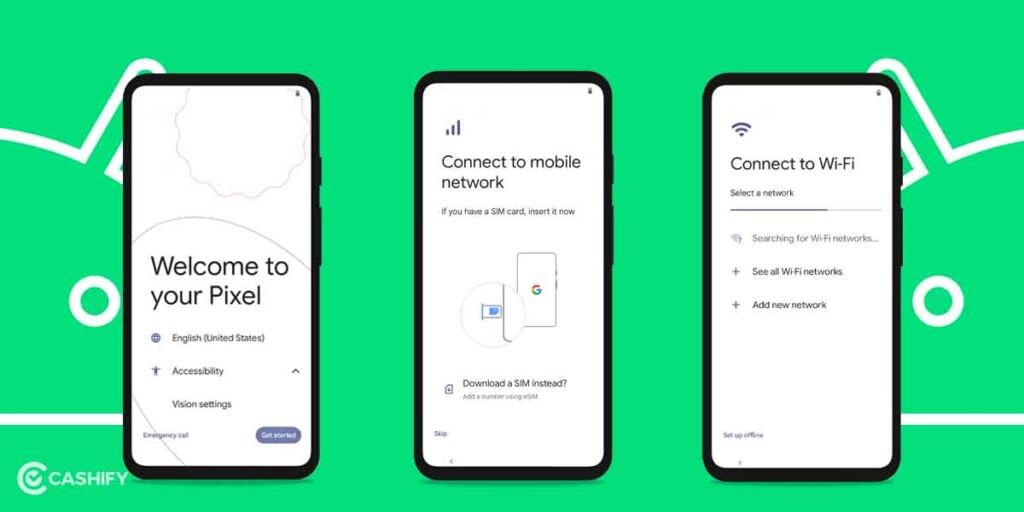
- Turn on your phone: See the Welcome screen. Adjust text size or brightness under Vision settings. Change language by tapping English (United States) if needed.
- Insert your SIM card: Put in your SIM or choose Download a SIM instead? for eSIM. Tap Skip to do this later if you want.
- Connect to Wi-Fi: Pick a Wi-Fi network to connect. If no Wi-Fi, tap Set Up Offline.
- Wait a moment Let your phone prepare for the next steps. This can take a few minutes.
- Copy apps and data: Tap Next to transfer from your old phone, or choose Don’t copy to start fresh.
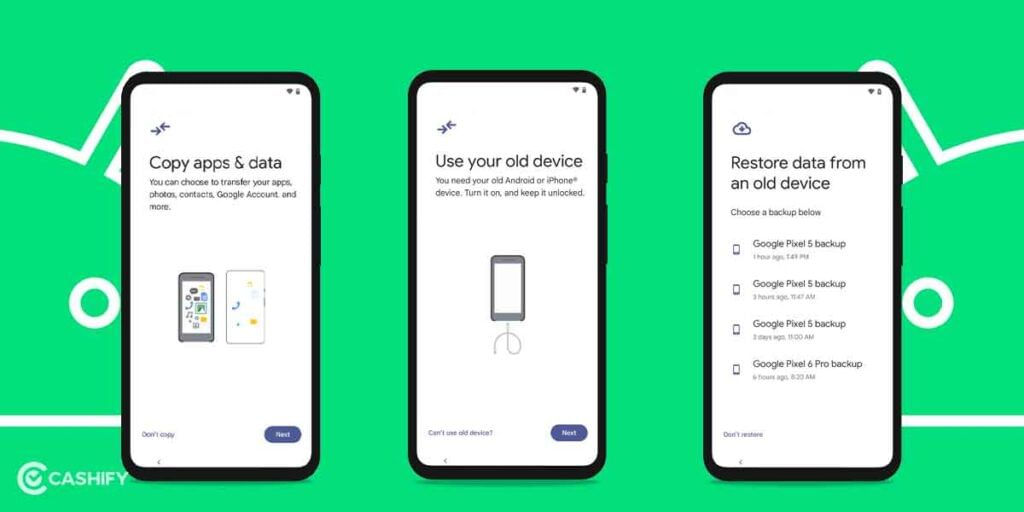
First Step: Backup and Restoration
Log in with your Google account to restore backed-up data (contacts, apps, settings). Make sure that the data from your old device is backed up from your previous device before continuing. Once the login is complete, the device will start downloading the backup data from the cloud to continue the process.
Also Read: How To Take A Backup Of Your Android Smartphone
Second Step: Logging Into Your Google Account
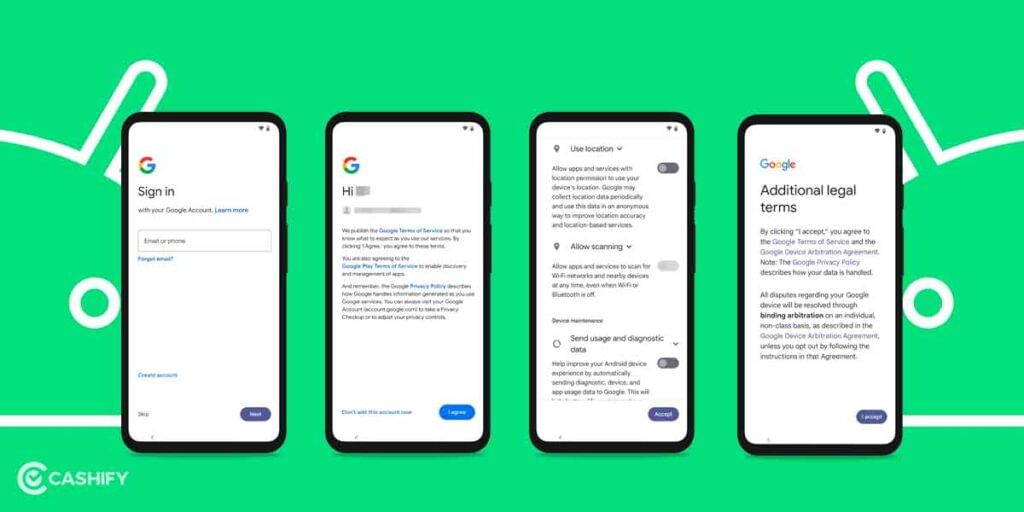
It’s now time to sign in to your Google account. The process requires signing into your Google account to access services such as Google Maps and the Play Store.
- Sign in to your Android smartphone using your Google account.
- If using a wired cable, you’ll first see the Google Terms of Service page.
- You may choose Skip, but this limits Google services.
- On the Google Services page, customize options as needed.
- Turn off Send usage and diagnostic data if not required.
- Tap Accept to continue.
- Review additional legal terms on the next screen.
Also Read: Best Data Recovery Apps For Android
Ok Google Set My Device: Password Setup & Additional Settings
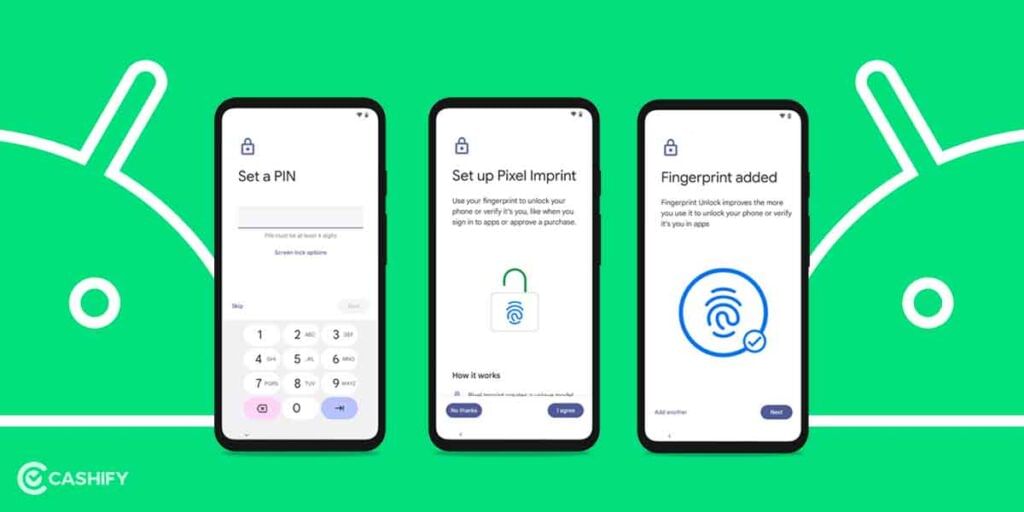
1. On the ‘Set a PIN’ screen, enter a 4-digit number that you will use every time while unlocking the device. If you want to choose any other type of password, such as text or a 6-digit PIN, tap on ‘Screen lock options’ and proceed accordingly.
Also, you can choose not to lock the device by selecting the ‘Skip’ option during the set up my device process.
2. From the “Setup Pixel” screen, scroll down or tap the More button to reach the bottom of the page. Tap on ‘I agree’ after reading the information and then follow the instructions to set up fingerprint unlock for your device. If you don’t want to use the fingerprint scanner to unlock, tap on the ‘No thanks’ button. You can also set up fingerprint unlock in the settings later.
Get to Your Home Screen (Almost There!)
3. On the ‘Continue setup screen’, tap on the ‘Leave & get reminder’ option to enter into your new phone’s home screen. Otherwise, tap on the continue button to complete the Ok Google set up my Device process fully
4. Set up Google Assistant, Google Pay, and additional device settings.
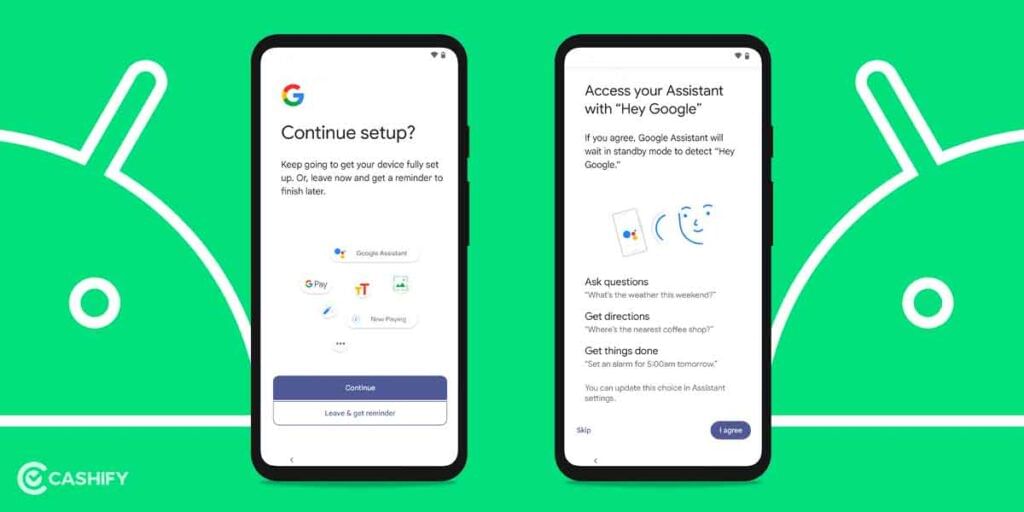
5. On the ‘Get tips and tricks’ screen, click on ‘No thanks’ if you are already familiar with all the device’s functions and features. Otherwise, select the ‘Yes, I am in’ option. This will provide a nice overview of all the features available on your new phone.
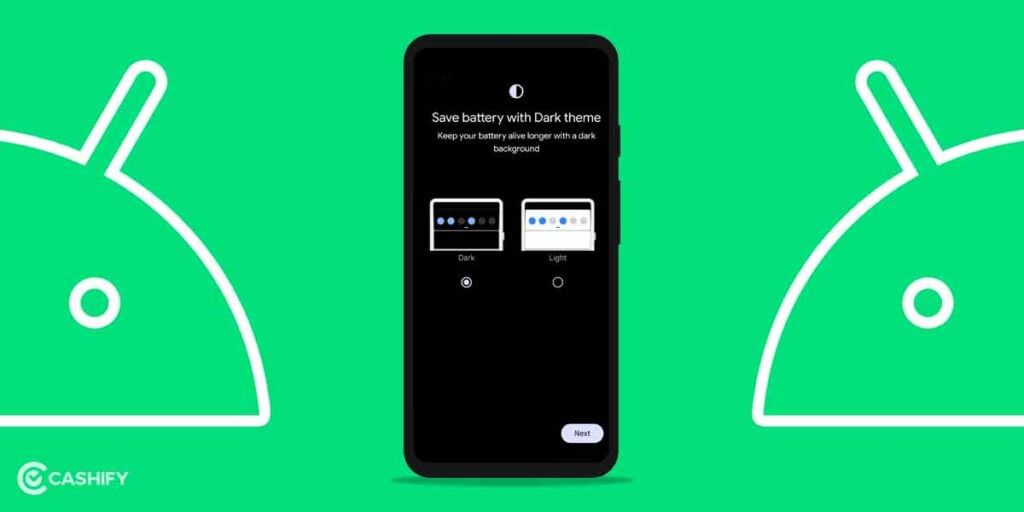
Personalise By Choosing Theme
6. Select the dark or light theme option, then tap the Next button to personalize your phone during the set up my device process
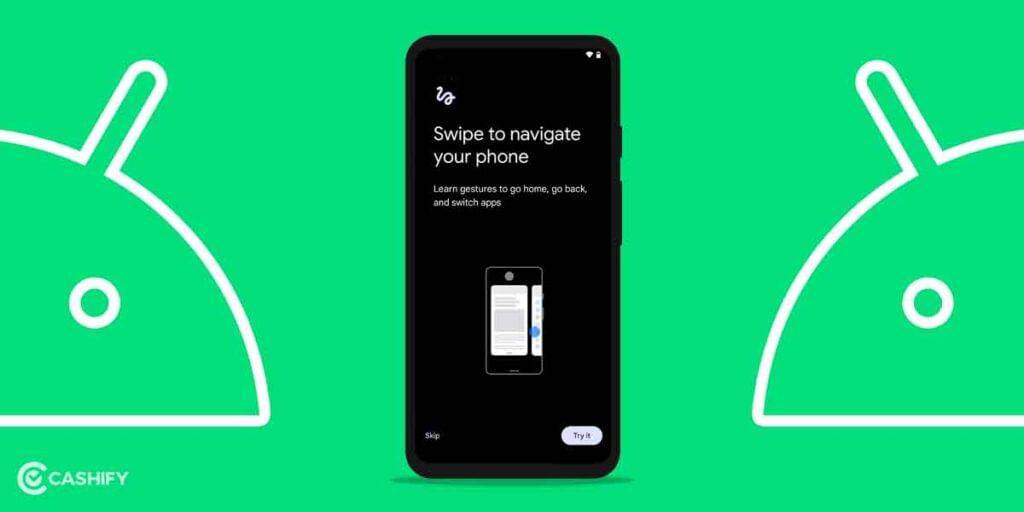
7. Tap ‘Try it’ to learn about navigation gestures. If you are already well-versed in them, tap ‘Skip’ and proceed to the next steps. You can stick with the traditional three-button navigation or use the modern gesture one, depending on your preference.
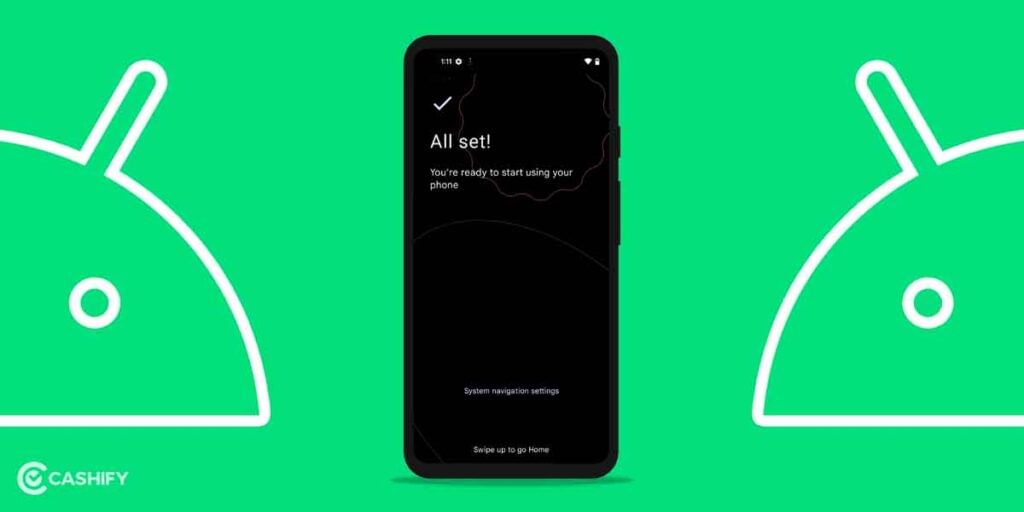
8. Swipe on the screen that appears now, and you are all set to explore your new smartphone!
Apps from your previous device will now start installing in the background if you had chosen to restore the backup in the initial steps.
Also Read: How To Remove Bloatware From OnePlus Devices?
Ok Google Set My Device: Finish Setup
After Setting Up Your Phone
- Finish Setup: Open the notification centre, tap “Finish Pixel Setup” (or similar).
- Tap on the ‘Start’ button and explore the options that you might be interested in. For example, enabling Google Assistant and other Google services.
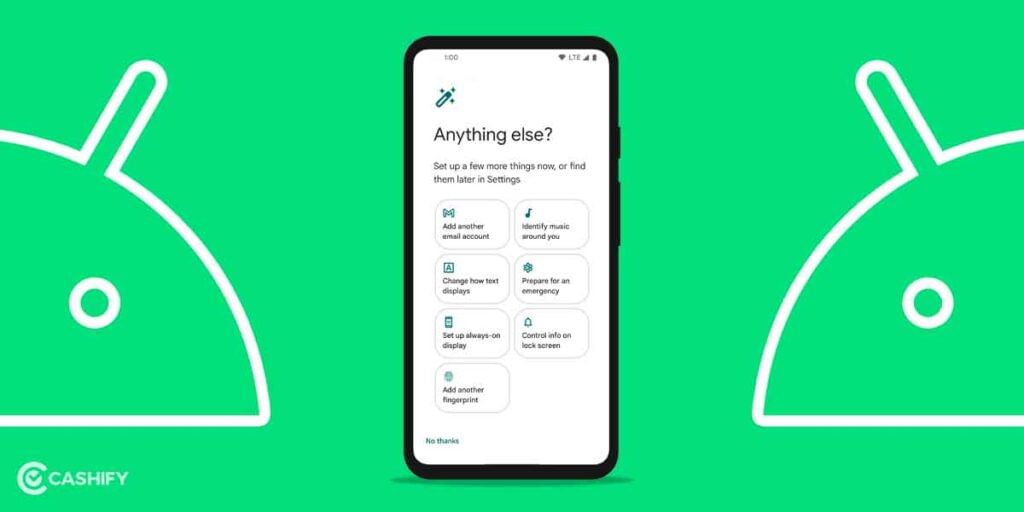
- Now, on the screen that says ‘Anything else’, select useful options. You can add another email ID, fingerprint, add info on the lock screen and much more.
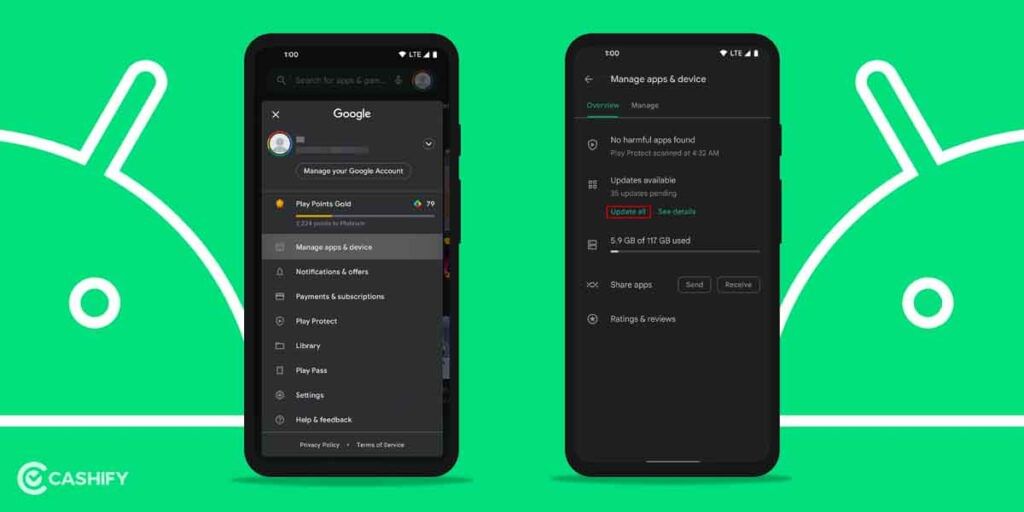
- Update Apps: Go to Play Store > Profile > Manage apps & device > Update all to update apps.
- Check for System Updates: Go to Settings > System > System Update to install the latest Android version.
- Remove Bloatware: Uninstall unwanted pre-installed apps via Settings > Apps.
- Transfer Data Later: If you skipped data transfer, go to Settings > System > Backup or Copy Data to restore apps, contacts, and files from a Google account or another device using Quick Share.
- Transfer Specific Data: Now, the detailed methods of transfer data are given below, just follow them.
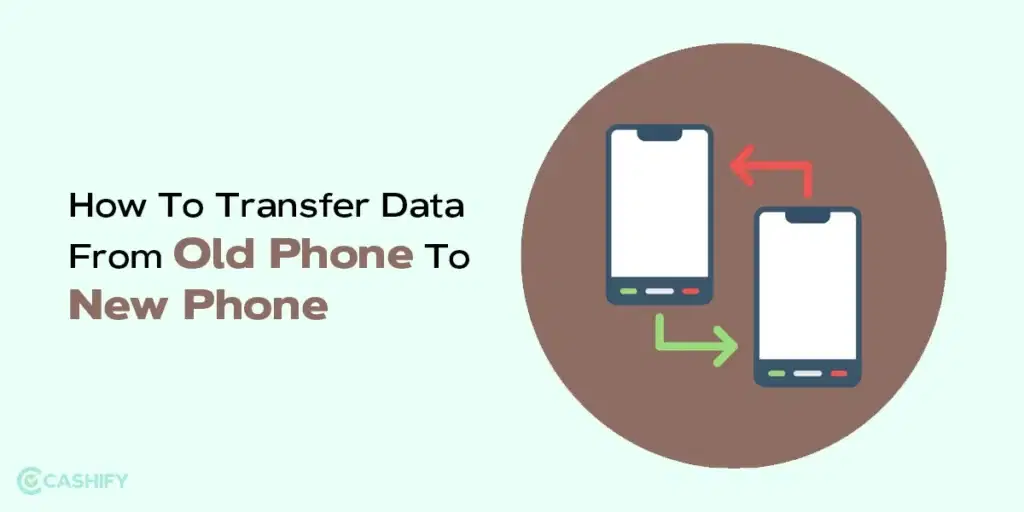
How To Transfer Data From Old Phone To New Phone
If you want to transfer data during the Ok Google Set Up My Device process, there is a short checklist of tasks that you need to complete.
- WhatsApp Chats: Backup chats to Google Drive or use the Transfer Chats option to move everything.
- Contacts: If synced with Google, your contacts will transfer automatically. If not, export them and move to the new phone.
- Photos & Videos: Use Google Photos to back them up. Make sure you have enough cloud storage.
- Log In to Accounts: Sign in to your Google, Instagram, Snapchat, and other apps with your old credentials.
- Other Files: Move documents and files using an SD card, Quick Share, or transfer via PC or cloud.
How To Copy Data From Other Phone After Setup
Now, it’s time to show you the steps to copy data. If you want to use your OK Google setup my device’s final step as the memory revival, and want to bring back your precious data and private stuffs from your old phone to new phone, then we show you the way to do that right here.
To use Ok Google, follow these steps:
1. Google Pixel Phones
- Open Settings > System > Backup & restore.
- Tap Copy data > Copy data from another device.
- Choose an Android phone and follow the on-screen instructions.
- Connect via cable or sign in to the same Google account to restore apps, contacts, messages, photos, and settings
2. Other Android Phones
- Go to Settings > Google > Set up & restore.
- Select Copy data from another device.
- Pick your old phone type and complete the transfer using a cable or cloud.
Note: Phones with custom interfaces (e.g., Samsung OneUI, Realme UI) may include additional setup steps, such as configuring manufacturer accounts or disabling bloatware. Follow on-screen prompts for these.
How To Copy Old Images And Videos From OK Google To My New Phone?
If you are someone who just bought a new phone and is performing the “OK Google set up my device” task, then hear this out.
Here are the steps to copy old images to new phone:
- On your old phone, upload all media to a cloud service (e.g., Google Photos, Dropbox, iCloud).
- Install the same cloud app on your new phone and sign in with your account.
- Sync both devices from the same cloud app.
- Select Transfer from your old phone, and click on accept request on your new phone.
Alternatives To The OK Google Setup My Device Method
Well, if you don’t want Google setup my device method to interrupt in your new phone journey, and want a different method to set thingsup, then, we bring you sme alternatives as well. Let’s show you the best alternatives to the Google setup my device method:
- QR Codes: You can set up your new phone with a QR code in settings.
- Cable Transfer: You can transfer your data to your new phone through USB or Type-C cable method.
- microSD Card Transfer: Transfer files and data from your previous microSD card [only applicable to phones with a microSD card slot].
- Google Account Restore: You can restore apps/data after just a direct login to your Google Account.
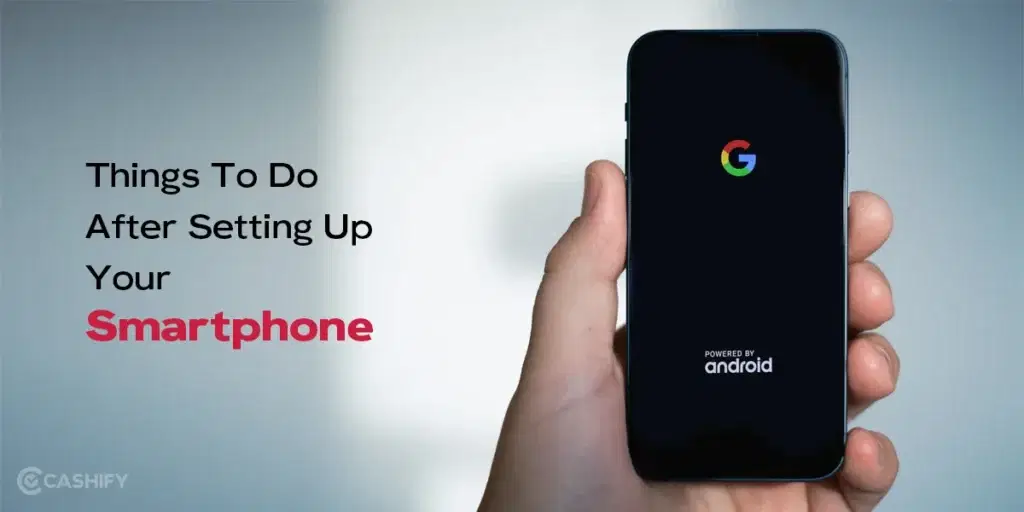
Things To Do After Setting Up Your Smartphone
Also Read: Pixel 10 Pro Camera Features Explained: AI Gets Better
Once you have completed the “OK Google, Set Up My Device” process, you can take a few steps to further customise and personalise your smartphone. Here are the steps that tell you what to do after setting up your device:
- Login With All Your Credentials: Use your account details, and log in to rest of the apps, to recover your mails, maps, apps-based data, etc.
- Update All Software: Install the latest system security patches and hit “Update All” in the Play Store for peak performance.
- Enable Digital Payments: Set up your preferred UPI or payment apps, like Google Pay, for convenient daily transactions.
- Modify Settings: Modify the Settings and app preferences according to your choice.
- Explore Unique Features: Test model-specific tools like AI assistants, stylus shortcuts, or foldable gestures to fully personalise your experience.
How to Set Up OK Google on iPhone?
- Turn on your new device> Tap Start > Connect to a Wi-Fi network > Choose to copy apps and data from your old device.
- Recommended: If you have a cable to connect your devices, follow the on-screen instructions to copy your data.
- If you don’t have a cable: Tap “No cable?” and then Ok.
- Tap Using an iPhone device?
- To copy your data, follow the on-screen instructions.
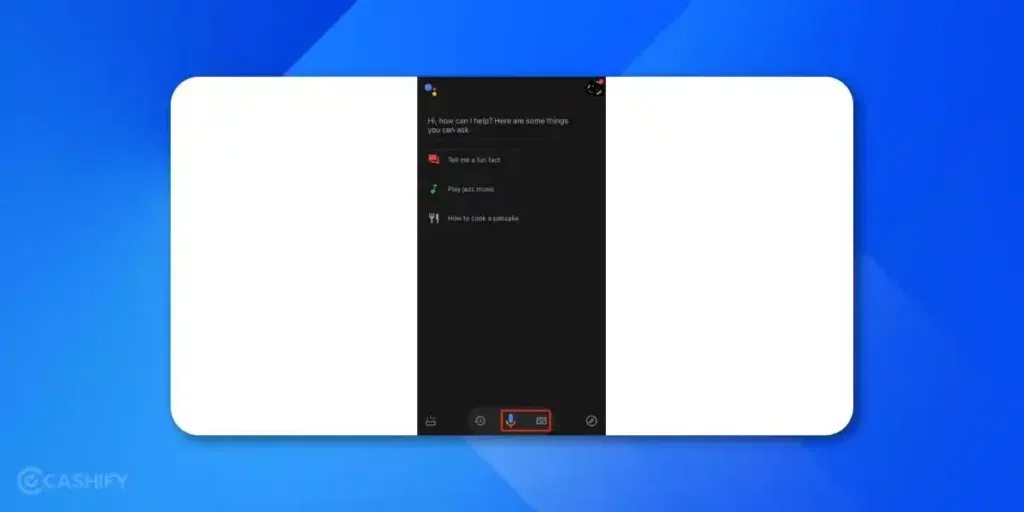
What Else Can You Do With Google Assistant?
| Feature | Uses You Get |
|---|---|
| Smarter Home Automation | Create complex routines just by typing what you want, and no need of coding! |
| AI Camera Alerts | Get rich, specific notifications like “Sergei walking with a dog” instead of vague “Person Detected.” |
| “Ask Home” Context | Search your video history instantly. Ask, “What happened while I was out?” |
| Gemini Live | Have a real-time, interruptible conversation for brainstorming ideas or deep-dive learning. |
| Proactive Task Scheduling | Schedule recurring daily summaries or project updates to be delivered automatically. |
| Enhanced Device Control | Control your TV, lights, and locks hands-free across compatible speakers and displays. |
Conclusion
Here we come to the end of this guide. Hopefully, this guide helped you with the setup process. Now, you are officially an Android team part. It is quite simple and easy to use the OK Google Set Up My Device. It makes everything simple- from installing apps to using custom widgets and icon packs. Of course, it will take some time to become fully aware of your phone’s new features, but take your time and explore them when at your leisure.
If you find yourself stuck somewhere, you can ask your friend, Google to solve the problem. Most of the solutions are just one search away. Moreover, you can ask your doubts and questions in the comment section below. We will try to resolve them as soon as possible.
Also Read: Tips To Capture Great Smartphone Pictures
FAQs
Q- How Do I Use OK Google To Set Up My Device?
If you have an Android phone, here is the easiest way to use OK Google to set up your device:
- Open a Google Account.
- Log in/Sign up to Your Google Account.
- Go to Profile> Settings.
- Go to Voice/ Voice Controls.
- Set up the ‘OK Google Assistant’ features.
- You are ready to go.
Q. What is OK Google Set up my device and how does it work?
When you unbox a new Android phone, tablet, or wearable, “Set up my device” is the shortcut to bypass manual data entry. By triggering Google Assistant on your old phone, it searches for the new hardware via Bluetooth to securely port over your data, Google Accounts credentials, saved Wi-Fi passwords, etc.
Q- How To Use Google To Setup Nearby Devices?
To set up and pair with a new nearby device with OK Google assistance, here are the steps you should follow:
- Turn on the device and put it in pairing mode.
- Unlock and turn on your phone’s screen.
- A setup notification will appear on your phone.
- Tap the notification and follow the steps on-screen.
- Notifications for nearby devices are on by default.
- To manage notifications:
- Open your phone’s Settings app.
- Go to Google > Devices & sharing > Devices.
- Toggle Scan for nearby devices on or off.
Q: How do I set up my device TV?
- Plug in power and HDMI cable (or connect streaming stick).
- Turn on the TV and select the correct HDMI/input source.
- Follow on-screen wizard: choose language, connect to Wi-Fi, then sign in to your account (e.g., Google on Android TV).
Q: How do I start with OK Google Setup my device?
Firstly, you need to turn on your phone/tablet. After this, just say ‘hey Google’/’ok Google’. After this, you will see a pop-up of Google Assistant. Then open Assistant settings, go to input settings. Decide on your preferred input and save the changes.
Q: Do I Need A Google Account To Set Up My Device?
No, you don’t require a Google account to complete the setup process on your new phone. However, you will miss out on major features like installing new apps from the Google Play Store and using Google services.
Q: Can I set up an Android phone without a Google account?
- Yes. During setup, tap “Skip” on the Google sign-in screen.
- You’ll lose Play Store access and Google services, but core phone functions still work.
Q: Which Google apps do I need to set up my device phone?
Once you have successfully set up your device phone, configure Google Assistant. Set up “Hey Google” to ask questions hands-free.. Moreover, you can always set up other apps such as Google Meet, Google Pay and YouTube Music.
Q. How to transfer data from old to new phone?
- During setup, tap “Copy apps & data” and follow prompts to transfer via cable or Quick Share.
- Or finish setup, then go to Settings > System > Backup or Copy Data to restore apps, contacts, photos and files.
Q. Which app is best for data transfer from old phone to new phone?
- Google Quick Share (Android 6+; Chromebooks; Windows; Samsung 10+) for files and media.
- SMS Backup & Restore for messages and call logs.
- Samsung Smart Switch for Samsung-to-Samsung transfers.
Q- How do you Transfer Contacts From the Old Phone To the New Phone?
To transfer your contacts from your old Android phone to your new one, sign in to the same Google account used on your old phone. Then, wait for the contacts to sync. After the process is complete, these contacts will automatically appear on your phone.
Q- How Do I Transfer Photos From My Old Phone To My New Phone?
If you use an Android smartphone, you can easily transfer your photos from your old phone to your new phone by backing them up with Google Photos. However, it is important to note that each Google account comes with only 15 GB of free storage space.
Q. How to set up and use Android Find My Device?
To set up Android Find My Device, sign in to your Google account on your phone and enable Location and Find My Device in Settings. Ensure the device is connected to the internet. To use it, visit google.com/find or open the Find My Device app, sign in, locate your phone, ring it, lock it, or erase data remotely.
Q. Can I use OK Google to set up my device on an iPhone?
No, OK Google set up my device is only used on Android phones. iPhones have a separate procedure os setup, which is powered by iOS. However, to sync the Google setup, you can use Google Home on iPhones.
Q- Can I use OK Google to transfer files from my laptop to my mobile?
No, OK Google setup my device feature is only for phone-to-phone transfer, and for laptop file transfers, you can choose other methods.
Q- What is the fastest way to transfer files from my laptop?
Connect via a USB-C cable and select “File Transfer” on the phone. Alternatively, use Quick Share (for Windows) or LocalSend for fast, wireless drag-and-drop transfers.
Buying refurbished mobile phones was never this easy. Sell old phone and get exclusive offers & discounts on refurbished mobiles. Every refurbished phone is put through 32-point quality checks to ensure like-new standards and comes with a six-month warranty and 15-day refund. Buy refurbished phones easily on no-cost EMI today!